

Quickly and from scrap materials.
Let’s not argue about the benefits of order and trust the wisdom and experience of people of different eras and generations:
It is necessary to restore order while there is still no turmoil. - Lao Tzu
Order saves time. – Johann Goethe
Order frees thought. – S.P. Korolev
It is impossible to put everything in order, let's start with ourselves. Many of us spend most of the day at our desk with a bunch of necessary and unnecessary junk. We are literally entangled in wires, chargers, adapters and other electronics. Why not organize it all?
To solve the problem, I suggest making a simple organizer. Each of the available means can do it. You may have to buy something extra, but spending a penny is not comparable to the benefits that our product will bring.
What do we need
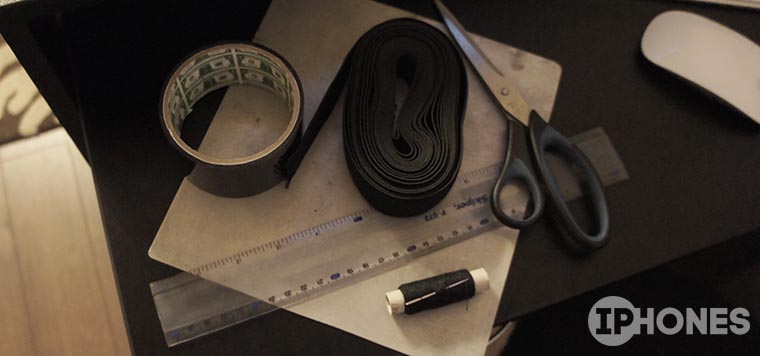
- base for the organizer (any flat object of suitable size);
- elastic band for clothes (we will calculate the length below);
- threads, needle, scissors, tape (optional);
- up to an hour.
The basis
1. First you need to decide on the size of the future organizer. I recommend making it so that it fits easily in a drawer or on a specific shelf.
We are looking for a place for the future organizer, measuring the length and width of the space.
2. Now we need a base that will fit in the allotted space without any problems. As a frame, you can use a board, a very thick piece of cardboard, chipboard/kragis/plywood. A metal plate or plexiglass will do; you can use a DVD box or an old vinyl record (cutting a square out of it) as a base.
There is only one condition for the base - it must ensure the rigidity of the structure and not bend. For example, I found a suitable piece of galvanized steel in the pantry.
3. To make the finished product look beautiful, I covered it with black tape (to match the color of the rubber bands used). Those who are not interested in the aesthetic appearance of the organizer can skip this step.
Rubber

4.
Most likely, you won’t have the required amount of elastic at home; you’ll have to go to a fabric store to get it. There you can choose a ribbon of any color and width.
- divide the length of the base by the width of the tape - we get the number of vertical stripes (we take into account only whole stripes);
- multiply the number of stripes by the width of the base and multiply the resulting length by two (the stripes will encircle the frame on both sides);
- Now we similarly divide the width of the base by the width of the tape - we get the number of horizontal stripes (we take into account only whole stripes);
- multiply the number of stripes by the length of the base and multiply the resulting length by two (the stripes will encircle the frame on both sides);
- we add the two numbers that were obtained in the second and fourth steps and get the required length of the tape.
5.
Now the elastic band needs to be cut into strips (vertical and horizontal). We have already counted the number of stripes, the length of the vertical ones is equal to twice the width of the base, and the length of the horizontal ones is twice the length of the base. In other words, each strip should encircle the frame without overlapping. 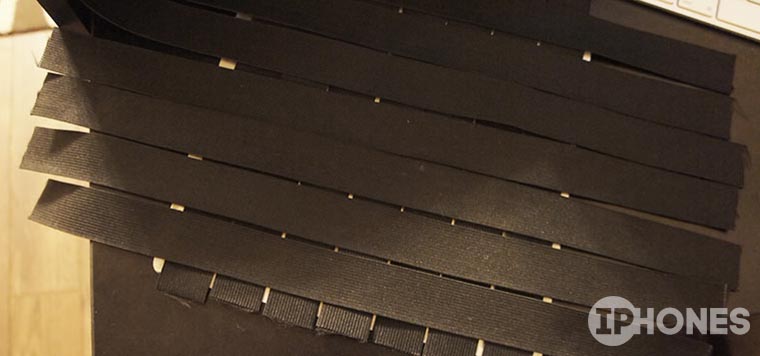
6.
The most painstaking process is sewing rings from strips. Pre-singe the edges of the tape on the fire and you can start making rings. 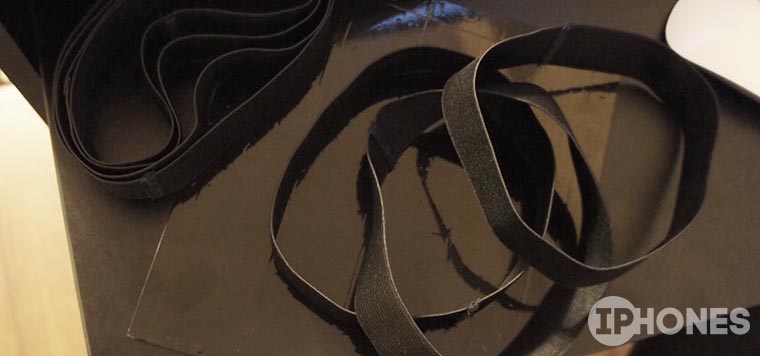
We make a small overlap of 3-4 mm. and sew the ribbon together with a ring. You can ask your wife for help, especially if she has the skills to operate a sewing machine.
Weaving
7.
When all the elastic rings are ready, we begin to put them on the base. First we put on all the vertical stripes.
8.
Now we begin to put on the horizontal ones one by one. They need to not just be put on top, but threaded through one vertical one. 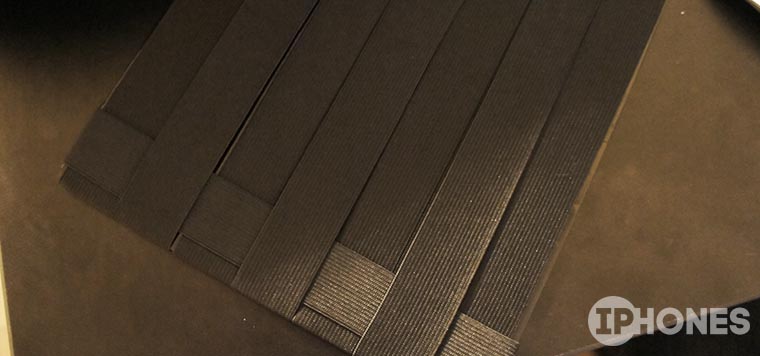
Each subsequent strip is threaded in a checkerboard pattern. 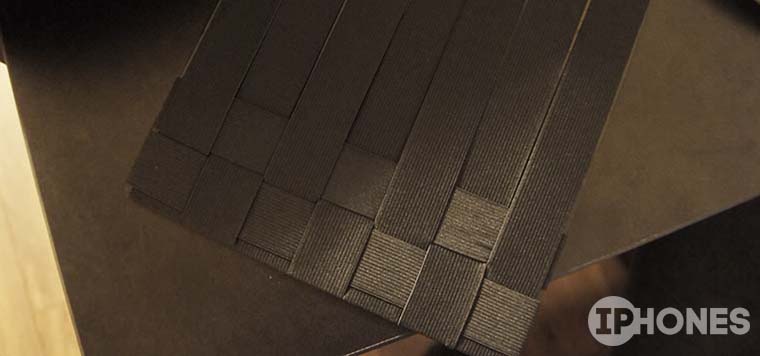
9.
The result is a beautiful checkered organizer. 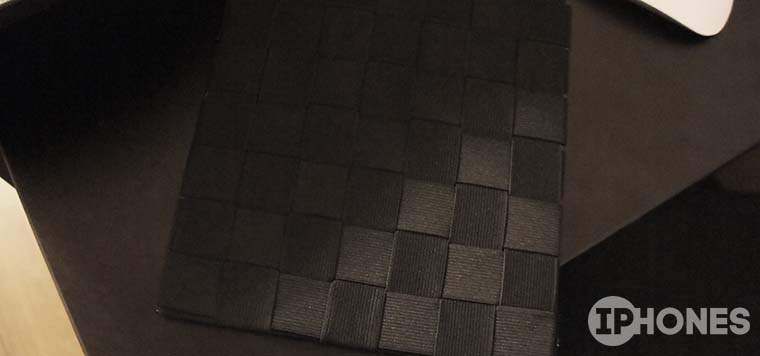
Fill in
This product can be filled with any small items stored in the table. Place wires, adapters, batteries, memory cards and flash drives, chargers and headphones in the organizer. 
All the elastic bands stay in place quite confidently, but you can additionally stitch them around the perimeter. This process is quite painstaking; I would not recommend starting it right away. 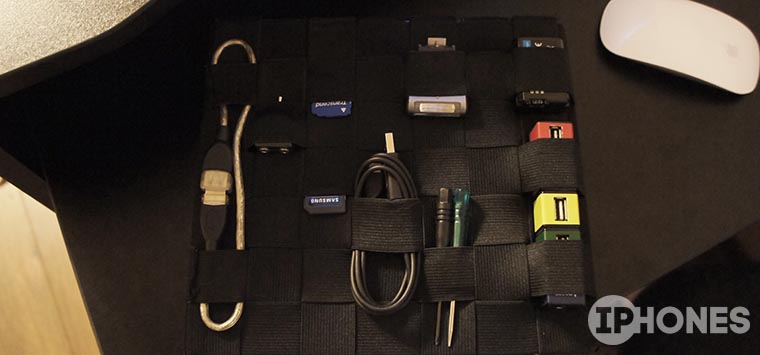
While the elastic bands are not sewn on, you can try to change the shape of the organizer so that not only small objects, but also large ones fit into it. 
To do this, in a certain place when weaving the elastic, we skip the required number of intersecting rings. The size of such loops is determined by the dimensions of the device that we will carry in the organizer. 
A few days later, when the final weaving pattern has been approved, you can sew elastic bands around the perimeter or glue them with Moment glue. If the organizer will not be used in the most active way, you do not need to stitch or glue the elastic bands.
Bonus
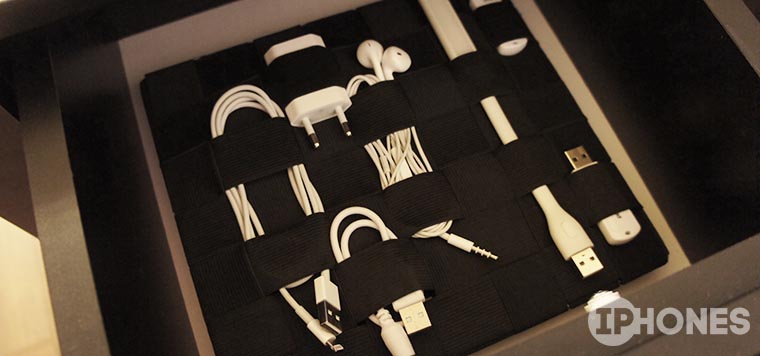


Our organizer can be stored not only in a desk drawer, it will perfectly cope with its functions on the road or travel. Determine the size of the product in advance so that it can then be placed in a bag or backpack.
In this article we will offer ten ideas for creating small storage spaces for a variety of small things that tend to get lost and at the same time should always be at hand. We’ll tell you how to set up such “storages” without any special expenses or additional expenses.
We have already written about arranging storage places in the article “Storage places in a small apartment”. However, we then turned our attention to large-scale projects such as converting the pantry into a walk-in closet and making the most of the podium functions. Now I would like to offer several options for arranging storage areas for small items, which turn out to be very important for a comfortable stay.
If you have ever conducted a “search” in your apartment, trying to find the keys to your office, the ever-disappearing TV remote control, or a charger for your mobile phone, the ideas proposed in this article will come in handy.
Phones, remote controls, chargers, sewing supplies, children's construction sets... Every apartment has many such small but very necessary items. How to arrange convenient places to store all these things? We are ready to offer you ten simple options that do not require significant expenses.
1. A shelf for keys and small items in the hallway in the form of a mailbox, an antique shelf or a soft “pocket” on the wall
If you think about it, a shelf or pocket for keys on the hallway wall is a simply necessary thing. Usually, each family has several sets of keys, and searching for them in an immense woman’s handbag or a spacious wall drawer can take a lot of time, which is already lacking in the morning.
It’s not difficult to make a shelf or box for keys yourself. As an option, you can use a regular mailbox, of course, pre-painted and tidied up. Hooks for keys are simply attached to it, and inside you can store receipts for utilities and the latest newspapers.
Another option is a small shelf, decorated in an antique style. Craquelure varnish and regular water-based paint will help you tidy up such a cute and convenient item.
Craftswomen can easily replace a regular shelf or key box with a soft textile pocket, which can be decorated with buttons, embroidery, or turned into a soft toy. It will turn out very cute, roomy and comfortable. All these “storages” are simply hung on the wall in the most convenient, “handy” place in the hallway.
 A small, antique-style shelf with nails on which you can conveniently hang your keys
 A vintage version of a mailbox that can take its place in the hallway. To give it a more modern look, just use acrylic paint. And don't forget about the key hooks
2. DIY stand for pencils and pens from improvised containers or papier-mâché
A mess on the table will definitely not contribute to increased productivity, and such a tabletop will look, to put it mildly, sloppy. Meanwhile, when creating stands for pens and pencils, amazing scope for creativity opens up!
Here are just a few options:
- Good old papier-mâché. Anyone who attended labor classes at school is familiar with this technology for making crafts. All you need is a suitable shape, scraps of newspaper, flour paste and paints to give the product a bright and attractive look.
- Clay. Kits for creating crafts from clay can now be purchased at any children's store. The material, pleasant to the touch and environmentally friendly, allows you to create amazingly beautiful things.
- Cardboard boxes decorated with beads, buttons, threads, shells. You can use not only small boxes from cups or mobile phones, but also round toilet paper rolls. And you can decorate them literally any way you want.
- Tree. An option for those who know how to cut with a jigsaw and are comfortable with a drill. The simplest and at the same time original way is to find a not too thick section of a tree trunk and simply drill many holes in it where pencils and pens will be inserted.
- Cut-off plastic bottles and cans. Such containers can be decorated with fabric, textile flowers, or knitted into an unusual cover.
It’s interesting that today such handmade pencil holders are considered a very fashionable trend and rightfully occupy a place not only on a schoolchild’s desk, but also in formal offices, adding a touch of homeliness to the work environment.
 What do you think of this unusual option of turning cans into a stand for pencils and markers? All it took was magnets and the author's imagination
 In this case, beans, felt and glue were used to create an unusual stand. The beans were then simply painted to give the stand the appearance of an ear of corn.
3. Shelves and hooks on the bathroom door
The bathroom, traditionally one of the smallest rooms in the house, is where a lot of things are usually stored. At the same time, for some reason, the space on the door is not used often. Meanwhile, with the help of ordinary, inexpensive hooks and towel holders, you can turn the door into a convenient storage place.
So that you can hang not only a towel and a bathrobe on the door, but also place other small but necessary items, you can use the same system of textile pockets.
Just remember that the bathroom is a “wet” place and to sew pockets on the door you should use fabric that is not afraid of water, or thick cellophane.
 A multi-tiered storage system on the bathroom door will allow you to conveniently place a lot of small items
4. Children's bucket for storing bathroom supplies
Does your child love to swim? Then your bathroom most likely contains toys that a young sailor usually dives and plays with. Where to store all these boats, numerous soldiers, rubber duckies and dolls? The most convenient way is to put all the toys in a children's bucket, which is usually used only in the sandbox.
The bucket can simply be placed on a shelf or hung on a hook. If the bucket is made of iron, it can be painted to match the color of the bathroom design, and it will become an integral part of the interior. A plastic bucket can be decorated with stickers or decals.
 If you have very little space in the bathroom or you want to create an original design, you can even store toothbrushes and toothpaste in a children’s bucket.
5. DIY decorated jars for spices and all kinds of products in the kitchen
All housewives know that it is best to store spices and other bulk products in glass containers with a securely closed lid to preserve their aroma and properties. However, just glass jars are boring.
Why not, for example, decorate a coffee jar with coffee beans? Firstly, it will immediately be clear what exactly is stored here, and secondly, you will only need the coffee beans themselves and reliable glue.
Decoupage, so popular today, is also great for decorating containers in the kitchen. You can find suitable pictures online, for example, with images of cereals, tea, and so on, so as not to waste time searching for the jars you need.
If you are not sure that you can cope with decoupage technology that is unfamiliar to you, you can simply pick up bright, thick threads, attach to them a piece of cardboard with the name of the spice beautifully written and attach it to the lid. And the decor, and it’s immediately clear what’s here.
By the way, now there are convenient jars for spices and small items that hang on rails. This way, everything you need for cooking will always be at hand.
 Thick threads of different colors and cards with names - everything is very simple, but at the same time unusual and beautiful
 In this case, when decorating a coffee jar, not only coffee beans were used, but also decoupage
 Simple glass jars can be a great place to store spices. You just have to take care of reliable plugs and simply sign each container
 It is quite possible to hang on the railing not only a ladle, but also jars of spices, closed with special lids
6. Magnetic boards on the back of kitchen cabinet doors and jars with magnets for the refrigerator
Another way to save space in the kitchen and still accommodate a lot of small items is to use magnetic boards and magnets on jar lids. To make such unusual magnetic jars with your own hands, you will first need a magnetic sheet, jars with fairly reliable lids, a pencil, glue, plain paper and scissors.
It is better to take plastic jars rather than glass ones - they weigh less and will hold more securely. The bottom of the jar is outlined with a pencil, then the required number of magnetic circles are cut out along the contour.
The magnets are glued to the bottom of the jar, and on the paper we again write the names of the spices in beautiful handwriting and glue them to the container. It is clear that such jars can be “magnetized” either on the refrigerator, which is not always convenient, or on a special magnetic board, which can be attached, for example, to the wall of the door of one of the kitchen cabinets.
By the way, with the help of such a system you can store a lot of things not only on the refrigerator or cabinet door, but also under the shelf - hang it up and that’s it. Convenient and saves a lot of space.
 Jars with magnetic lids attach perfectly to the refrigerator. In this case, the owners decided not to sign them, but to decorate them with different ornaments - they will have to remember what is in the jar with stripes or polka dots
 Such small jars for spices will have to be purchased specially, as well as a magnetic board. But, believe me, this method of storing spices is very convenient and will not take up any space in the kitchen at all.
7. Compartments for phones and chargers in the drawer
Have your chargers ever gotten tangled up with each other? This means that either you have only one mobile phone in your family or you know how to store such irreplaceable devices correctly. Usually, all the chargers are simply put in a common drawer of a chest of drawers or a wall in the living room, lying around anywhere throughout the apartment, and as a result, finding the one you need turns out to be very difficult. At this time, the phone beeps annoyingly, warning of an imminent blackout, and the owner of the house is nervous.
Dealing with this problem is very simple. Yes, it is convenient to store chargers and mobile phones themselves in a drawer, and it is also easy to lock it with a key if there are small children in the house. However, it is worth dividing the drawer into separate sections - for each charger for a phone, e-reader, tablet, and so on. You can also “store” the phones themselves there—there’s plenty of space.
 It’s convenient when phones and, accordingly, chargers for them lie like this - each in its own compartment. You won’t get confused and you won’t have to search for a long time. Such sections are similar to kitchen ones, designed for storing forks and spoons. You can buy ready-made ones, or you can build them yourself from planks and planks.
 Have you ever seen a picture like this in your own chest of drawers or on a shelf? You are a very neat person!
8. Shelf or box for remote controls
Another item that constantly gets lost and disappears in an unknown direction is the TV remote control. Yes, if only he were alone! In a modern home there are usually at least two televisions, but there is also a tuner, a DVD player, a stereo system and many more devices that are controlled by a special remote control.
And all these light, music and television control systems usually lie where the owner left them - that is, anywhere. Today, special plastic mounts are sold for remote controls of a certain size, which can be easily and simply attached to the wall. But, you must admit, a whole row of such mounts above the sofa will look somehow too “high-tech” and inappropriate.
But one shelf or box for all the remote controls in your home in the most convenient place is just right. Moreover, you can build it yourself and decorate it in accordance with the interior design style of the living room.
 This remote control box is easy to build yourself. And if it seems too rough and simple to you, you can always paint it, decorate it using decoupage or textiles
9. Wicker boxes, baskets, trays
Products made from wicker, the so-called “braids”, still remain one of the most popular storage areas. They fit perfectly not only into country style, but also into modern interiors, and fulfill their role as “storage” impeccably.
The advantages of wicker boxes and crates include their versatility, environmental friendliness, attractive external parameters and low cost. There are many types of “braids” - from spacious deep boxes to flat fruit trays and small boxes.
By the way, with the help of such flat wicker boxes you can arrange storage areas for mobile phones and chargers. To do this, you can simply arrange them in a retractable drawer.
 In such wicker boxes with comfortable handles you can put anything - from vegetables to books and newspapers
 Wicker boxes with lids are even more convenient - they look beautiful and keep things more secure. Often used to store jewelry and sewing supplies
10. Gift and candy boxes for small items
Another universal option for arranging storage spaces for important little things. The advantage of cardboard boxes left over from gifts or sweets is that they can be easily decorated to match the overall style of the room's interior.
In addition, such “storages” weigh little, and if you place the boxes one on top of the other, you can save space on the shelf.
The only disadvantages of this option:
- You should not use cardboard boxes in the kitchen or bathroom, as they are afraid of moisture and are simply not intended for storing food;
- Cardboard boxes usually have a short service life, they wrinkle easily and can tear. However, there is usually no shortage of such containers - new gifts and, accordingly, boxes appear in the house with enviable regularity.
 What do we usually do with gift boxes? We quickly take out the valuable contents, tearing open the colorful packaging, and throw it away. What if you try to carefully save the packaging in order to use it to store, for example, small parts from a children's construction set?
 Chocolate boxes usually have many compartments in which it is convenient to put all sorts of little things - buttons, paper clips, beads... Sometimes egg cartons are used for this purpose, but, you must admit, candy boxes look much more beautiful
Order in the house depends on such little things as the presence of convenient storage places. It's nice to know that the right thing is always at hand and exactly where it should be - in a specially designated place. And if the “storages” for small items are also originally decorated with your own hands, the interior will look especially interesting and homely.
Each of us knows how difficult it is to maintain order in our own things. Just relax a little and in just a few days your home or workplace will plunge into real chaos. A new small review, the author of which has collected useful tips on maintaining order, will help prevent this and fight it, if the worst has already happened.
1. Bottle organizer

Bottles of water, drinks and sunflower oil will take up much less space if you store them horizontally rather than vertically in a magazine rack. By the way, such a stand is also suitable for compact storage of cans of canned food.
2. Markers

Divide things into groups and put them in separate cabinets, marked with stickers with inscriptions or pictures corresponding to a specific group. Marking the drawer will help you easily find the item you need, and put it back in place after wearing it. This storage idea will be especially relevant in a child or teenager’s room.
3. Hygiene supplies

Most people store hygiene products on the sides of the bathtub, which is quite inconvenient as they interfere with cleaning and often fall off. Instead, shower gels, shampoos, conditioners and washcloths can be stored suspended on the shower curtain rod.
4. Planning things

An original organizer with pictures and Velcro, which you can make with your own hands, will help you create a daily routine and teach your children to follow it.
5. “Pocket” for a sponge

From an empty shampoo or gel bottle you can make a convenient holder for sponges, sponges, ear buds or cotton pads, which can be hung on a faucet or any other hook.
6. Headphone holder

Headphones tend to get tangled and torn all the time. To avoid damage and extend the life of your favorite headphones, you need to treat them with care and store them carefully. Some kind of spool can be made from two clothespins glued together. This holder can be carried with you in your purse or used at home.
7. Functional pieces of wood

A few roped boards attached to the wall are great for storing ties, scarves, glasses, chargers and headphones.
8. Linen organizer

Several gift boxes of different sizes, fixed in a regular drawer, will help divide it into sections, increase capacity and, finally, systematize the storage of your underwear.
9. Toy storage

From ordinary plastic toys you can make a huge rack for storing small toys, stationery and construction parts. Such a storage system will not require large investments and can be easily dismantled when the child outgrows play.
10. Recipe Organizer

It will be very convenient to store business cards, recipes, and utility bills in a homemade rag organizer attached to the inside of the kitchen cabinet door.
11. Christmas tree decorations

Several rails will allow you to turn an ordinary plastic basin into a container for storing Christmas tree decorations. At the bottom of such a container you can put all kinds of rain, garlands and unbreakable figures, and attach fragile toys made of glass and ceramics to the railings.
12. Fixing the power cord

Double-sided tape and Velcro will allow you to forever forget about the problem of cords lying under your feet or stuck somewhere. Simply stick one part of the Velcro to the electrical plug and the other directly to the electrical appliance and always hang the cord back after use.
13. Desk organizer

A simple, but very original and spacious desktop organizer for stationery, which can be made from ordinary glass jars.
14. Small parts

To avoid clutter and extend the life of chargers, adapters, USB cables, headphones and other wires without which life in the modern world is unthinkable, they need to be stored carefully and accurately. To do this, you can sew a special organizer and fix it on a wall or table using a regular paper clip.
17. Organize your freezer

Most freezers are a single space where all food is stored en masse. Several plastic containers will help you put things in order and sort the food in your freezer.
Continuing the topic, they still don’t even realize.
A simple and elegant way to organize a place to charge a smartphone is with a rail and a hanging shelf-basket. It will not be difficult to repeat such a solution in your own home, while the costs will be minimal, and the result will definitely please you.
2 In a drawer
A slightly more labor-intensive option, which, however, allows you to completely hide all charges and wires from view, is a station for gadgets in a drawer (desk, chest of drawers or kitchen unit).

If you have quite a lot of different electrical appliances that require recharging, choose a larger drawer. A very elegant, and most importantly, practical solution to the problem of wires, isn’t it?

3 On the shelf
Those who like to place their phone to charge at night - and certainly next to their bed! - another neat solution will please you: a bedside mini-shelf with a connector for connecting gadgets. Such a shelf clings to the side of the bed and provides an opportunity (say, a remote control for a TV or air conditioner).

However, you can also choose a very compact option, like this mini-shelf, which is mounted directly on the wall next to the outlet.

Shelf for a smartphone. Price: 98 rub. Photo: AliExpress
4 On the docking station - organizer
Modern manufacturers are well aware that a modern person is nowhere without a smartphone, and therefore they offer many stylish solutions for organizing a stylish and convenient station for recharging gadgets.
There are various docking stations with organizer functions that allow, in addition to your phone, to neatly arrange your watch, rings, business card holder and other important little things.

5 For the pots
Another clever trick that allows you to hide smartphone chargers in the interior is docking stations in the form of flowerpots with succulents.

Design: suitetreatments.com
Look how stylish this decorative thing is, and most importantly, no one will guess that it hides a lot of wires.

Design: suitetreatments.com
6 In a stylish case
Another idea that helps is a stylish case that hides all kinds of chargers and disguises them as a decorative accessory.

Design: IKEA
7 In a special box
However, there are also stylistic neutral boxes for wires that help neatly organize a place to recharge gadgets.

Design: IKEA
Take a closer look at this option from AliExpress. You can hide an entire extension cord in it and use it to recharge various devices.

Box for wires. Price: 838 rub. Photo: AliExpress
8 Wireless technologies
A modern solution is a neat and stylish docking station for wireless charging of a smartphone or tablet. Of course, this solution is unlikely to be suitable for those who have a whole arsenal of gadgets that require recharging. But it will help out those who need space on the bedside table - and solve the issue of wires from the telephone charger.
9 On the shelves
The most ordinary shelves can also help out in organizing a place for phone chargers.
The advantages of this solution:
- shelves can be placed almost anywhere (by choosing the actual length and width);
- finding models that match the color and style of your interior will not be difficult;
- the cost of such a solution is very democratic.
Hello everyone! Often, when trying to organize our home, we forget about details, both very important and not conspicuous. First of all, we start thinking about storing clothes, kitchen utensils, books or cosmetics. But the wires from chargers, adapters, and headphones continue to be in disarray. Therefore, the purpose of this article is to give you an idea that will help you choose the best cord storage method for you.
How to organize wire storage: the best ideas
It's very simple, I tell you. You can create some of their organizers with your own hands, or you can not work hard, but just go to the store and buy them at very low prices. By the way, I saw a lot of similar things on Aliexpress, this is just a godsend for housewives.
If you constantly lose your phone headphones or camera charger, then immediately start reading the post. And then create a place that will become a permanent refuge for them.

Toilet paper rolls. An unexpected decision, right? A cheap and very easy way to collect wires, twist them and put them inside. By the way, you can store them not only in a basket, but also in a drawer, like an organizer. If you don’t want to wait until the toilet paper runs out, you can buy cardboard and make these sleeves yourself. To make them look decent, decorate them with decorative tape or cover them with paper.

Boxes. The second and very simple way to eliminate clutter is to make storage out of boxes. The photo above shows the best option, when the inside of the box itself is divided by partitions, beautifully decorated and each cell is signed. Now you will never get confused in wires, chargers and headphones. And never throw away shoe boxes!

If you don’t have hands with hooks, you know how to sew and have a desire to create something, then this option is for you. A simple organizer made of fabric for storing wires with elastic bands can not only be twisted, but also hung on a hook, for example, under a table.

Well, for those who are not familiar with sewing, a ready-made organizer bag is suitable. This is a great way to collect and neatly organize chargers, cords and other accessories for equipment. In addition, it is very convenient to take with you.

In one of the articles I wrote about how to use . So, I really liked the idea of putting cords there. Agree, a very convenient option.


There should be order both on the table and under it. It is not only beautiful, but also safe. Chaotically scattered and disorganized wires create a fire hazard. Therefore, take this issue seriously.
The best way, in my opinion, to connect the wires together is to use Velcro or office clips. And adapters and power supplies in special containers that you can buy or make from a shoe box.


A special solution has been invented for headphones - cut out a rectangle from thick paper, make two longitudinal cuts on top, and cut out circles at the end. Insert the speakers themselves into them, and wrap the rest of the wire around the workpiece. Now you won't have to constantly untangle knots.


Sockets on the walls often also accumulate various kinds of wires and charges. Organizing them is quite easy. There are special devices that are attached together with the charger or wires next to it and are safely used without creating a feeling of clutter.
This is how I suggest you organize the storage of wires in your home. Share your ways! See you again!