

One of the most effective design techniques is the use of lighting effects. Often it is light that gives zest to the interior. A backlit plasterboard ceiling is one of the most common options. It is good because, if desired, you can make it yourself, with your own hands.
Main design differences
Illumination of a plasterboard ceiling can be hidden or open. Open - spotlights that are fully or partially visible. Hidden is called so because only its radiation is visible. Therefore, when installing a plasterboard ceiling with hidden lighting, the lower level boxes are made with a shelf on which the lighting fixtures are placed.
This shelf can be open or closed and, depending on this, and the position of the light sources, the width and brightness of the strip of light on the ceiling changes.

How does the light flux change depending on the shape of the shelf and the location of the light source?
Design of the lighting box
To make such a box for ceiling lighting, you need two types of profiles:

In the version shown in the photo above, the shelf does not rest on anything. The rigidity of the gypsum board itself is enough to hold a light backlight. In this case, it is necessary to take into account the weight of the lighting elements. The heaviest are fluorescent lamps, but they are practically not used recently, since there are other options that are more energy efficient and easier to install (LED strips, duralight).
There is a second design. Here the shelf extension rests on elongated crossbars. If the previous design seems unreliable to you, you can make this one. Only in this case a little more supporting profile will be required. The photo shows an example of organizing a two-level flow of plasterboard with lighting.

Exactly the same scheme can be implemented in a single-level version. If your main ceiling is in good condition, you can only make a box around the perimeter. An example of an assembled frame for lighting is below. All that remains is to make the inner side and hem the frame from below.

A backlit plasterboard ceiling does not always have straight lines. They are simply the easiest to implement. But the same schemes are made with curved lines. The results are very beautiful suspended ceilings.

Only at large distances from load-bearing walls it is necessary to additionally fix the load-bearing profile either to the ceiling or to the profiles of the previous level. It is more convenient to do this with the help of suspensions.

Sources of light
When planning to illuminate plasterboard ceilings, you must remember that this is not lighting at all, but only a way to decorate the room. The flow of light is diffuse. Initially it is fused onto the ceiling, and then into the room. And it adds almost nothing to the overall illumination of the room. With its help, you can visually “raise” the ceiling, making it one of the components of the interior, but this element cannot be considered lighting. You will have to take care of lighting separately: install built-in lamps, wall lamps or traditional chandeliers.
Backlighting can be done using different light sources, but recently three types have been used:
- LED
- ribbons;
- duralight.
- Neon tubes.
LED strips and duralight
This is a series of LEDs mounted in series. Their peculiarity is that they are powered by 12 V or 24 V. This power can be provided using an adapter that converts the 220 V household voltage to a lower one. There are monochrome tapes (white, red, blue, green) which are labeled as SMD or universal RGB.
Monochrome ones always emit one color; the color of universal ones can change. RGB strips only work with a controller and remote control. Upon command from the control panel, they change shade (the number of colors can be different - from tens to hundreds); in some models, the intensity of the glow can also change.
By type of design, LED strips are:
- Ordinary. They do not have a protective coating and can only be used in dry rooms.
- Waterproof. Their surface is varnished. Can be used to illuminate wet rooms - kitchens, bathrooms.
- Moisture resistant. They are sealed in a polymer tube (called duralight) or housing. They are rarely used to illuminate rooms, more often in aquariums, swimming pools, etc.
The choice here is clear. Select the type of tape depending on the room conditions. , and we’ll talk about why LEDs are good or bad in backlighting.
First, about the advantages:
- Low power consumption. They are very economical. Considering that this is just decoration, I don’t want to shell out large amounts of money for its maintenance.
- They don't warm up. Only the power supply can heat up; the LEDs themselves do not heat up. This is important if the ceiling is wooden.
- Long service life. Counts in thousands of hours. With normal power supply, they burn out very rarely (do not exceed the current strength for which they are intended).
- Low price. SMD tape 35*28, 5 meters long and with a density of 120 pcs/m, costs about $2-3. You have to pay about the same amount for the adapter. True, these are AliExpress prices. Everything in stores is much more expensive (2-3 times), although you won’t go broke either.
- Easy installation. An adhesive composition is applied to the back surface of the tape. Remove the protective layer and glue it in the right place. If the surface is rough, you can “shoot” with staples from a construction stapler, but it is better not to pierce the tape itself.
Now about the disadvantages. First, and most important: LEDs harshly highlight all surface imperfections. Therefore, the requirements for the quality of ceiling finishing are very high. The second minus: the presence of adapters. They need to be placed somewhere. I guess that's all.
Neon tubes
These are glass tubes filled with a mixture of inert and luminous gases. The brightness of the glow changes with changes in current strength, which is regulated by the convector. These devices are installed every 5 meters, their power consumption is about 100 W, and they do not make noise during operation.
A step-up transformer is also required for operation: normal voltage is not enough for neon to operate. Transformers are installed every 6 meters. But they can hum during operation, and also get warm and, of course, draw electricity quite well. The entire system as a whole consumes a fairly large amount of electricity, which, coupled with the fragility of the tubes and the rather high complexity of installation, makes it not very attractive compared to LEDs.
But recently neon cords have appeared. They come with a controller and all you need to do is press a button. They operate on AA batteries. But the power of such lighting for the ceiling is definitely not enough. They can be used in conjunction with LEDs to illuminate interior details.
Installation of ceiling lighting around the perimeter with step-by-step photos
The main ceiling in this version was puttied, so the first tier was not made. We attached only the box around the perimeter: the height is already small and 7-8 cm, required for organizing the hanging one, is critical.

Near the window there is space left for a cornice, the width of the box is 60 cm, it is lowered by 12 cm relative to the main ceiling, the height of the side is about 5 cm, the protruding part is 6 cm, roundings are made in the corners.

The first method was chosen - a step under the lighting without support. Since the lighting is planned from a regular LED strip, its load-bearing capacity is more than enough.
First make markings on the ceiling. All given dimensions are set aside and lines are drawn using a paint cord. Please note that the line on the ceiling is laid at a distance of 54 cm, and not 60 cm, as in the first diagram. It is obtained taking into account the fact that the step is moved forward by 6 cm.

When drawing curves, their center is made not in the place where the profile is attached, but taking into account the protruding step: this way the element turns out to be more expressive.

The profile guides (CD or PNP as marked) are attached along the marked lines. They attached it to dowels at 50 cm intervals. They drilled straight through the metal. Having installed the plug, we tightened the dowel-nail.

Where it is necessary to form a rounding, the walls (sidewalls) of the profile are cut, the back remains intact. After this, the profile can be laid out in a circle.
From the front side, we attach a strip of plasterboard 12 cm wide to the guide profile on the ceiling. This will be the back side of our box. We fasten it around the entire perimeter with self-tapping screws at a distance of about 10 cm.


On the back side of the installed side we attach vertical posts from the CD (ceiling) profile. Their length is small - 9.8 cm (12 cm height of the box, minus 1 cm for installing profiles, and another minus 1.2 cm for the thickness of the gypsum board screwed from below).
In each segment the lower part is trimmed. The side walls are removed so that another guide profile can be screwed on. As a result, its bottom shelf should be flush with the profile screwed to the wall. The installation step of the vertical posts is about 40-50 cm.

We screw short vertical pieces around the perimeter

Next step: screw on the PNP profile that goes along the bottom of the boot. It is also installed on self-tapping screws in increments of 10-12 cm.

They connect two guide profiles: the one that is screwed to the wall, and the one that is attached to the main side. They are made from a supporting profile in increments of 40-50 cm.

Let's start creating the curves. To make the strip bend along the required path, we take a strip of drywall about 15 cm wide. We cut it in 5 cm increments and break the plaster. The result was pieces of plaster that were held on cardboard.

Now we attach such pieces to the profile. For each fragment - one self-tapping screw, approximately in the middle of the width, so that it does not burst.

Using a laser level, we transfer the height markings to the inside. If you don't have a laser level, use a water level and draw a line with a pencil.
Then we take a piece of the supporting profile 9.8 cm long, just cut it both at the top and bottom. Approximately in the middle of the arc, we place one edge behind the profile and fasten it with a self-tapping screw.

Then we take a piece of profile cut into fragments (as we did when forming a circle on the ceiling) and fasten it along the mark.

Finished rounding “from the inside”
Now the excess pieces of gypsum board can be removed. They are cut level with the bottom edge of the profile, carefully cutting the paper and breaking off small fragments.


The next step in making a backlit plasterboard ceiling is putty. The ceiling and main side are plastered. This is the most convenient moment for this. Later, the bottom hem and the protruding cornice will interfere.


The most convenient way is to cut out a square, then trim it on one side. First we screw it in straight lines. Then, gradually, in an arc, drawing the required edge shape.

First you can draw, then bite off small pieces along this line. Smooth out any uneven surfaces with a wallpaper knife.

No news: to make curves, we cut the sides, bend them to the required diameter and install them in place, fixing them with self-tapping screws.

If you are planning to use LED lighting for a plasterboard ceiling, now is the time to attach the tape. Then it will be very uncomfortable. It is glued in the right place, if necessary, installing some kind of inclined plane.

Next, a strip of plasterboard 5 cm wide is attached to the profile. One of the features is that it is fastened in the middle, and not at the top and bottom: the height is too small. The bends are also done in a familiar way. We cut a strip every 4-5 cm, break the plaster and fasten it.


In this option, to facilitate the work and give the ceiling a finished look, fillets (ceiling plinth) are glued to the side. Similar ones are glued at the junction of the box and the wall.

Now all that remains is to putty everything and achieve a smooth surface. Almost everything. The plasterboard ceiling with lighting is ready, all that remains is to install the lighting itself. And it can be different.

Another option can be seen in video format, but with working backlight.
The installation of a two-level flow is demonstrated in the following video. The steps are shown schematically, but the assembly of the first level is clear. So that might be useful.
How to decorate a plasterboard ceiling with lighting (photo)


LED lighting of a plasterboard ceiling is just an effective design technique. Lighting must be taken care of separately


Ceiling lighting in the bedroom


Sometimes during the process of renovating an apartment, very interesting ideas come to mind on how to decorate the ceiling. Some of them are related to lighting. Often, designers or even the owners of residential premises themselves decide that a ceiling illuminated along the perimeter would look very attractive. And to implement this idea, you will need an LED strip.
Why do you need backlighting?
Ceiling lighting using LEDs is now one of the most commonly used design solutions. If you decide to completely transform the rooms in your home, then she will help you do it with the greatest effect.
On a note! The first experiments with LED lighting began in the not so distant 70s of the twentieth century - it was then that LEDs themselves appeared on the market. But at that time they were not yet of such quality that would allow them to be used in residential premises for the purpose of organizing lighting, as they irritated the eyes.

Previously, only sconces were used as additional lighting or illumination in rooms; later, spotlights appeared. However, it is LEDs that have proven themselves to be the most successful option for installing hidden lighting - after all, you don’t always want light sources to be visible to everyone. In addition, LEDs allow you to implement extremely interesting lighting options, and not only additional, but also primary.

What is so good about LED ceiling lighting?
- It allows you to implement the idea of hidden lighting - the light source, that is, the LED strip, is laid out so that it is not noticeable to humans, but at the same time it gives a lot of light and creates a luminous aura in the room.
- This type of lighting is easy to install yourself.
- LED backlighting in certain cases can act as the main light source.
- This is an opportunity to bring to life the most daring fantasies and design solutions regarding the play of light and color.
- The backlight can be not only white or yellow - LED strips are available in various color variations.
- In addition to LEDs, you can also use optical fiber - an excellent “conductor” of light, which significantly expands the possibilities of organizing lighting.
- LEDs consume little electricity during operation, which means they are economical.
- Thanks to the lighting, you can clearly delimit zones in the room, if necessary.
- Finally, lighting can serve a regular decorative role.

Prices for ceiling lamps
ceiling lamps

LED ceiling lighting also has its disadvantages. There are not many of them, but it’s worth knowing about them if you plan to install it in your apartment.
- The use of colored backlight is not always a plus. Sometimes this lighting can irritate the eyes. Therefore, it will be great if during installation you provide the ability to change the backlight colors.
- LEDs are not cheap, but they are cheaper to maintain due to their low power consumption.

The service life of the LED is quite long. Some manufacturers claim that this little bulb can burn for about 100,000 hours. But you shouldn’t trust this figure much. The fact is that over time, the LED strip begins to shine less brightly. The service life of this lighting element is considered to be the period from the beginning of its commissioning until the moment when its luminous flux decreases by 30%.

Prices for LED strip
LED Strip Light

On a note! If you use LED lighting for no more than 6 hours a day, the tape will work properly for about 10,000 hours. That is, the human eye will notice a decrease in the brightness of the glow no earlier than after 4 years of this mode of operation of the LED strip.
Types of backlight
There are several types of lighting that can be installed indoors.
Table. Types of lighting for the ceiling.
| View | Description |
|---|---|
| Gives a gentle, beautiful diffused light. The ceiling is, as it were, illuminated from below along the perimeter, contour. In this case, the LED strip is located on a special shelf (at the lower level in a prepared recess), and the light from it falls on the ceiling surface. A continuous luminous strip is formed. |
| In this case, the LEDs will be installed on a slope, which is located between two ceiling levels, shining as if along the ceiling surface. |
| This is a ceiling covering with a “starry sky” effect. LED light bulbs are installed in the finishing material. One of the most difficult types of organizing ceiling lighting, since it will require a lot of time. |
| LEDs are installed in small lampshades that will be mounted into the finished ceiling. Several light bulbs are installed, one, for example, shines down, several others create “rays” on the surface of the ceiling. |


The backlight is also divided into:
- target;
- general purpose;
- designer.

The first type is the installation of lighting to delimit certain zones in the room. Simply put, in this case, lighting is used to zone the room. For example, in the kitchen the work area may be more illuminated - additional light would not hurt.

General purpose lighting is ordinary lighting. True, most often it is implemented not with LEDs, but with the help of spotlights. Although there is an option when an LED strip can turn into a full-fledged lamp - this is.
A luminous ceiling can be installed in any room. For production, an LED strip and a stretched translucent fabric are required. The tape is attached to the rough ceiling and hidden under the tension material. As a result, when we turn on the light, we will get a completely luminous ceiling above our heads.
Attention! Installation of this ceiling is not as simple as it seems. In order for the light to flow evenly, it is very important to correctly calculate the distance from the tape to the canvas. If you make a mistake with this parameter, the ceiling will be “striped.”

Typically, a luminous stretch ceiling is combined with plasterboard edging. A small cornice is made from this material around the perimeter of the room, and a backlight with canvas is placed between its sides.
And finally, a designer version of the ceiling lighting. Such lighting will not provide a large amount of light, but it will make the room cozy and complete. Such lighting includes illumination around the perimeter of the room and the creation of luminous patterns on the ceiling.
The patterns are created according to the same principle as the luminous ceiling. Only the LED strip is placed in the shape of the desired pattern, and not across the entire draft ceiling. When you press the switch, the light will penetrate through the translucent stretch fabric and create the same figure on the ceiling surface that is made of LEDs.

By the way, the ceiling lighting does not have to be white. It can be either single-color decorative or multi-colored RGB, that is, shimmer with red, green, blue and other shades. Colored lighting, if it matches the color of the bulbs with the style of the interior and the general appearance of the room, will look very good around the perimeter of the room both with the main light on and in the dark.
Selecting materials
So, you have firmly decided to add ceiling lighting in one of the rooms at home. It doesn’t matter which one - colored, white, or even decided on a luminous ceiling. But in any case, you need to visit a hardware store where you buy the necessary materials.
The most important element is the luminous ribbon. It comes in LED and duralight. Duralight is a cord, inside of which there is a mass of small light bulbs, diode or incandescent. It is not afraid of water, very durable and flexible. Duralight can be installed on any surface. Its main drawback is its weak glow.


On a note! Duralight is a very durable light element. The fact is that the cavities inside the cord between the light bulbs are filled with polyvinyl chloride, which gives it additional density.
An LED strip is a thin and flexible board where LEDs are located at equal distances from each other.
Its main advantages:
- Possibility of installation on any surface;
- low level of electricity consumption;
- high brightness;
- ease of installation.
On a note! Sometimes other types of lamps, for example, neon, are used to install ceiling lighting. But they are too large in size and will not allow you to create beautiful decorative structures.

Prices for LED lamps
LED lamp

It is the strip of LEDs, due to its advantages, that is usually used for installing such decorative lighting.

And it is important to know how to choose the right detail for future lighting.
- First, decide what color your lighting will be. This is an important aspect, not only because the shade of light should suit the interior, but also because certain colors, whatever one may say, affect the human psyche.
Table. The impact of flowers on the human condition.
| Color | Impact |
|---|---|
| Red | An irritating, but at the same time exciting color. It is not recommended for use by people with increased irritability. |
| Blue | It puts you on guard, puts you in a working mood, and makes you collected. |
| Yellow-blue | Capable of causing hysteria. |
| Blue, sea, turquoise | It makes you think and calms you down. |
| Green, yellow-green | Calms. |
| Orange, yellow | Neutral, does not cause any special feelings. |

It is best to choose a tape that has several color variations and a controller. This way, you can choose exactly the shade that you like at the moment to suit your mood. And in your normal state, you can turn on the white light.

- Look at the density of the light bulbs. It comes in 30, 60, 120 pieces per meter. For contour lighting, experts recommend taking a strip with 60 or 120 diodes, but for directional lighting, a strip with 30 is best suited.
- Decide on the power of the tape - they also differ in this indicator. For directional lighting, buy a 5 W/m model, and for contour lighting it is better to buy a larger one – 8 W/m. To save on controllers (buy cheaper ones), 5 and 7 W tapes are placed on the slopes, and 7 and 14 W are installed on the shelf. The power of the tape will be determined by its marking, which has an alphabetic and digital code, for example, SMD 3028. The first two digits will be the power value.
- It is also important to evaluate the total power of the belt, which is calculated over the entire length. Having calculated how many meters of tape you will need, multiply this number by the power of 1 meter. Based on the obtained parameter, select the controller power for the tape.


By the way, look carefully at how the tape blinks. This type of lighting can also have a psychedelic effect due to this parameter. Do not take tapes that flicker at frequencies of 0.5 Hz, 2 Hz and 7 Hz. They can cause the development of epilepsy.

Attention! If you want to get a flickering backlight, then choose a controller to achieve this effect, which will make the diodes smoothly flare up and fade out.
So, to install ceiling lighting you will need:
- LED strip in the required quantity;
- PVC corner (you will glue the tape on it);
- power unit;
- cornice, drywall (if your ceiling does not already have slopes and shelves for placing lighting);
- network cable;
- controller;
- connectors for connecting pieces of tape.

This is the main list of required materials. Depending on how you plan to install the ceiling lights, you may need other items.
On a note! LED strip usually does not require additional adhesive material during installation - as a rule, it is already equipped with an adhesive layer. But cheap tapes usually stick to it poorly. It is better to choose a more expensive but high-quality material.
Installing perimeter lighting
Step-by-step instructions for creating a simple contour LED ceiling lighting.


Step 1. In the niche where the LED backlight will be located, attach a plastic corner around the perimeter using small screws. The fact is that the sticky layer of the tape is in good contact with PVC, but it can peel off from drywall. So do not neglect this stage of installing the backlight.

Step 2. Using a tape measure, measure the required lengths of the LED strip and cut it into pieces equal to the sides of the perimeter rectangle that you will highlight. Cut the tape only at the cut points marked on it, otherwise it will not burn.

Step 3. You can connect the segments using connectors, but it is better to solder them - it will be more reliable. Solder the contacts according to the principle - plus with plus, minus with minus. By the way, remember that you cannot combine too many tapes into one whole - they are usually produced in reels of 3-5 meters. So, more than three reels are not assembled into one structure. If there is more tape, then its segments are connected to the power supply in parallel.


Chandelier prices

Attention! The LED strip can be bent, but only if the angle is less than 90 degrees.
Step 4. Remove the wires from the system that will be needed to connect the controller and power supply. Connect the system first to the controller, and it to the power supply. Check system functionality.


Step 5. Remove the adhesive layer from the tape and attach it to the previously installed PVC corner. The backlight is ready.


Another option is to install an LED strip in a ceiling cornice.
A few words about soldering: LED strip does not like high temperatures, so soldering time should not be more than 10 seconds, and the melting point should not be more than 160 degrees.
Video - Installation of LED lighting
Starry sky
The “starry sky” ceiling is a real hit, which is becoming more popular and is increasingly used for the design of the ceiling surface. It can be made from fiber optics and using LEDs. Let's consider the second option. The main difference from the installation of the previous backlight is that this time you will need individual LEDs, and not a strip.

Step 1. This step is performed before covering the ceiling frame with plasterboard. Make many small holes in sheets of this material in a chaotic manner.

Step 2. Connect (solder) all the diodes into one circuit using wires. Check it for functionality.

Step 3. Install an LED in each of the holes in the drywall. It is best to choose light bulbs of different power - then you will be able to create a more realistic starry sky.
On a note! It will not be possible to create many stars this way - as a rule, for the appearance of real galaxies in the sky, you need an optical fiber.
Step 4. Attach the drywall to the ceiling frame as usual.

Step 5. Connect the system to the controller and power supply. The backlight in the form of a starry sky is ready.

This system also has a drawback - the LEDs glow very brightly, so diffuse starlight cannot be obtained. As an option, you can try experimenting with light diffusers.
Ceiling lighting is undoubtedly one of the best options for decorating a room. And almost anyone can handle the installation of an LED strip. The main thing is a little desire and patience, and you will succeed.
Ceiling lighting with LED strip is an original design solution that allows you to give the ceiling area a unique look. In order for this ceiling design technique to be stylish and appropriate, it is necessary to study the subtleties of its placement and the most advantageous design techniques.


Peculiarities
LED strip is a functional lighting device with a lot of diode lamps. The design consists of a base with an adhesive surface and a protective film. Some varieties are attached to the ceiling using plastic brackets. At the very base there are auxiliary components, a contact pad and LEDs. To ensure uniform lighting, light sources are placed at the same distance from each other.

This material is quite flexible, the tape is sold in reels that prevent the formation of creases, and has cutting lines. It is an auxiliary lighting, although the power of this lighting device often allows it to replace the central lighting. The power consumption of 1 m of tape ranges from 4.8 to 25 W.
In this case, the number of LEDs per 1 m can range from 30 to 240 pieces. Its uniqueness lies in its efficiency: a 10-meter-long piece consumes less energy than a conventional incandescent lamp.


Resistors eliminate the possibility of a voltage surge; they limit the flow of current. The width of the tape can reach 5 cm. The size of the LEDs also varies, so some varieties shine brighter than others. If it is necessary to increase the intensity of the ceiling lighting, sometimes an additional row of diodes is soldered to the strip.


Based on their tightness, LED strips are divided into three types:
- not having tightness (for ordinary premises);
- with an average degree of protection from moisture (for rooms with high humidity);
- in silicone, resistant to water (for the bathroom).
On the modern market, such products are presented in the form of classic white strips, RGB varieties and single-color backlighting.

Advantages
LED backlighting in the form of a strip is convenient and of high quality.
It is a sought-after ceiling design tool for several reasons:
- is an impeccable technique for updating the interior composition of any room;
- sets a unique atmosphere for any room;
- features an even and soft directional glow without flicker or noise;
- attaches directly to the ceiling;
- significantly saves energy consumption;
- has an attractive design;


- durable - has a service life of about 10 years;
- distinguished by the ability to choose a color shade for the interior composition;
- due to its flexibility it can take any shape;
- harmless, does not emit toxic substances into the air during operation;
- fireproof;
- does not affect TV and communication signals (does not create interference).


Such a ribbon can be a decoration for any room in your home.
You can decorate the ceiling with it:
- living room;
- children's;
- hallway;
- corridor;
- bathroom;
- bay window area;

- kitchens;
- work office;
- home library;
- glazed loggia;
- balcony;
- storage rooms.
LED strip lighting is affordable. It is easy to install; you can install it yourself, without involving outside specialists.

photos
Criterias of choice
LED strip lighting has a lot of varieties. Before purchasing, determine the type of lighting.
If this tape will serve as general lighting, all lighting fixtures are removed from the ceiling. Then several tapes of higher power are fixed on the ceiling, placing them around the perimeter, as well as behind the stretch ceiling film (a costly method). To accentuate the contours, this self-adhesive lighting is fixed around the perimeter of the niches, creating diffused light and the visual effect of increasing the space.


If you need to highlight a figured protrusion, you can partially repeat its shape, which is especially important for suspended structures. At the same time, the flexibility of the tape does not limit the curvature of the line.
If the ceiling lighting is planned to be repeated, for example, by highlighting the shape of a mirror or the lining of a kitchen apron, varieties are purchased that are identical in glow. In order to choose the right LED strip and not get confused in the wide range of the presented assortment, you need to decide on the type of fastening, the shade of the glow, the power of the light sources and their number. The design idea also matters, on which the final effect of light transmission depends.


Therefore, when purchasing, you should even pay attention to the backing: you don’t want it to be conspicuous. It is purchased to match the color of the main background of the ceiling. She can be not only white. On the market for similar products you can find options with a brown, gray and even transparent base.
Shade of glow
Ribbons are not simply divided into plain and colored. In the first case, these are light bulbs that burn exclusively in one shade (for example, white, blue, yellow, orange, green). In addition, these varieties can emit infrared and ultraviolet light. The second ones are a strip with built-in light bulbs that can glow in different colors alternately or simultaneously. The different capabilities of the tapes affect the price: options with a light switching mode are more expensive.


Power and density
If the main requirement for backlighting is the brightness of the luminous flux, you should purchase a product with a smaller gap between the diodes. In this case, electricity consumption will be greater than that of varieties with sparse bulbs. If the lighting in the ceiling design will only have a decorative function, it is enough to buy an LED system to decorate the ceiling area - a system with the number of LEDs per 1 m of about 30-60 pieces. For the main lighting, a tape with a number of bulbs of 120-240 pieces per 1 m of length is suitable.


In this case, a nuance is important: the more spacious the room, the larger the width of the tape should be. A narrow option on a high ceiling of a large area will be lost. It is better to decorate the ceiling area with a wide variety of LEDs in 2 rows.
Studying the board
In fact, everything is simple here: the abbreviation SMD indicated on the tape means “surface mount device”. There are 4 numbers next to the letters: this is the length and width of one LED. Of the options presented, the most relevant choices are parameters 3020 (3 x 2 mm), 3528 (3.5 x 2.8 mm), 5050 (5 x 5 mm). The larger the diodes and the density of their placement, the brighter they shine. Each type of belt has a different capacity. For example, SMD 3528 with 60 diodes per 1 m consumes 4.8 W, if there are 120 light sources, the power is 9.6 W. If there are 240 of them, the consumption is 19.6 W.


Footage
The meter of the tape depends on the perimeter of the ceiling plane being pasted. Since LEDs differ in the intensity of their glow, they are not bought at random: if the space is small, excess light will hit the eyes. Simply put, a total of 11 watts will replace a 100 watt incandescent light bulb.
To select the light level, measure the required footage of the illuminated area using a tape measure. After this, the resulting figure is multiplied by the power of 1 m of tape. This value will allow you to decide on the purchase of a power supply or controller if you plan to purchase a strip with multi-colored light bulbs to decorate the ceiling.


As a rule, the length of tape for ceiling lighting is 5 meters, although today such a product can be purchased in shorter lengths.
Protection class
Each type of LED strip is designed to decorate the ceiling of different types of rooms.
Returning to the topic of notation, it is worth considering the marks:
- IP 20 is a label indicating the possibility of using LED strips in dry rooms (living rooms, children's rooms, work rooms, corridors).
- IP 65 is an indicator indicating that the board can withstand contact with moisture; it can be used in “wet” areas (places where leaks are possible from neighbors above).
- IP 68 – category with insulation.

When purchasing, it is worth considering that varieties with a silicone layer are not suitable for decorating the ceiling, as they conceal the intensity of the light flux and force the substrate to heat up, which provokes heating of the surface of the ceiling finish.
Installation
Installing LED backlighting with your own hands is easy. However, before installation, it is worth considering the fact that the tapes dissipate some of the energy in the form of heat. Therefore, before fixing and connecting the lighting, in some rooms it is necessary to consider insulation. For higher power diodes this may be an aluminum substrate. If the backlight power is low, the lamp is needed as decorative lighting; insulation is not necessary.

Into the baseboard
This method is convenient because the lighting can be mounted on the ceiling after the ceiling covering has been installed. The main task is to purchase a skirting board that is attractive in appearance, but it is important to take into account that it is not thin. This can cause the backlight to lose its expressiveness. At the beginning of work, a plinth is attached to the ceiling using reliable glue (for example, liquid nails), leaving a channel about 8 - 10 cm from the ceiling. To ensure that the cornice is level, you can mark it using a level.

After the glue has set and dried, begin installing the tape. To do this, clean the surface of the plinth, remove the adhesive layer from the back of the backlight, and attach it to the ceiling or the back of the plinth in the gap left. If laying the self-adhesive tape seems unreliable, you can glue it in several places with silicone glue or double-sided tape. All that remains is to connect the power supply, and for multi-colored varieties, the RGB box, taking into account the polarity. After checking the voltage in the system, you can connect the tape to a 220V power supply.
In a plasterboard cornice
You can hide the lighting in a plasterboard box while installing the ceiling. At the time of construction of the system, an open or closed niche is created for laying the built-in strip lighting. The box structure is made according to markings, connecting load-bearing profiles with CD elements to the walls, forming a niche. In this case, whatever the system is (single-level, two-level or multi-level), it is necessary to mount it with a gap of 10 cm in order to ensure the passage of light from the LEDs.


Sheets of plasterboard are placed on the frame, leaving a niche for strip lighting. The perimeter of the box is covered with a side (cornice), which will subsequently hide the fastening of the tape. The seams are masked, primed and painted, then the self-adhesive backlight is mounted directly on the drywall. Fixation is carried out in such a way that the light of the LEDs is directed from bottom to top. After observing the polarity, the system must be connected to the current conductors.


Design
Ceiling decoration using LED strip is varied. It depends on creativity, the design of the ceiling, the presence of protrusions, patterns and the type of lamps. The light strip can be located around the perimeter of the ceiling and can be a decorative element for multi-level structures. There are many options for its location, in each case it creates an individual effect.
The lighting of the ceiling with LED strip looks especially interesting, participating in emphasizing the protrusions of the structures. For example, the lighting of the second level with a combination of strip and central lamp will be beautiful. At the same time, they try to select the backlight in such a way that its shade matches the temperature of the central light.


The tape, hidden in a niche of the suspended structure, will emphasize the desired area of the ceiling, due to which you can zone the room. For example, in this way you can highlight a dining area in a living room combined with a dining room. The same technique can advantageously accentuate the guest area, creating a special atmosphere in it due to the color shade.


The illumination of the curly lines of a certain part of the ceiling composition looks beautiful. This can be a single-color coating or a stretch ceiling design with photo printing. The use of diode strip around the perimeter of the picture gives the image volume and a special effect. Lighting small prints changes their perception and is a tool for adding the right mood to the interior. Such lighting makes the ceiling visually wider and lighter, even if the structure consists of several levels.

The texture of the ceiling covering also matters. For example, LED strip lighting is reflected in a glossy canvas, visually adding light to the space, which is especially important for rooms with north-facing windows and spaces with small window openings. Directing the diodes upward creates a soft light; mounting to the side of the niche provides a directed flow and a “floating ceiling” effect.
Installing a tape between the coating material and the base creates the illusion of a glow from within. A complex technique is to create designer lighting using a strip inside a stretch ceiling. Often, for such systems, additional threads with a glow source at the ends of the fibers are used.


To make the backlight as correct as possible, the cut locations must be fixed using a connector or soldering iron. In this case, you cannot act on the material for more than 10 seconds. In single-color varieties, it is necessary to connect the “+” and “–” contacts.
In RGB type boards, the contacts are combined based on color and markings, where:
- R stands for red;
- G – green;
- B – blue;
- 4 contact = 12 or 24 V.

During renovations, special attention is paid to lighting, which, as you know, sets the basic atmosphere for each room. Along with the rapid development of energy-saving technologies, the use of diode lamps is increasing, which can significantly reduce energy consumption. LED strips are distinguished by a combination of practicality and attractive design. They are attached directly to the ceiling and create even, soft lighting.
What are the devices
LED strips are flexible boards made in the form of strips and equipped with LEDs. The latter are located at an equal distance from each other.


In addition to the luminous elements, the tape contains resistors that protect the entire system from high voltage and limit the flow of current.

Table. Types of LED strips.
| Characteristic | Varieties |
|---|---|
| Diode type | 1. SMD 3028. 2. SMD 5050. The diameter affects the coverage area. |
| Fixation method | 1. Self-adhesive with a reliable adhesive layer. 2. Attached with plastic brackets. |
| Tightness | 1. Without sealant, used in ordinary rooms. 2. Medium protection from water, can be used next to the sink or in the bathroom. 3. Sealed, able to function under water. |
| LED color | 1. White tape. 2. RGB. |


Product benefits
The main advantages of LED strips include:
- saving electricity;
- uniform and directional lighting;
- service life reaching 10 years;
- the ability to choose different colors;
- in multi-color ribbons - stable color throughout the entire service life;
- flexibility, allowing you to give the tape any shape;
- environmental friendliness and fire safety due to the absence of mercury and low heating;
- possibility of adjusting the length of the tape;
- no influence on TV signals due to the absence of interference.

Due to these qualities, diode strip is often used not only for additional lighting, but also as the main light source. At the same time, the energy consumption of 10 meters of such a strip will be even less than that of an incandescent lamp that is familiar to many.

Selection of tape by diode type
The most common diodes for such tapes are SMD 3028 and SMD 5050. They are mounted directly on the surface of the tape and vary in size, as indicated by the numbers in the name. In terms of brightness, small SMD 3028 diodes are not inferior to large ones, but due to their small sizes they can illuminate a smaller ceiling area. Therefore, to create a brighter backlight, you should choose SMD 5050.
As for the color parameter, it is worth paying attention to the crystals used in LEDs.
Prices for LED strip
LED Strip Light

There are currently 4 options available:
- yellow;
- red;
- blue;
- green.
White crystals are not currently produced. Instead, the design uses a blue element that emits ultraviolet light. Since the diode is coated with a phosphor that glows when exposed to such rays, the output is white light.

But such a solution to the issue negatively affects the quality of the tape. It is the most short-lived due to the rapid burnout of the phosphor. The result is not only a decrease in the brightness of the tape, but also the appearance of a blue glow.
The classic RGB combination, in turn, allows you to get more than just one of the three colors offered. As is known from optics, white color is obtained by mixing all three colors. In combination with the stable operation of crystals that do not require additional coatings, this significantly increases the service life of the product. Typically, such tapes come complete with a remote control, which is used to adjust the lighting. This provides additional opportunities for experimentation.
Tips for choosing LED strip for different rooms
Depending on where the ceiling lighting is planned to be installed, the type of product and its placement are selected. The brightness changes due to variations in the number of diodes within one meter of tape. The more lighting elements, the brighter and more expensive it is.


In the corridor
Since this area does not require stable bright lighting, purchasing a strip with SDM 5050 or higher diodes will be impractical. Mostly corridors and walk-through areas need additional light at night. Using incandescent lamps will lead to high energy costs, and darkness is not a good solution. The best option would be to install low power LED strips. Their light will not irritate the eyes at night, and using a dimmer you can change the brightness, which will also have a positive effect on the family budget.


In the bathroom
Since this is a room with high humidity, it is necessary to use a sealed structure. This will prevent electrical problems if water gets in. The brightness of the lighting is selected according to the wishes of the home owners, because for a small space the tape is suitable both as additional lighting and as the main light source.

In the bedroom
Most people who want to purchase LED strips install them in the bedroom to add comfort and a more relaxing environment. In this case, options with RGB crystals are suitable, giving more room for imagination, working in certain parts of the spectrum and providing finer tuning when using a dimmer.
Prices for LED strip

In the nursery
It will be a great joy for your child to select interesting color combinations with their parents and adjust the lighting to suit their mood. For this reason, it is worth paying attention to diode strips with advanced capabilities. These are models with RGB + W diodes.
The advanced functionality mode allows you to configure both pure white light for main time and different shades of the spectrum for games. In this option, it would also be appropriate to use dimmers. Then a low voltage will allow you to minimize the glow of the diodes and use the backlight as a night light.

In the living room
This place performs key functions in almost any home. All relatives gather here, holidays are held and guests are received. Therefore, it is important to choose not only the optimal interior design, but also to take a responsible approach to the installation of lighting. Massive chandeliers with incandescent lamps have long given way to diode systems. The latter allow you to implement a larger number of design ideas. For example, creating a multi-level ceiling with internal lighting.
Drywall prices
drywall

This idea will appeal not only to guests, but also to members of the household. For supporters of natural white lighting, monochrome strips are suitable, and for creating a festive atmosphere, the best solution would be RGB strips, the variety of colors and customization options of which will be an excellent addition to the fun.
In the kitchen
Here, in most cases, tapes are used not only for decorative, but also for practical purposes. In addition to the ceiling, they can be glued to the top edges of wall cabinets, which will add something unusual to the kitchen interior. You can increase functionality using sensors - they are convenient to use when you need to turn on the light, but your hands are full. When using the tape over the work surface, this solution is especially convenient if your hands get dirty while cooking.

Video - RGB LED strip
DIY installation
Since adhesive-based tapes are in greatest demand, let’s consider this method of creating LED lighting.
To work you will need:
- LED strip purchased with a small margin for safety;
- scissors for cutting the required length of the product;
- heat shrink tube or electrical tape;
- soldering iron with solder and rosin or LED connectors;
- wires for connecting tapes.
Additionally, you may need ceiling skirting boards and a level for marking the ceiling. The best option is a ceiling plinth glued to the wall. Using a level, you will need to mark the walls to obtain horizontal lines along which the part will be glued.
Installation of tape, completely ready for installation
Step 1. Measure the heights in different corners of the room and find the smaller value from which the markings will go.
Step 2. Using a level, mark horizontal lines for installing the baseboard. At its lowest point it should be 5 cm from the ceiling. This way the light will freely penetrate into the upper area of the room.

Step 3. If you have the necessary wiring, install the baseboard using adhesive known as “liquid nails.”

Step 4. Degrease the surface on which the LED strip will be installed. It is also necessary to get rid of crumbling coatings. To increase the reliability of fastening, glue the installation site with strong double-sided tape.
Step 5. Separate the adhesive layer from the diode tape and glue it parallel to the ceiling or at an angle to it to create the desired lighting.

Connecting to the power supply using wires
The easiest way is to use an LED connector. In this case, the contact end of the tape is applied to the connector contacts, after which the cover is closed. But this option is more expensive and less reliable, like soldering.


Steps to connect power using soldering.
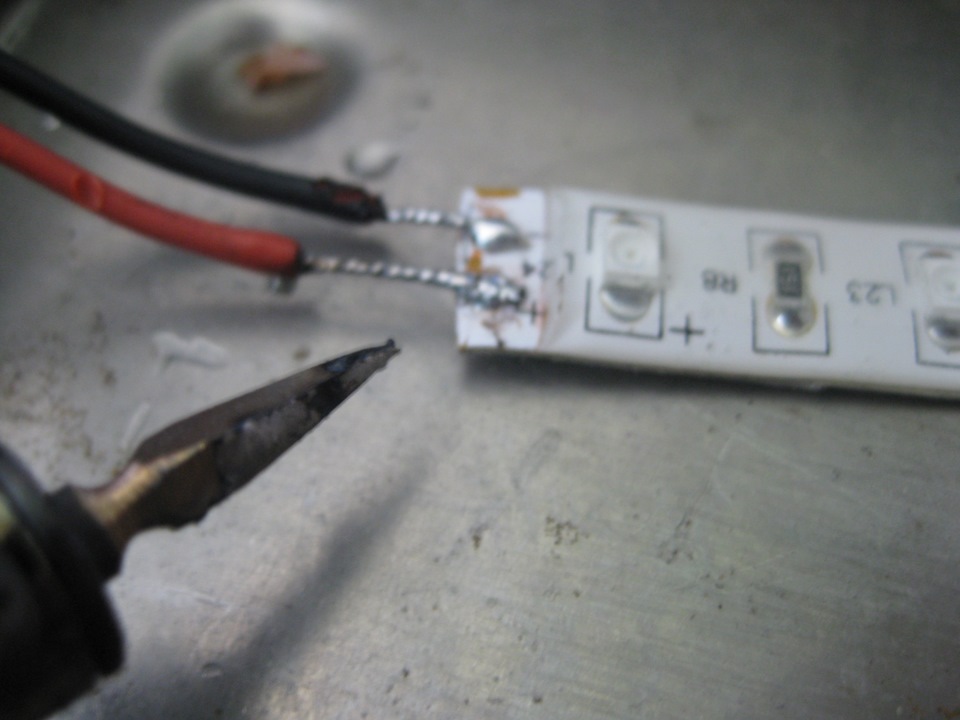
Step 1. Tin the contact pads on the tape and cover them with solder.

Step 2. Strip approximately 8 mm of wires from insulation, tin them, provide them with solder and cut them to a length of 3 mm.
Step 3. Place the wires on the pads and use a soldering iron tip and solder to perform soldering.

Solder on different pads should not be connected to avoid short circuit on the wires.

Step 4. Despite the low voltage, it is better to insulate the soldering area using heat-shrink tubing or regular electrical tape.


Cutting and fastening the tape
To cut the tape, you should use special markings applied to the surface of the product. The standard pitch through which pads are repeated is 3 diodes. Typically, the location for the cut is indicated by a line or a pictogram in the form of scissors.

The tape is connected in one of three ways:
- LED connector;
- soldering with wires;
- soldering without wires.
Regardless of the chosen method, you must follow the rule - do not connect the tape in length exceeding 5 meters. This value allows all diodes to burn evenly without losing brightness, which will suffer when going beyond 5 m.


The first method, as mentioned, is simple but expensive, so let's turn our attention to soldering.
Soldering with wires.
Step 1. Tin the stripped ends of the wire. Cover with solder.
Step 2. Coat the contact pads at the end of the tape with solder.
Step 3. Solder the ends of the wire and the end of the tape so that the solder from different pads does not connect.

Step 4. Repeat with the end of the other ribbon.
This method is convenient when you need to install the tape at an angle. It is prohibited to bend the tape itself at a right angle for fastening. The use of soldering the ends using copper wire of a suitable diameter solves this problem.

Another option is to use a corner connector
Prices for suspended ceilings
suspended ceiling
Backlight power supply from mains
After installing the tape in place, a switching power supply is connected to it, reducing the voltage from 220 volts to the optimal value for the functioning of the structure. The operation of the tape itself is supported by a voltage of 12 or 24 volts. When installing the product, it should be taken into account that the power consumption of the LEDs should not exceed the power of the power supply. Otherwise, automatic shutdown will occur in accordance with the protection system. This characteristic is selected based on the length of the installed tape. The size of the power supply also plays an important role. The smaller it is, the easier it will be to hide it. Therefore, it is better to think over the connection diagram in advance.
A special controller is used to operate the multicolor ribbon. Upon completion of installation, it is advisable to hide it along with the power supply. The result of the work will be functional lighting and an aesthetic appearance of the furnished room.

Prices for slatted ceilings
slatted ceiling
As practice shows, the popularity of LED strips is only increasing over time. This is explained by the ease of use of the structures in everyday life and when working with room design. Well-chosen lighting will not only provide visibility in your home. Using a custom setting, you can achieve the desired emotional effect by changing several lighting parameters, which cannot be noted with classic chandeliers with incandescent lamps. Economic benefits are also a plus. Purchasing a diode strip will save you from high energy bills and the need to replace lighting for the next 10-20 years (depending on the type of product).
Video - DIY LED lighting
The most fashionable request for lighting in an apartment is “How to install LED strips for ceiling lighting.” Every year, the demand for LED lighting is growing steadily. What is this, fashion trends or common sense?
LEDs have a number of advantages over other lighting sources:
- Optimal spectrum (as close as possible to daylight);
- ability to choose colors;
- possibility of zone lighting;
- reduces energy costs;
- high service life.
Ceiling lighting can be used as primary, additional (night) and decorative lighting.
If LEDs serve as the main lighting, it is necessary to comply with sanitary standards so as not to harm your health.
The required illumination of a room depends on its purpose. The optimal parameters according to SNiP are shown in the table below.

Knowing the required lighting, you need to select the LED strip and power driver.
The most popular are LED strips based on SMD 3528 and SMD 5050 modules. Detailed technical characteristics of these LEDs can be found.
Both options suit us. SMD 5050 will require a shorter length (but is more expensive) due to its increased brightness. Let's look at the calculation using an example.
Calculation of ceiling lighting with LED strip
Let's look at the calculation of backlight using a specific example. Input data:
- Room - 20 m2;
- LED strip SMD 5050.
Method I
LED strip SMD 5050 white 60 led per 1 m has a luminous flux of 800 lumens per linear meter (characteristics of popular LED strips are collected at the end of the article). With a room area of 20 square meters, the illumination from 1 meter of tape will be 40 lux (800 lumens / 20 square meters).
For a living room or kitchen, a comfortable illumination level of 150 lux. Let's multiply it by the ceiling height coefficient:
- up to 2.7m - 1;
- 2.7 - 3m - 1.2;
- 3 - 3.5m - 1.5.
This means you will need the following tape:
150Lx / 40Lx * 1 = 4 meters
But with the length of the tape being 4 meters, it is difficult to evenly position it around the perimeter of the room. Let's use another calculation method, based on a fixed length of tape (along the entire perimeter of the room).
Method II
With room dimensions of 5 by 4 meters, the perimeter length is 18 m. Based on the need for 150 lux, we use the following formula:
Required tape brightness(lumen/m.p) = required illumination * room area / room perimeter
Required tape brightness = 150 * 20 / 18 = 170 lumen/m.p.
Considering that this is not a direct light flux, but reflected from the ceiling, we add 10-20% to compensate.
170 * 1,2 = 200 lm/m.p
In total, we need an LED strip with a brightness of 200 lumens/m.p., for example SMD 3528 60 pcs/m. with a brightness of 240 lm/m.p.
The total power of such a tape 18 m long will be 4.8 W/m * 18 = 86.4 W. We take plus 25% of the power reserve:
86.4 * 1.25 = 110 W
All that remains is to select the driver.
Driver calculation for LED strip
Choosing a suitable power supply for an LED strip is very simple. LED power is designed for:
- Supply voltage – 12V (less often 24V). The required voltage is indicated in the accompanying documentation (on the packaging);
- Current consumption is indicated on the packaging based on 1m. On average 0.02A per 1 LED.
If the current consumption is not indicated, multiply the current of 1 LED 0.02A (SMD 3528) by the number of diodes per 1 m (60 pcs) and by the length of the strip (18 m).
0.02 * 60 * 18 = 21.6A
Final parameters of the power supply: 110+ W and 22+ A.
It would be more rational to divide the entire circuit into 2-4 circuits with several power supplies of lower power.
Connection diagram of the LED strip to the power supply

Do not connect several tapes in series with a total length of more than 5 m. The manufacturer sets the thickness of the conductive tracks on the tape based on the maximum section length of 5 m.
Following from the above, connect the tapes to the driver only in parallel!
Errors when calculating ceiling lighting
On websites dedicated to LED lighting, even basic concepts are often confused. Some people calculate LED lighting in watts, which is fundamentally incorrect, since the light output of each type of matrix is different. Some try to compare the lux of a diode and an incandescent lamp, which is also incorrect.
The power of the lighting device does not matter to us; it is the efficiency of the light source and is used only for comparative recalculation.
Recommendations of 4-5 W/m2 for an LED lamp should be ignored. The luminous flux at this power can be from 180 to 330 lumens per 1 meter (depending on the LED matrix). With a room area of 20 square meters, the total illumination will be from 3600 to 6600 lumens. The difference is almost 2 times.
For ease of calculation, we have compiled comparative tables of several popular types of SMD tapes.
| Characteristics of LED strips | ||||
|---|---|---|---|---|
| Tape type | Diodes per meter | Power P, W/m | Voltage U, V | Brightness, Lm/m |
| SMD 3528 | 60 | 4,8 | 12 | 240 |
| 120 | 9,6 | 12 | 440 | |
| 240 | 19,2 | 12 | 880 | |
| SMD 5050 | 60 | 12 | 12 | 800 |
| 120 | 24 | 12 | 1600 | |
Be sure to pay attention to the country of manufacture. Brightness values may vary significantly among different manufacturers.
Let's take the popular SMD 3528 (neutral white) 60 pcs/m as an example.
Chinese diodes are 1.5 times dimmer than Taiwanese ones and 2 times weaker than European products. Many will argue that they cost 4-5 times less than the “European” ones. You can’t argue with this, but the price of a normal driver for a strip will handle 10 meters of super-budget LEDs.
To make a table lamp, this is a completely decent option, but for lighting an apartment, buying a child from heaven is simply not profitable.
Mounting options
How to install LED strips for ceiling lighting? It depends on what the tape will be mounted on.
 Method of mounting LEDs, depending on the base for the LEDs
 In principle, installation options are limited only by flights of fancy. But it is advisable to take into account that the LED is a point source of high brightness with a small scattering angle and is unpleasant to look at directly. Therefore, during installation it is necessary to provide a light barrier, which in standard schemes is a baguette, plasterboard or a mounting strip for a suspended ceiling.
Instead of mono, you can use multi-color (RGB) tape, which will serve as night illumination.

The ceiling lighting of a stretch ceiling, placed BEHIND the ceiling canvas, depends on the material of the canvas. If it is dense or dark in color, its light transmittance is low, and ribbons placed above the fabric are only suitable for night illumination.
Illumination of a stretch ceiling using translucent materials, and even with the application of images, allows you to create a unique atmosphere in any home.

It is worth mentioning separately the “starry sky” stretch ceiling option. How to illuminate the ceiling with LED strip depends on the design features of this solution. There are two types of technical execution of such decor - static and dynamic.
Static- when the design is applied to translucent fabric. In this case, the lighting is placed around the periphery, and, if necessary, on the ceiling itself.
Dynamic- in terms of the design of the picture, it can be completely identical, but a system of fiber optic conductors is mounted above the fabric, transmitting the signal from the projector. Thanks to this, the natural twinkling of stars and the effect of complete immersion are achieved.
 How dynamic ceiling lighting is performed
 LED ceiling lighting is a completely justified solution. Despite the relatively high initial costs, this type of lighting in an apartment will be pleasing to the eye, and will pay off in the future due to a significant reduction in energy consumption for lighting the apartment.