

People have been weaving from vines since ancient times, only at first they wove from grapevines, which is why the name came about - weaving baskets from high-quality vines, although you can use twigs and other plants (raspberries, blackberries, currants) for weaving, which will be more pliable for beginners. Then man found a more flexible and durable plant - willow. Willow twigs are flexible and do not break like a grapevine, so large objects, furniture (sofas, tables, shelves, shelves, armchairs), as well as smaller products, boxes, baskets, bread bins, dishes, vases, figurines are woven from it. , photo frames and much more, for which only your imagination is enough.
Many saw wickerwork and some of them also wanted to get such a household item for their own use. Therefore, the question often arises about how to weave large and small baskets from wicker. Weaving it with your own hands is possible and not at all difficult, you just need to stock up on time, patience and materials for weaving.
Photo lesson on weaving baskets from wicker for beginners
Preparation
For beginners in wicker weaving, it will be more useful to prepare the material yourself, i.e. It is necessary to cut one-year-old twigs in large quantities and with a reserve, because for beginners twigs break more often during work. You need to cut off thin twigs with a sharp knife or pruning shears, leaving 3-4 more buds on the branch so that the branch can continue to grow.
Before cutting a large number of vines from a certain bush, you need to check the flexibility of the first cut branch, i.e. you need to bend it in half from the thick end, if it is not cracked, it means it fits and you can cut it further.
To ensure that the vine in the finished product does not change color, it should be soaked, preferably in running water (up to 1 month), steamed in hot water (1-2 hours) or boiled in boiling water (up to 20 minutes), peeled from the bark, and then dry it on a flat surface so that the color is uniform and without stains. Before work itself, the vine should again be soaked in water or wrapped in a wet rag and bag to again give it the flexibility so necessary during weaving.
Material and tools
Material required for the basket: 8 rods for the bottom cross, 7 mm in diameter and 20-25 cm long, for the rigidity of the walls - 15 rods 25-30 cm long, and 5-7 mm in diameter, for braiding - 20-30 pieces of wicker thickness in diameter no more than 4-5 mm, and length up to 1 meter.
Tools that will be needed during work: knife, round nose pliers, pliers, side cutters, awls of different diameters, incl. and a thick curved awl (kochedyk), a weight to hold the work in place and elastic bands or rope.
Weaving bottom
Basket weaving starts from the bottom. You need to take 8 thick rods approximately in length, make a cut in 4 of them, i.e. you need to split it in the middle with a knife or an awl, then insert 4 more rods, so you get a cross bottom.

The braiding of the crosspiece begins with the “rope” technique, the thin ends of two rods are hidden in a crack in the crosspiece, then the rods are separated and one goes above the axes of the crosspiece, the other under the axes, then they change places and so one or two rows pass in a circle.

Then the axes of the cross are divided into two and braided further.

Then you need to make an odd number of rays of the cross, because This is necessary for simple weaving; one of the rods is cut with a side cutter. The rods are moved further apart and the angles between them are made equal so that the bottom is round and the weaving is uniform.

So the weaving continues until the entire length of the rays is braided, the excess ends are cut off.

Basket walls
The next step is to attach 15 side posts into the weave bottom.

It is necessary to bend these posts 90 degrees, set them in a vertical position and tie the upper ends of the posts together with an elastic band or rope.
The border between the bottom and the walls of the basket is then braided with three rods. You need to take three pieces of vines and insert them into the bottom with thin ends near each of the three successively located racks.

The leftmost twig goes around the outside of two posts to the right, goes behind the third post inside and comes out outside near the fourth post. In the same sequence, 2 other twigs of the vine are braided. This is how several rows (2-3 pieces) of braids are woven (the border between the bottom and the walls of the basket) to form a shape.


The weaving of the walls occurs using the usual weaving method, i.e. one rod is behind the counter, the other is in front of the counter.


Basket handle
It is necessary to take a thick rod of the required length and bend it into the shape that the finished handle should look like, sharpen the ends and insert it into the weaving of the wall on both sides.


6 thin rods 2-3 mm thick are inserted next to the thick rod, they are braided around the handle, and if necessary, they are fastened with tape.


Lately, wicker weaving has become quite popular and there are many reasons for this - low cost, ease of learning, a fairly attractive result in the form of the final decorative element, reliability of materials and ease of obtaining them.
That is, if you plan to do handicrafts for your own leisure time, or you plan to do this activity with your child, or this activity plans to become your additional income, then you have every chance of getting a lot of pleasure from it and doing what you love business without special equipment, tools and skills.

Required Tools
Despite the fact that wicker weaving does not require additional fasteners or even glue, we still need some tools. In particular, do-it-yourself wicker weaving requires you to have good scissors and a knife specialized in this type of work.

Regular kitchen scissors can also work, but it is best to go to a hardware store and find gardening scissors - they are designed specifically for cutting twigs and small twigs, so that wood or skin from twigs will not get stuck between the blades, and the scissors themselves will not be damaged by long-term use and their handles are designed in such a way that you cannot injure your fingers in any way.


You shouldn’t take a kitchen knife either; after all, you use it to cut bread and other foods, so we’ll cut the rods with a separate knife. You can buy a very ordinary stationery knife, it works well, you can buy a small knife and sharpen it to make it easier to cut and sharpen certain areas of our design.

The main thing is the lightness and compactness of the knife; we will need to crawl between the twigs and trim certain unnecessary parts, so a hefty knife for cutting meat is not very suitable here.

Beginner level - making a wreath
Of course, weaving baskets from wicker is a very complex activity that requires you to have a certain knowledge of technology, an understanding of working with wicker, plus it takes a lot of time and effort to do this. You shouldn’t start with weaving complex structures, because you definitely won’t get it right the first time, and this will only reduce your desire to continue doing needlework.

Let's start with something simple, for example, weave a wreath - these are very often hung on the door before the New Year holidays, at Christmas, and so on, the decoration looks very attractive and is easy to make, this is an ideal start for a beginner.


It is best to weave a wreath from a grapevine - it bends well, practically does not break, and it is thin, so you can gradually increase the thickness of your wreath. First, let's find about two to three meters of grapevine, it doesn't have to be one whole vine, you can collect thirty to forty centimeter sticks and use them.

You can weave wreaths from shorter branches, but this is more difficult and requires a certain skill; today we are discussing the very beginning level. Apart from the vine, we don’t need anything else for the wreath itself, but for the decoration we need pine cones, glue, and other decorative elements of your choice.

First you need to take one long vine and twist it so that you get a ring, and not just a ring, but a closed one, so that the vine ties itself. Thus, you will receive a reliable structure, a foundation, for our future wreath.

If you have a long vine, then you can make a ring and wrap the branch on itself several times, then the structure will be even more reliable and will not fall apart even with active actions.

Seal the Christmas wreath
When there is a base, all that remains is to add a little thickness - on top of what we initially wove, we add new branches according to the same pattern - we braid new branches on top of this structure, lighting them around the base.


After adding several branches, your wreath will become thicker and more voluminous, then it all depends on your desire and availability of materials - you can weave a small dense wreath, you can make a large wreath with thin frames, whatever you like. The main thing is a solid base that will allow you to add new branches and improve the design as a whole.

Decorative elements
Although do-it-yourself wicker weaving does not require a lot of resources and decorative elements from you, no one is forcing you to do everything exactly that way. You can take New Year's balls from the tree and glue them to the base of this wreath with glue, you can add branches of some trees, you can add sparkles, decorations of all kinds, beads, and so on.

Here your imagination can reveal itself one hundred percent and you can come up with your own wreath, with a unique style and decorative elements of all colors and varieties. The main thing is that the end result seems attractive to you and pleases your soul.

Weaving with children
Nobody argues that it is difficult to attract modern children with anything other than a computer or smartphone, but if you open wicker weaving lessons for beginners and show your child how interesting and cool it is, he will definitely become interested and will do it with great pleasure.


Again, this activity does not require a large investment of money, and the child will be busy, plus in the process he will develop fine motor skills, improve creative thinking and memory, plus his eyes will take a break from the smartphone or tablet. As for me, this activity has some advantages.

Photo of wicker weaving


WHICH WILLOW TO WEAVE FROM
For weaving, willow is used, which grows along the banks of rivers, often in marshy and damp places. This willow is quite flexible and has a brownish bark. Its twigs that can be used should be as long and thin as possible (annual shoots without branches). The optimal length of the rods is 0.5-1.5 m.
ADVICE
It is very easy to check whether this type of willow is suitable - break the rod in the thick or butt part and, if it does not break, then feel free to take such a willow
HOW TO PREPARATE RODS
You need to start harvesting willow twigs at a time when the leaves on the tree begin to fly off and turn yellow (approximately the end of September). You can continue harvesting twigs all winter and spring until the first leaves appear. For the preparation you will need pruning shears or a knife and a nylon rope (clothes cord) to tie the rod together. You can carry bundles of twigs on your shoulder, in a backpack, and in winter - on a sled.
HOW TO CLEAN BARK FROM RODS
To clear the bark from the twigs, you need a low pan with a diameter of at least 40 cm. Take bundles of twigs of approximately the same length and twist them in layers into the pan. The bunches are placed around the circumference of the walls of the pan, and the middle of the pan should remain empty. Pour water into the pan 1-2 cm above the rods, put the pan on the fire, bring to a boil and boil for 25 minutes. Then turn off the heat and leave the rods in boiling water for 30-40 minutes.
Then they take the rod and remove a strip of bark about 10-15 cm long from its butt part, wrap the bark around the rod and, holding it between the thumb and forefinger, release the rod from the bark with a sliding movement.
ROD STORAGE
The cleaned rods are straightened, sorted by length and tied into bundles (photo 1). Store bunches in a dry, well-ventilated area.

TOOLS
For wicker weaving you will need (photo 2) pliers, round nose pliers, side cutters, a knife, awls of different diameters, a flat weight for pressing the bottom, elastic bands and a kochedyk (a thick curved awl).

WE WEAVE A ROUND BOTTOM
You need to take eight pieces of thick rods with a length slightly larger than the diameter of the future bottom. These rods should be soaked by placing them in hot water for 30 minutes. Then split 4 rods approximately in the middle with a knife and insert the remaining 4 rods in a cross. You will get a cross (photo 3).

To weave, you need to take 20-30 thin rods diameter 0.2-0.4 cm and 0.5-1 m long, which should be soaked in hot water for half an hour.
To weave a rope into two rods, you need to take two rods of the same length and insert the thin ends of the rods into the split of the cross. The first rod braids the cross from the outside (photo 4), and the second from the inside, overlapping the first (photo 5). The same technique is repeated during the final separation of the racks. In this case, the sequence of laying the rods should not be confused.


The crosspiece is braided, spreading the ends of the crosspiece in pairs (photo 6). Then any rod from the pair is cut with side cutters, all ends are separated completely and weaving is continued with a rope until the desired diameter of the bottom (photo 7). This is necessary in order to subsequently use simple weaving, which requires an odd number of racks. We must strive to ensure that the distance between the rods is the same, and the ends of the bottom rods are as close as possible in the same plane. The smoother the bottom is woven, the better the quality of the basket.
The finished bottom must be taken with both hands and, pressing with your knee, given a convex shape (photo 8), which is necessary for the stability of the future product. The protruding ends of the rods are trimmed as close to the weaving as possible.


MAKING THE BASKET FRAME
For future basket stands, you need to take rods 0.5-0.7 cm so that they are 25-35 cm longer than the height of the finished basket, and also soak them in hot water for half an hour.
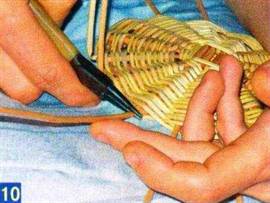
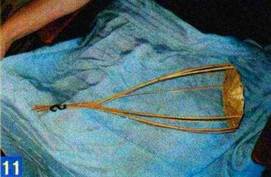
The butt ends of the rods for the side posts are planed with a knife and inserted next to the bottom rods (photo 9). Having retreated 0.5 cm from the bottom, flatten the rod of the stand with round nose pliers and bend it upward (photo 10). Having bent all the posts, they tighten their ends with an elastic band. The result is a structure similar to the skeleton of the “Indian folk hut Wigwam” (photo 11).


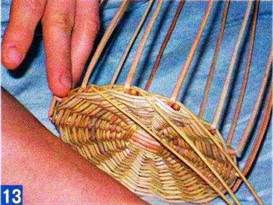
The base of the future basket is braided with three rods of rope in three layers. To weave a rope into three rods, you need to take three rods longer than the circumference of the bottom with a butt diameter of 4-5 mm. Then select three racks in succession and insert the thin end of each rod into the bottom next to the rack. The leftmost rod goes around the outside of two posts to the right side, goes under the third post and exits outside the fourth post (photo 12). The remaining rods are braided in the same sequence (photo 13,14).


Using this technique, we form the frame of the future product, after which the elastic band is removed from the stands, the frame is placed on the table and the bottom is pressed down with a weight (photo 15).
WE BRAID THE WALLS USING THE “FRONT-BACK” TECHNOLOGY
After weaving the bottom, we braid the walls. Let's consider only one type of weaving - “simple weaving”. This is braiding of posts with one rod according to the weaving pattern “front-behind”.
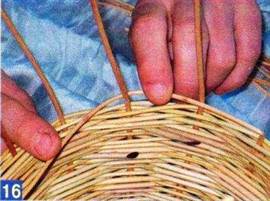
We measure the circumference of the basket with a centimeter and multiply by 1.5 - this will be the length of the rod. Weaving begins from the thin end of the rod. We insert the thin end next to any post, pass the rod behind the adjacent post from the inside, bend the rod around the next post from the outside and continue weaving according to this pattern (photo 16). When the rod runs out, it is extended with a new one, substituting the thick end for the thick end, and the thin end for the thin one.

During the weaving process, it is necessary to monitor the shape of the product and maintain the same distance between the posts and the inclination of the walls. Each layer of weaving must be compacted by pressing with your fingers.
When the height of the basket is 2 cm less than the required height, you need to secure the resulting weaving with a rope of three rods in two layers.
SEALING THE EDGE
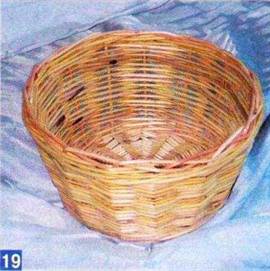
Having completed weaving the walls, you need to soak the racks for 20-30 minutes, lowering them into water with their free ends so that the finished walls are 2 cm submerged in water. Then each stand is crushed with round pliers at a distance of 1 cm from the weaving and bent in the same order as the weaving of the wall (photo 17). The ends of the rods should remain inside the basket. The ends remaining inside are cut off with side cutters (photo 18,19).


WE MAKE A HANDLE
For the base of the handle, we take a thick rod Ф1.2-1.5 cm, give it an arched shape and try it on the product (photo 20). The height is calculated from the bottom of the basket. After the length of the future handle is measured, we cut the rod in the right place and trim the ends.
Using a poker we widen the hole next to one of the posts and insert a rod there all the way to the base. Select the stand on the opposite side and insert the second end of the rod (photo 21).

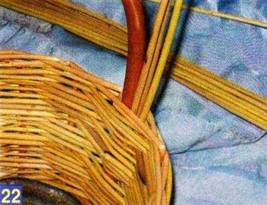
To give the finished look to the product, the handle must be braided with a thin rod. To do this, we take 16 rods diameter 0.2-0.3 cm and a length twice as long as the braided part of the handle. We plan the ends of the rods and insert 6 pieces from the outside of the handle (photo 22-23).


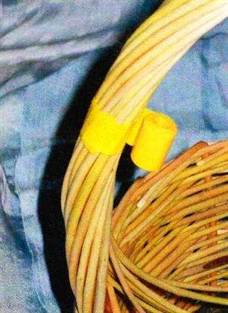
With these rods we wrap the base in a spiral 3-4 times, bringing the ends to the opposite side inside the basket. We use a poker to expand the weaving near the base of the handle and insert the thin ends, bringing them out (photo 24-27).
To prevent the rods from falling apart when braiding the base, they can be secured with a piece of electrical tape.


We perform the same operation on the opposite side. If gaps appear between the rods, then insert an additional 1-2 rods until the base braid looks continuous.
We wrap the thin ends of the rods around the base of the handle and tuck them into the weave of the basket from the outside in (photo 28). From the inside, the ends of the rods are secured under the braid at the base of the handle and cut flush (photo 29).
Most people have a desire to decorate a holiday table or interior with something on the eve of a holiday. The desire for beauty lives in our souls, it is ineradicable and this is very healthy. And we suggest decorating the interior of your home with a small basket like this, which you can use on Easter when you go to church to bless the holy gifts, or to your friends, treat them to Easter cake and colored eggs. It will be unexpected and original. And how to make such a beauty?
Making a wicker basket with your own hands
The basis of the basket is, of course, wicker (we take rods 5 mm and 1 cm thick) and colored rattan, in this case, pink and green. And tools - an awl, a sharp knife, pruning shears.
Soak the vine in cold water for two hours, then wrap it in a damp cloth and put it in a plastic bag so that the vine does not dry out while working. We do the same with rattan. Then cut eight pieces 28 centimeters long. It is better to cut at the base of the rod.

We spread four rods in the middle at a distance of 5-7 cm.

For the remaining four rods, we make a flat notch one third of the diameter of the rod, 5-7 cm long.

We take an awl and thread it through the rods that were loosened. We insert rods with flat cuts into the gap. The cuts should face the same direction. A cross was formed - the base.

We take rattan fiber, fold it in half, and throw it on one side of the base cross.

Our working piece is always the left piece of rattan. We outline one of the rays of the cross with it and lead it to the next one after it. On the left side we have the second part of the rattan left. We perform the same operation on them. And we repeat this several times, all the time with the left side of the rattan fiber.

Having made two circles, we insert the vines between the two rods and continue weaving.

Having made two more circles, we move the rods apart one by one. Two more circles are made. In general, you should get a circle with a diameter of approximately 8 cm.

Then we add a new color. The ends of the rattan fibers are left on the wrong side. We weave several rows of pink fibers. Then we switch again to green fibers. Pay attention to the evenness of the base.

We weave 6 rows in this way. Then we cut 16 pieces of vine, 3 cm longer than the remaining ends of the base and sharpen them.

We insert additional base posts and weave the base to the level we need.

We cut off the ends of the posts.

We cut pieces of wicker and rattan 70 centimeters long and insert them in pairs into the base of the basket.

We do everything carefully, helping ourselves with an awl. We weave the fixing row and bend the posts.

We assemble the racks and tie them together. We use a jar of water as a load (don't forget to close it to prevent water from spilling).

We make a fixing circle.

We cut 32 pieces of rattan fibers 40-50 centimeters long. Then we lay the end of the fiber behind one of the posts, and, moving counterclockwise, we outline one post in front, the other behind. When introducing new rattan fibers for weaving, we start a little to the left where the previous fiber ended.

We divide the racks into four parts - eight double racks. We leave two parts free; they will form the elongated shape of the basket. We do layer-by-layer weaving.

Take pink rattan and make a pink rope.

We divide the racks into two parts to form the rise of the walls. We fix the end of the fiber and perform simple weaving up to half in one direction and the other, while reducing the number of braided posts.

Having made the lifts, we braid it with a rope.

Having reached the desired height for the walls of the basket, remove the vine rods, leaving the rattan.

We make a bend. Each fiber bends outward, encircling the adjacent fiber.

We insert three beacons to perform a side braid. First we weave the braid using pairs of fibers.

We make an ordinary braid, weaving in fibers from the stands.

Having finished weaving, we should get three pairs of fibers. We draw them into the weaving instead of beacons.

Each pair of fibers is pulled along the beacons. When bringing the pair out, we leave one fiber outside, and pull the second one further, continuing the braid. Cut off the excess ends.

We place the thick rods of the vine in a container and boil for 2 hours. They will take an arched shape. Cut them to the length you like. We insert the arcs into the weaving so that the distance between them is four posts. The thick end of the arc of one handle is inserted on the side where the thin end of the other arc is located. Having cut off 90 centimeters of fiber, insert it to the left of the handle and twist it. We draw it on the opposite side to the left of the end of the arc.

We do this three times, each time changing the direction in which the arc begins to wrap.

Next we make the castle. We lay five fibers from the weave side by side. We wrap the leftmost fiber around the base of the handle. We hide it in the weaving. The remaining fibers are laid in the same way - a new fiber on top of the previous one. On the reverse side, the ends of the fibers are hidden under the weaving. Cut off the leftovers.

The basket is ready.

Weaving from wicker and willow is a very exciting activity. In Belarus and other CIS countries, wicker weaving is very popular. Creating crafts from wicker with your own hands is not only exciting, but also useful. Knot weaving allows you to develop attentiveness and perseverance, and also improves fine motor skills of the hands. You can find many master classes for beginners, which describe step by step how to properly create a wicker basket from branches.
Weaving with wicker is a very exciting activity.
There are patterns for weaving baskets and vases. Those who like this activity can take special courses. There they teach you not only the basics of this craft, but also introduce you to all the subtleties and nuances of the weaving process.
So, the work consists of the following successive stages:
- To begin, the rods need to be prepared. You should take an armful of willow twigs and place them on a flat surface. Preparing the material involves pre-drying it, but if a person uses purchased rods, then you can do without this.
- The artificial basket should be made from pre-soaked rods. This should be done so that they become flexible. They need to be kept in water for at least 2 days. During this time they will become flexible enough and will not break.
- Then you need to cut the twigs to their base. They are cut depending on the desired size of the basket. If you want to weave a small basket, then it is enough to use 30-centimeter twigs. Larger products are woven from 60-centimeter twigs.
- Next, take 4 twigs for the base of the product. You need to make a slot in them. It is done in the middle, the length is approximately 5 cm.
- After this, you can begin collecting the base. To do this, other rods that do not have slots are placed crosswise on 4 rods with slots. They should lie perpendicular.
- Now the process of actually weaving the basket begins. Workpiece on the surface. 2 twigs are inserted into it. They will weave around other twigs, thereby creating the shape of the product.
- To strengthen the base, weaving should be in pairs. All rods should lie in the same direction and not twist. Each willow twig should fit snugly against the other twigs.
- After the master has managed to weave 2 rows, the rays of the base must be divided.
- Working rods should be added as needed.
- The weaving of the walls occurs using the method of setting up side posts.
- When the walls are ready, you can begin making the handle of the basket. It can be made from 5 thin twigs.
Gallery: wicker weaving (25 photos)


How to make a basket from a wicker with your own hands (video)
Weaving from willow twigs: differences and secrets
In such a craft one cannot do without some features:
- The twigs must be soaked in water for a couple of days, as this will make them flexible. Some even have to boil them.
- If willow twigs lose their flexibility during work, they should be sprayed with water.
- In such work it is important to use twigs of different thicknesses. For example, the base of the product must be made from thick rods.
- Before using willow twigs soaked in water, you need to make sure that they are completely dry.
- To make the product beautiful, it is important to ensure that all the twigs fit very tightly to each other. It is also important to place them to one side to prevent the rods from twisting.

If willow twigs lose their flexibility during operation, they should be sprayed with water
What tools might you need for the job?
The technique of wicker weaving is not always easy, so the master may need tools such as:
- Awl.
- Secateurs.
- Mallet or nippers.
- Pliers.
- Templates.
Tip: the preparatory stage makes the work much easier. If you pre-dry the vine and soak it in water, it will be much easier to work with, and you won’t have to use some tools.
Harvesting vines
When to harvest?
The most favorable time for harvesting is autumn. The vines begin to be harvested when the leaves begin to fall.

The most favorable time for harvesting is autumn
How to make a cut?
The twigs are cut with hand tools, for example, pruners. An oblique cut is made. When making a cut, it is important to ensure that there is no contamination on the twig, because it can be damaged during cleaning. The cut should be smooth and there should be no wood flakes on it.
How to store them?

Thin rods are stored with thin rods, and thick rods with thick ones.
Do not store it in a damp place, as it will turn black and become moldy.
How to prepare a vine for work?
You need to use only clean vines for weaving, so if there is soil or dirt on it, you need to start cleaning it. Next, the twigs are cleared of bark. If you treat the vine correctly, it will become white and shiny. Only after this can you start drying.
Grapevine weaving: furniture
Vine furniture looks very presentable and expensive. It’s always nice to have such products in the house, so why not make something from this material yourself?
Master class on making a chair from a grapevine:
- At the first stage, the material for work must be selected. A beautiful chair can only be made from high-quality material.
- Next, the selected material must be processed. The vine is cleaned and the bark is removed. Then it is dried and soaked in water for several days. You should not neglect this preparatory stage, since without it it will not be easy to work with the rods.
- The structure is being assembled. You need to decide in advance on the size of the chair. The vine is pruned according to the desired parameters of the product. The chair frame is made first.
- After this, the legs should be attached to the frame. To ensure that the legs are firmly attached, in addition to the vine, you can use a rope.
- Weaving occurs according to a simple pattern: horizontal twigs are superimposed on vertical ones, then braids are knitted and knots are woven.
