

© When using site materials (quotes, images), the source must be indicated.
Tandoor (tanur - Farsi; tone - Georgian; tono - Turkic; tandoori - Hindi; tandoor - English) is currently a popular trend in dacha-stove fashion. However, it's not just about fashion. In the tandoor you can cook everything that you can cook in or in, and many other oriental dishes. And at the same time, making a good tandoor with your own hands is generally easier than any other country stove.
Another important advantage of the tandoor is that it can be made of clay, i.e. “truly oven-like”, without the slightest admixture of metal in the design, and at the same time mobile. At the end of the season, you can hide it indoors or take it with you when you move. Installation will require a minimum of work, and the tandoor does not need a foundation at all.
Finally, the tandoor is economical. It was born in places that were never abundant in fuel, and the design was perfected not for centuries but for millennia. The amount of fuel in the barbecue is barely enough for a heel of kebabs, in the tandoor it is enough for a dozen of them plus flatbreads, plus the tea will boil while the flatbreads are baking.
Many people who want to own a tandoor of their own making are put off by the complexity of pottery work. But they can be simplified, see below. And the tandoor is generally unpretentious in the choice of material - you can even build an Uzbek tandoor out of brick. Ancient nomads in the vastness of Turan, Taklamakan and Tsaidam generally made tandoors from whatever they found at their next stop, and the food was finger-licking good. A galaxy of Russian travelers in Central Asia in the 19th – early 20th centuries. confirms unanimously.
Make or buy?

As for the tandoor for the dacha or just for the household, you first need to decide whether to make it yourself or buy a ready-made one. There is no shortage of proposals, and the quality of the products, as a rule, does not require special praise, see fig. on right.
The fact is that it is difficult to make a real clay tandoor in mid-latitudes, and even impossible without special technological equipment. A special section will be devoted to this issue later, but for now we will only note that even during the initial firing, tandoors crack, even from selected fireclay clay, which requires at least 1,500 rubles for each attempt, not counting the work.

Meanwhile, the price of purchased mobile tandoors, like the one shown in Fig. higher, ranges from 11,500 to 70,000 rubles. depending on size. The smallest one is the size of a large saucepan. It can be placed on a table, and can be carried without effort by one person. And the same person, if necessary, can climb into a large one, for 60-70 thousand rubles. It’s clear here that it’s better to buy: after all, the price includes a set of utensils, a lid with a hatch for the kettle and slots for skewers. Doing all this yourself will cost you more.

But if we are talking about a stationary tandoor oven, then the cheapest custom-made work of a tandoor master will cost no less than 100,000 rubles, and he will not take this money in vain. At the same time, the heart of such a stove, the tandoor itself (see the figure on the left above) of a proprietary manufacture, properly fired and with a guarantee, will cost from 5,000 to 30,000 rubles. depending on the size and method of delivery (to the place, pickup). And the actual stove that frames it (see the figure on the right) is quite capable of being built by any craftsman, even if before that he had only looked at bricks. The materials are also the most common ones, see below.
Video: basics of tandoor construction (1 channel)
About electric tandoors
Civilization and electrification have not bypassed tandoors. In the end, you simply cannot heat with wood in a city apartment or restaurant. The obvious solution is to place an air heating element above the hearth, left pos. in Fig. below. The finished factory-made product looks elegant (middle position), and the price is not much higher than for wood-burning ones - from 14,500 to 80,000 rubles, again, depending on the size.

But an electric tandoor with an open heater is more of a prestigious gift than a culinary technique. The taste of dishes made from it will be distinguishable from the real thing even by an inexperienced gastronome. For the worse. The reason is that the heating element dries the air. Of course, it does not absorb moisture vapor, but as the temperature rises, the relative humidity of the air drops, the cakes dry out, and a burnt taste is clearly felt in meat, fish and poultry. If you burn with wood, then water, along with carbon dioxide, is one of the main combustion products. It penetrates into the microporous body of the tandoor during heating, and then is gradually released, maintaining the desired microclimate inside.
Trying to humidify the air by placing a bowl or tray with water on the grill is useless. It boils away, steam flies out, at the same time spoiling the food. There is also no point in trying to saturate the tandoor with moisture during heating: in order for its vapors to penetrate into the baked clay, their temperature must be at least 350 degrees, and not 100, as when boiling.
Therefore, a real electric tandoor is a device that looks like a kitchen stove (on the right in the figure), but is very complex inside and controlled by an on-board computer. The same clay tandoor is wrapped in an electric spiral, coated with an additional heat-resistant dielectric lining, lined with heat-reflecting screens, and moisture is introduced into the baking chamber in precise doses using inserts made of nanomaterials, like those used in mobile air conditioners, only heat-resistant. The price is appropriate. Replace the above rubles with US dollars, there will be no big mistake.
What and how to cook in a tandoor?
There are countless recipes for oriental dishes for tandoor. In addition, bread is baked in it and shish kebab is prepared. By removing the lid and placing a grate in the neck, the tandoor can be used as a barbecue. And by placing a teapot with a teapot neck there, or a cast iron pot, we will get tea no worse than the best samovar or daily cabbage soup without.
To describe at least the basics of tandoor cooking, you need not even a separate article, but a voluminous monograph. Therefore, we will limit ourselves to the most general instructions.
First, if you cook any meat, especially lamb, you need to place a grate over the coals, and on it - a bowl into which the juice will flow. Without it, shurpa or tandoor-shurva will not turn out properly.

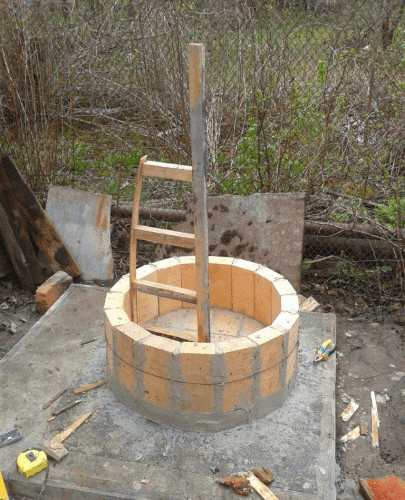
Secondly, if shashlik or kebab is cooked in an Uzbek tandoor, the skewers are either simply inserted into its mouth (on the left in the figure), or first inserted into the slots of the lid, then the meat is threaded, and the tandoor is closed with a lid. The second method is more economical (literally a handful of coals is enough) and guarantees uniform baking of pieces of any size.
If the kebab is cooked in an Armenian tandoor - tonir - then the skewers are hung vertically on a hanger (right position). Not every cook can cook kebab in a tonir, but in any case there is no need to turn the skewers.

Third, flatbreads can be baked in an Uzbek tandoor both inside and outside, see fig. on right. Which one depends on the recipe. In general, dinner bread is baked inside and baked goods outside.
Fourth, by hanging a grate at the mouth of the tandoor on hooks of adjustable length, you can cook everything the same as in a Russian oven. At the mouth cut, the temperature will be approximately the same as in the fire, and directly above the coals - as at the back wall of the furnace immediately after burning. An additional plus is that you don’t have to cook in cast iron; it works just as well in regular pans.
Fifth, dishes in a tandoor cook much faster than similar ones in other ovens:
- Beef - no more than half an hour.
- Pork, lamb – 15-20 min.
- Fish, poultry – 7-10 min.
- Vegetables – 3-5 min.
Sixth – a little culinary secret. After cooking, when the tandoor has not yet completely cooled down (you can put your hand inside, but it burns), we put a pan inside filled with pieces of old, impossibly stringy beef. Close the lid tightly and wait until the morning. Now you can cook anything from this meat, and it will melt in your mouth.
About firewood and firebox
Tandoor is fuel critical. In its homeland, Central and Central Asia, it is heated mainly with saxaul. Occasionally - elm or plane tree (sycamore). Of these, in the southern regions we only have the plane tree, but here it is a valuable ornamental tree and is not allowed for firewood.

Saxaul and ready-made saxaul firewood
In our area, tandoors are heated with wood, the same as barbecues. Charcoal and pellets are not suitable - they produce too much heat, an expensive tandoor can crack and cannot be repaired. Coal is absolutely no good: the tandoor will become saturated with coke gases and will forever become smelly and poisonous.
The amount of fuel in the tandoor is small, about 1/5-1/6 of its height. It is specifically determined by the experience of use so that there is enough coal for cooking. In general, barbecue requires two to three times less fuel. Cooking begins when the fuel burns down to coals. A prerequisite is that the soot and soot on the walls must also burn out. With good quality fuel, this is always observed.
In tandoors with a built-in firebox, the vent is not closed after heating, so that the coals smolder without burning. And in order not to create excessive draft, the mouth of the tandoor is not completely covered with a lid, if it is solid. In mobile Uzbek tandoors (see below), the lid is made double; At the end of the fire, the smaller one is removed. Its nest in a properly made tandoor is made jagged, then you can place a kettle on it without disturbing the draft.
History and evolution
So how can you build such a wonderful culinary unit yourself? In order to approach construction with knowledge of the matter, let’s dwell a little on its origin.
Initially, a tandoor is the same hearth, a fire in a fence or recess so that the wind does not blow away the flame. However, the heart of Asia, where the map is entirely mountains, is, oddly enough, poor not only in fuel, but also in stones. The reason is severe wind erosion in a sharply continental climate. N. M. Przhevalsky described how in the Gobi, right before our eyes, granite boulders were worn into dust. The author of the article had the opportunity to be in those places, to see something for himself in the summer, not in the winter, and he does not have the slightest doubt about the veracity of the great researcher.
But the same terrible winds, combined with daily (!) temperature changes from +45 to –30 degrees, abundantly supply the Asian plains with loess - the smallest stone dust. She very quickly buries what the wind carrying her did not have time to wear away. Loess layers on the Asian plains reach hundreds of meters in thickness. To see any pebble, you need to climb quite high into the mountains.
Actually, dust is not loess. Loess is obtained when dust is knocked into a dense conglomerate by the wind, carrying stones the size of a fist, periodically baked by the Sun during the day and frozen in dry air at night. Loess has incredible properties. It is exceptionally fertile, producing stable wheat yields of 40 kg/ha in monoculture and without any agricultural technology.
But it’s more important for us to know something else: loess is heat-resistant, like fireclay clay. When dry, it is as strong as cement, but is completely permeated with microscopic pores, i.e. breathable and quite easy to process. And if you soak it a little, you can sculpt it like plasticine. True, if it rains heavily, the loess gets soaked into mud, in which the tank gets stuck up to its turret. But heavy rains where there is loess occur once every 10 years, and not every decade.
It is clear that in such conditions it is useless to simply fence the fire with stones: they will simply be blown away along with the fire and food. But the same wind also provides a solution to the problem - loess. The ancient Asians sculpted their hearths from it 6000 years ago, and in some places they still sculpt them, see fig.

The evolutionary tree of European ovens, from barbecue to Russian, is entirely made of stone. The Asians, settling beyond the loess plains, looked everywhere for a replacement for such wonderful material. They had three more allies - the hot Sun of low latitudes, the eternally cloudless sky and very dry air. As a result, tandoors of various types appeared, and culinary subtleties were added to them during development.
Zemlyanoy
The simplest tandoor is a hole in loess soil with a diameter of about 0.5 m and a depth of about 35 cm, to the bottom of which an inclined passage is dug from the side - an air duct. Loess tandoors are still in use; connoisseurs claim that only they produce real tandoor delicacies.
Where there is no loess, the pit is lined with bricks to dry it (see figure), and pipes made of fireproof materials are used to supply air. However, the same experts claim that such a tandoor is no longer a tandoor.

You can dig a pitcher-shaped hole in the loess without the danger of it collapsing. This made it possible to significantly save fuel: due to the reflection of IR, the heat was concentrated in the center of the chamber. In areas without loess (in Fergana, for example), you cannot build an earthen tandoor, but there are also many deposits of high-quality clay, and pottery has been developed since time immemorial. It was there that the Uzbek tandoor was born.
Uzbek

The diagram of the Uzbek tandoor is shown in Fig. The fireplace underneath is ordinary, made of masonry with slots for air access. But the main secret of the Uzbek tandoor is the clay top placed on the fireplace. It, as can be seen from the figure, is two-layer.
The first, inner layer, was made from high-quality clay with a small (1:1 or 1.5:1) admixture of sand and the addition of chopped wool; The wall thickness is half a span. The solution was made very thick, the consistency of plasticine. To achieve complete homogeneity, we kneaded the solution with our feet.
Then natural conditions came into force. In the center of the Asian continent, the air is constantly saturated with fine dust; The sun in a completely clear sky appears as if in a haze. Meteorologists call this phenomenon a danger. You can quite understand the degree of dustiness in the air there when you see a phenomenon common in those places - dry rain. Drops of water collect dust particles as they fly. Due to the extreme heat and dryness, the water evaporates and dry pellets fall to the ground.
Dust completely absorbs ultraviolet radiation, even at an absolute altitude of 1800 m there is almost no ultraviolet radiation in daylight. Caucasian Asians come to the sea in the summer with the same “brown cheese” tan as northerners from Olenegorsk, Naryan-Mar or Norilsk. But dust re-radiates all absorbed radiation (UV and upper visible spectrum to blue-green) in the IR range - the air is oversaturated with thermal rays. Asians seem to live in an annealing furnace.
Having sculpted the blank, it was exposed to the Sun. The unbearably hot light, combined with very dry air, literally drove the water out of the workpiece within an hour or two in the morning, but drying (in fact, low-temperature firing; at noon the workpiece was heated to the temperature of sand in the desert, 70-80 degrees) lasted two weeks. The workpiece turned out to be microporous. The famous Bukhara sweating jugs were prepared for firing in the same way, keeping the water poured into them cool in any heat.
It is precisely due to the inability to organize such a natural technological process in cooler and/or humid places that homemade Uzbek tandoors fail. During drying, a crust forms on the workpiece, which does not release water from the solution. Gradually it still evaporates, but the workpiece goes into firing with residual stresses, which is why it cracks during firing. In middle latitudes, the maximum wall thickness of pottery is about 13 mm; for a tandoor this is clearly not enough, and it is impossible to build up and dry in layers due to the same residual stresses.

But the tandoor cannot sweat, and the heat capacity of a vessel with a wall thickness of 40-50 mm is not enough for proper fuel economy. He must return the water obtained during heating. Therefore, the first layer after drying was lined with a solution of ordinary white or gray clay without fibrous additives. After 2-5 days of drying, the product was fired. The top layer often cracked, see Fig. higher, but this did not deteriorate the quality of the tandoor: the outer layer is simply additional thermal insulation.
Over time, small portable single-layer tandoors appeared, with their own firebox and grate. They were no longer suitable for baking baked goods, but meat cooked perfectly in them. These were more commonly used by the nobility and were richly decorated. Most of the modern tandoors available for sale (see next figure) are from the “Bai” branch.

“Bai” tandoors
Uzbek tandoor oven
There is also a class of tandoor consumers in Central Asia, from whom a very high heat capacity is required at a reasonable price. These are the dukhan-keepers (tavern-keepers) and the tea-khan-keepers. The stationary tandoor had to provide continuous preparation of food for visitors within 3-4 hours from one heating. Asians are a patient people when they have to tighten their sash, but if they have several tangas in their belts for pilaf or beshbarmak, they become very active. And firewood is expensive.

For catering tandoors of old times, craftsmen began to produce ready-made fired inserts, many of which are still exhibited in Central Asian bazaars, see fig. Most of them are in the form of a cap, they are cheaper, and the stove is also cheaper: the brick is ordinary, the thermal insulation is self-leveling from unfired clay. A diagram of the design of such a furnace will be given below.

In areas especially poor in fuel, starting from the 18th century. Stoves with an insert in the form of a jug became widespread. The chamber was made relatively small (see figure on the left), lined with a thick layer of fireclay bricks. The blower air duct was made long to heat the air from the furnace body. An elbow-length bundle of saxaul, which could be wrapped around the fingers of two hands, was enough to bake a dozen flat cakes and boil kumgan water for five; The kumgan was installed in the neck of the tandoor instead of a lid. This tandoor oven is called tandoor-nan or tandoor-non.
Video: Uzbek traditions of tandoor construction
Toner
The second trunk of the tandoor evolution tree came from Transcaucasia. It's hot here too; in Shamakhi it is perhaps hotter than in Fergana. And the air is also dry, but clean and transparent. This alone was enough to prevent pottery tandoors from being made here.
But the Transcaucasian Highlands is perhaps the first region on Earth where people discovered deposits of fireclay clay and learned to work with it. Armenians are considered jacks of all trades and the best artisans among the Caucasian peoples.

The Armenian tandoor, or tonir, is laid out of fireclay bricks on clay; in terms of properties, its body is equivalent to an Uzbek clay body with walls half as thick as brick. The outside of the tonir is lined, like the Uzbek one, with clay, see fig. The purpose of the lining is the same - additional thermal insulation. It could be made of brick, but it would be difficult and expensive.
On Uzbek tandoors, the decorations are mostly molded and glazed: such a large “pot” without reinforcement is not very strong and may not withstand additional load. Toner is like a brick structure, much stronger. Therefore, the external decoration of tints is much more varied and richer: from simple coating with decorative colored clay with polishing and cladding with wild stone to the most complex tiled compositions, see fig.

Armenian tandoors - tonirs
It is much more difficult to build a brick vessel with a complex curvilinear configuration than to fashion it from hand-thick clay sausages, pressing and pinching them. Therefore, toners are most often made in the form of a cylinder topped with a truncated cone, or even in the form of a straight pipe. In this case, IR can more freely escape outside without any use. The high heat capacity of fireclay, combined with its negligible thermal conductivity, compensates for this disadvantage to some extent, but still, a toner of the same capacity per unit of finished product consumes 15-20% more fuel than an Uzbek tandoor, not to mention a Nana stove .
Another (however, like the first, not significant) disadvantage of toner is due to its “brick” strength: it also gives “brick” weight. If mobile toners are made, they are made on a stand with wheels. And horizontal tints, embedded in the wall, are found as an exception. Almost a third of the “Uzbeks” go to walling up.

There is also a difference in the soils: in Central Asia they are more alluvial, alluvial, i.e. weak, and in Transcaucasia - volcanic, strong, waterproof. Therefore, earth toner has been revived in Armenia (more for the sake of saving space and space). It is made in the form of a well (see figure), and in terms of product quality it is not inferior to an earthen tandoor in loess. But trying to build one in the black soil or loam of the middle zone is a waste of time, soil moisture will get inside through any lining and ruin the entire gastronomy.
About the cauldron
Tandoor is made quite simply: a boiler with water is placed at the mouth or on it, depending on the size of the tandoor/boiler. If baking or cooking is being done and the skewers do not stick out, the water heater can be combined with cooking: the hot air above the mouth is exhaust, and the body will not give off more infrared than it can emit, so the product will not spoil. You just need to place pieces of something durable and non-flammable under the bottom of the boiler to create a gap for air to escape.
About the form and mouth
The shape of the tandoor slightly affects its fuel consumption, but does not significantly affect the quality of the finished dishes. The tandoor can be made spherical, oval, ogive-shaped (jug), in the form of an inverted cardioid, a barrel, cylindrical-conical or in the form of a straight pipe. The usual diameter of the mouth of Uzbek tandoors is 0.35-0.7 of the internal diameter of its lower back, and for tonirs it is 0.5-1.0 of the same.
Domed with a wide mouth, cylindrical-conical and cylindrical tandoors are better for baking: lumps of dough are stuck more conveniently and in larger quantities onto the inner surface of a large area. Other tandoors are mainly meat and fish, but in general the specialization of tandoors is relative. When using a skilled cook, it simply comes down to the dosage of fuel.
Making tandoor
From the above it is clear that making a tandoor yourself comes down to two options: a tonir made of brick or something like an “Uzbek” made from it. There is, however, a way to make a clay tandoor even in Murmansk, we will also dwell on that.
A brick tandoor can be built by anyone whose hands have not grown into their pockets, who can distinguish their wife’s breasts from the back of her head by touch, who can pick up an office folder with papers and bring a cup of coffee to their mouth without spilling it the morning after yesterday. The sequence of work is basically clear from the figure; we will only give some explanations.

Materials - fireclay bricks (300-1500 pieces depending on size), ready-made dry kiln masonry mixture, which is diluted with water to the desired consistency, and ordinary construction sand. There is no need for a foundation: we dig a pit two times the diameter of the base of the tandoor and as deep as the bayonet of a shovel. We fill it halfway with sand and fill it up to ground level with liquid, creamy, oven mortar. We stick an even pole or rod exactly into the middle and set it vertically along a plumb line. We secure it from the wind with temporary guy ropes on pegs. We also protect from rain with a temporary canopy made of slate or galvanized steel. Film or fabric cannot be stretched for reasons that will be clear from what is described below.
While the clay dries (this takes 1-3 weeks), we prepare the main working equipment: a rotary template according to the shape of the inner surface. In order to avoid undercuts of bricks when laying, we coordinate its shape with the size of the brick and the permissible thickness of the seams - 3-13 mm.
When the fill dries, lay out the first row of bricks on a dry surface. We carry out the masonry with butts (bricks across the masonry line; if along the bricks, they are called spoon bricks, or spoons; emphasis is on the penultimate syllable) standing up. Having laid out, adjusted the width of the seams and aligned them by turning the template a full turn, take out the bricks one at a time, dip them in clean water for a second, apply the masonry (dough-like) mortar, and insert them into place. At the end of the row, we turn the template again and level it. We work slowly, the clay solution takes a long time to harden.
In the first row we leave an opening of two bricks, this will be the vent. The same brick will go onto the beam above it, see middle pos. in Fig. We lay out the arc of the row above it from halves of brick. We put it and the subsequent rows, like the first one: first on a dry basis, and double-checking it with a template. If the template is calculated correctly, then by changing the width of the seams it will be possible to lay out all the rows with solid (solid) bricks, changing only their number in the row.
The third and all other rows will be continuous. But already from the second row, you need to try to maintain the dressing of the seams between the rows: install the first brick of each subsequent row in the middle on the seam between the bricks of the previous one, as highlighted in the right pose. Here, at the stage of calculating the template, you also need to follow the rule: the protrusion of the row inward is no more than 1/4 of the width of the brick. The second option, but less durable, is to lay the bricks with the bricks tilted in a vertical plane; then no internal lining is required.
Complete dressing will not work, because... The diameter of the rows changes smoothly. Therefore, we begin the laying of each subsequent row not from the same place as the previous one, but shifting by 1/5-1/3 around the circumference; It’s convenient to navigate around the ash pit. This technique is called dressing through rows. So we bring the masonry to the top.
Video: example of building a simple brick tandoor
Video: tandoor based on a finished insert
Commissioning
If the tandoor is also intended for baking, then after the masonry has dried (2-4 weeks under a canopy), we line it from the inside with the same masonry mortar, but with plasticine viscosity. Before lining the tandoor, thoroughly spray it from the inside with a spray bottle.
After another 1-2 weeks we begin pre-firing. First - paper, cardboard or shavings. We set fire to a handful and throw a handful at a time through the mouth until the outer wall becomes slightly warm. Then cover with a lid and let cool completely, this will take about a day. We gradually increase the heating dose over the course of 2 weeks until the water dripped onto the outer surface begins to boil, shooting out and splashing. You can’t pour too much, half a liter can ruin a tandoor that hasn’t been fully annealed!

Now it’s time for the final firing. We fill the tandoor a quarter full with standard fuel and let it burn down to coals. Add fuel in the same portions until the tandoor is at least half filled with smoldering coals. It is better to take firewood that burns out quickly, but smolders slowly (cherry, apple) so that the level of the coals approaches the mouth. Let it cool, still under cover. In this case, you need to be careful and follow fire safety rules: the hot stream of air from the tandoor will hit with reactive force. Once it has cooled down, unload the ash, the tandoor is ready for use.
Tandoor ovens
The best tandoor oven is made from a ready-made, purchased tandoor-hood in a brick shell with thermal insulation, which is also an additional heat accumulator. Its installation diagram is shown in Fig. The foundation is two rows of tongue-and-groove blocks (GGB) on a cement-sand mortar and a cushion of sand or crushed stone. Thermal insulation is the same crushed stone or vermiculite chips (more expensive, but better), mixed with clay oven mortar - “sour cream”. The masonry is made of ceramic bricks on cement-sand mortar (walls) and clay oven (under and at the foot).

And here’s another exotic option: tandoor-barbecue oven. True, only the name is derived from the tandoor: the authors of the design honestly warn that it is unsuitable for baking. However, this product has an undoubted advantage: a chimney, and it is suitable for installation not only outside, but also indoors. Therefore, it would make sense to lay out the firebox not in a cone, but like the brick tandoor described above.
The drawing and order of the “tandoor-combi” are shown on the next page. rice. It requires a full-fledged stove foundation, so this work is not for beginners. The 31st row is reinforced with a sixty steel corner. Smoke collector - made of steel from 2 mm. Chimney diameter – from 250 mm.

And yet – clay!
Now we’ll tell you how to make a tandoor from clay yourself. They say that this method was invented by specialists from military chemical and bacteriological enterprises of the USSR. This extremely dangerous production was concentrated in Central Asia - away from the center, closer to the then potential enemies with a dense population and poor medicine.
Already in the 70s, the production of this nasty thing was completely stopped, enterprises were repurposed for agricultural chemicals, insecticides, and plant protection products. Specialists who served for 8 years (a year there was 2.5) received severance pay, which allowed them to immediately buy a cooperative apartment in a regional city and, if they wanted, to retire. Of course, they immediately pulled away from the terrible climate, deadly poison and plague at hand. But they missed tandoor dishes in new places.
 The solution was found very simply: an ordinary cucumber or cabbage barrel. A very competent engineering solution: since the issue is uneven drying across the thickness of the material, it needs to be made uniform. Don't have an industrial drying chamber? We will ensure uniformity from the opposite: not by heating, but by moisture. Will the process take longer? For myself, it’s not scary.
The technology is as follows: wash the barrel and fill it with water. Let stand for 2 weeks until the wood swells completely. Then pour out the water and thoroughly coat the inside of the keg with vegetable oil. Flaxseed is best, but refined sunflower or corn will also work.
Next, we wrap the barrel tightly with rope, but so that it does not catch the hoops. We protect the coils from slipping with nails. Now we cut the hoops and remove them. We cut a hole in the bottom to the diameter of the mouth of the tandoor.
At this point, firstly, a temporary cushion must be ready, at least from bricks laid directly on the ground on dry ground. The oven solution, described above, with the consistency of plasticine, must also be prepared. Nowadays, there is no need to trample clay with your feet until exhaustion: a 1.5-2 kW hammer drill with a mixing attachment at low speeds will bring the solution to the desired homogeneity in an hour and a half.
Instead of wool, 25% by volume of fluffed asbestos was added to the solution for strength. You need to work with fibrous asbestos in the open air with full protection of the respiratory organs, eyes, face and body, but those men on demobilization also took gas masks with them with them, just in case.
The barrel was placed on a pillow, and the inside was coated with clay with a layer of 60-70 mm. Then they turned it upside down and placed it on 4-6 bricks so that there was a gap at the bottom. After 2 weeks, the harness was removed and they waited until the rivets began to fall off on their own. The last one fell off - it was dry enough to burn. The work began when the weather began to warm up in the spring: drying lasted for months.
One of the most ancient ovens known to mankind, the tandoor, not only still lives, but is also the main element for preparing national cuisine of many eastern peoples. They say that its homeland is Mesopotamia and it was originally called “tinuru”. The tandoor is easy to make with your own hands, and it is extremely economical. With the same amount of fuel (wood, brushwood, dry cow dung), you can cook several times more food than with any other device. This is understandable: our taiga does not exist in these countries. Let’s interrupt the historical excursion at this point, and let’s start making our own tandoor.
Making a tandoor from clay with your own hands step by step
It is clear that the clay of the Russian outback differs in composition from the Uzbek “living clay”, but we can use some working techniques and materials.
First, let's look at the diagram of a simple tandoor. This tandoor is located above the surface of the earth. It’s easier to make, and besides, it will allow us to somewhat modernize the design of the ancient stove by installing a blower, which makes it possible to speed up the process of processing firewood into coals, which we need for the normal operation of the tandoor. True, in our first example we use the materials closest to the proto-furnace; we will consider brick options below.

And the rest is close to the diagram shown above. And we start with the foundation, or rather, the foundation for the tandoor. Since we will have it made of clay, we need to think more about the strength of its lower part than about the serious load-bearing capacity that is needed when making this oven in brick.
1. Base
We dig a small donut-shaped groove in the ground of the required diameter in order to place the boulders in it to form the base of the furnace.

The gaps between them can be filled with cement-sand mortar, or you can simply sprinkle it with sand, which we also distribute in an even layer of 10 - 15 cm inside the formed recess. This will be the basis of our tandoor.

Sand, among other things, will act as drainage, removing excess moisture from our clay structure. And he is also an excellent heat accumulator. After all, the entire operation of a tandoor is based on the action of the heat accumulated in the oven from burnt fuel during cooking. Having leveled the top of the sand cushion, lay fireclay bricks on it strictly according to the level, as shown in the photo.

This completes the preparation of the base for the clay tandoor. Fireclay brick is almost the only modern material that we use when building a clay tandoor with our own hands. Although no. There will be some other little things that it would be obviously stupid to refuse. But, if you want to comply with traditions as much as possible, then instead of fireclay bricks, make a multilayer clay platform, reinforced in the lower layers with intertwined branches, and in the upper layers with camel or sheep wool, which can be safely replaced with horsehair.
Remember that the clay for the solution needs to be prepared. For this purpose, it is better to take frozen clay that has lain on the surface for at least one winter. Carefully sift or press it through a sieve to get rid of lumps, soak in water for 2 - 3 days. In the process, carefully knead the clay with your hands or feet. At the final stage, knead the wool into it. At worst, you can use long basalt fiber; it will not melt. You can add up to 2 parts of fine river sand. No one can tell you the exact composition of the solution. Need to try. Too much depends on the quality of the clay. You need to make from it either rollers 6-7 cm thick, or strips of the same thickness, or balls of the same diameter and, if possible, keep it for a couple of days in a cold, not dry room.
2. Walls
Make a cone from thick, preferably moisture-resistant (waxed) cardboard, as shown in the photo below.

In the lower part, it is necessary that the diameter of the truncated cone be 50 - 60 cm, and in the upper part - 35 - 40 cm. Having installed it strictly in the center of the base, gradually, without much effort, begin to cover it with clay mortar.

To prevent the cardboard cone from deforming during the process of laying out the tandoor, sand is poured inside to compensate for the pressure from the outside.
When the walls of your tandoor rise to a height of 70 - 75 cm, form a hemisphere from moistened sand, as shown in the photo, cover it with wet newspapers and add a clay solution to this model.

Thus, you will form the upper shape of the tandoor, allowing you to rationally use the internal heat.

Somewhere on the second day, when the clay has already set sufficiently, but has not yet hardened, cut off the top. To mark the cut, you can use a bucket of suitable diameter.

Don’t forget to form a blower window measuring approximately 15 x 15 cm. And if you manage to fashion a suitable clay door with a metal handle built into it for this window, then subsequently the operation of your stove will be even more efficient.

After a week, take out the sand and cardboard cone, and leave the tandoor to dry for about a week, or even two, and only after that you can fire the first fire. Yes, make sure that before all these procedures possible precipitation does not spoil your work. In fact, you need to make at least 3 fireboxes, in between them sealing any possible cracks with a clay solution, bringing the amount of sand in it to a ratio of 1: 4, 1: 5. With the same solution, with moisture, we treat the inner surface of the tandoor .

Important! Before the last test fire, lubricate the inner surface of the stove with vegetable oil. Having burned out, it will prepare the surface for frying flatbreads and other dishes on the walls of the tandoor. And before directly attaching the flatbreads to the wall of the tandoor, it is moistened.
3. Manufacturing nuances
- Insulate it additionally, increasing efficiency. This can be done with the same clay solution, but with the addition of straw or sawdust.
- Plaster the outside of the stove with something modern designed for exterior use using plaster mesh and (optional) dyes. Make an intermediate clay-sand mortar with a steel mesh and use it as a finishing mortar. This will not only give your tandoor an attractive appearance, but will also extend its life for many years.
- Make a lid, it can be from the same clay, or you can simply use a metal one, preferably insulating it on top with non-flammable material. This will allow you to further diversify your tandoor menu, turning the oven almost into an oven.
DIY brick tandoor
If you don't have the time or desire to bother with a traditional tandoor, consider a more modern version - a brick tandoor. Done right, it's not much worse than its big brother.
Since brick is not a light material, this structure requires a more massive foundation. It hardly makes sense to lay it to the freezing depth, but we would recommend providing 15 - 20 centimeters of crushed stone backfill and approximately the same amount of sand. Considering the hydrophilicity of concrete and brick, such drainage will not be superfluous.

Calculate the diameter of the base by first placing the bricks on a flat area, based on the internal size of the tandoor - from 40 to 65 - 70 cm. Make the diameter of the foundation 10 - 20 centimeters larger, depending on what the outer contour will be. The top of the concrete base must be strictly horizontal.

Next, make a template in which the internal diameter of the tandoor is repeated to the height of 2 bricks, and the upper 3rd row is made with a narrowing of 5 - 8 cm. The bricks of the internal contour are placed vertically on the edge, so that the wall thickness of this contour is equal to half a brick.

Install the template strictly in the center of the foundation, its upper part, secured in a cantilever to the outrigger pole behind the dimensions of the future tandoor.

With this option for securing the template, placing bricks will be a simple task. For the inner belt of the tandoor, it is better to use special fireclay bricks. Fill the seams with a solution based on the same fireclay, or it is better to buy a ready-made composition for laying stoves and add a little table salt to it for strength.
Also, filling the joints can be done using a clay-sand mortar with the addition of basalt fiber and the same salt. Along the outer side, the rows of brickwork are tied together with steel binding wire, preferably in two wire rings per row. The last brick of the upper tapering row is adjusted to size using a grinder with a large diameter disk or on a stone-cutting machine. The seams on the inside are carefully rubbed down so that there is no sagging of the solution. The absence of gaps between the bricks is a prerequisite for the normal operation of the tandoor.

The external brick contour can be made from any clay, or even silicate, brick on a cement-sand mortar, departing from the internal one by 5 - 7 cm, into which basalt insulation, or vermiculite, or any other non-flammable material is laid, expanded clay can also be used. The very top of the outer contour is connected to the inner one, or covers it (this is done so that the insulation layer does not get wet, which can lead to negative consequences, and will certainly reduce its role to a minimum). In this case, it is not necessary to repeat the bend of the top of the tandoor.
A modern tandoor without a blower looks archaic, so you need to make a blower. It is also possible to install a grate. It’s a very good idea to lay fireclay bricks flat on the base (at the bottom of the tandoor) in 2 rows. This will also increase the efficiency of the device.
If a brick tandoor is also used for baking flatbreads and other flour products, it is recommended to plaster it on the inside using the method and material described above. It’s a good idea to carry out the same surface preparation as for a clay tandoor. Although for some, incl. flour products, an option without internal plaster may be suitable.
Variations on the theme of making a tandoor
The two described methods for building a tandoor yourself are used most often, but there are options.
Recently it has become very fashionable to install tandoors in cafes and restaurants. Food cooked in such ovens has a number of undeniable advantages compared to more traditional methods of preparing the same dishes. Meat fried in a tandoor practically does not lose weight or volume, and is surprisingly juicy and aromatic. The same applies to vegetables, and some flour products cannot be prepared anywhere else. For such cases, an interesting option is an electric tandoor, the diagram of which is shown in the following photo.

In addition, a metal grate installed above the electric heater will prevent even an unauthorized cake from turning into coals. And the maintenance of such a furnace is greatly simplified, and the time required to reach operating mode is significantly reduced.

If you are not quite ready for the full-fledged independent construction of such a stove, but really want to, you can purchase a ready-made tandoor in a specialized store and modify it by building a base for it and insulating it according to one of the proposed schemes.

There are a lot of variations on the theme of this ancient stove. You just need to thoroughly understand the technology of its operation so as not to lose the main advantages in the creative process.
Cooking in tandoor
There are even more ways than the designs of these ovens to prepare various dishes in a tandoor oven. For this purpose, various devices are created that allow you to simultaneously cook several completely different dishes. So, instead of a lid, you can place a cauldron of the appropriate diameter on the neck of the tandoor and, in parallel with the dishes being cooked inside the oven, prepare pilaf, cook shurpa, or simply boil water for tea.
A simple device will allow you to distribute various food products in tiers so that the fat that drains during the cooking process of meat serves as a seasoning for the vegetables that are cooked with it, and the chicken does not exchange juices with the shashlik and kebab.
It remains to add that when making devices for cooking in a tandoor, it is important to remember that it is not carried out over an open fire, but when the firewood is completely burnt out. This uses the heat accumulated by the oven itself, so the temperature at the walls will be higher than in the center. Multi-level barbecue-type grills, made either on legs or on a suspension, have proven themselves well. But it is not recommended to use traditional skewers in a tandoor; the meat may simply slide off during cooking, and it is not very convenient to handle.
Therefore, they either use peaks, as in the first photo above, or special skewers with additional hooks for hanging on horizontal rods and one or more holes in the bottom. After threading the meat onto the skewer, stop pins are threaded through these holes, and the meat does not slide off it.
In general, once you try food cooked in a tandoor, you will definitely want more.
Dear readers, if you have any questions, please ask them using the form below. We will be glad to communicate with you;)
On the land, which is still used by many peoples, using it to prepare their national dishes. The simplicity of its construction and functionality is amazing. Therefore, if you want to make a tandoor with your own hands, our master class will help you with this.
Preparation for work, necessary materials and tools
To build a tandoor you will need the following consumables:
| Name of consumables and construction materials | Quantity | Price, y. e. |
| Sand and gravel | 150 kg | 10 |
| Cement grade M400 | 50 kg | 6,2 |
| Mesh for masonry with a cell of 5 cm (for an area of 1 sq. m) | 2 pcs. | 3 |
| Fireproof (fireclay brick) | 50 pcs. | 30 |
| Asbestos fiber | 5 kg | 6 |
| Water-based, acrylic, fire-resistant paint | 1 l | 5 |
| Fireproof masonry mixture | 20 kg | 4 |
| Fiberglass reinforcement Ø 6 mm | 15 m | 3 |
| Steel wire Ø 3 mm (the main requirement for it is that it should bend easily when twisting is formed) | 15 m | 5,8 |
| Total | 73 |
To work you will need the following tool:
- container for mixing construction mixtures (concrete, mortar, facing mixture);
- plastering rule;
- spatula (width 12 cm);
- paint brush (width 10 cm);
- grinder with diamond cutting wheel for ceramics.
Making a foundation for a tandoor
Despite the fact that the tandoor is a lightweight stove structure, it will be installed in the open air, therefore, a solid foundation is needed for it.
First, determine the type of soil; if you have heaving, heavy (clayey, loamy or lowland) soils, then they need to cast a reinforced foundation. A columnar foundation will solve this problem. If the soil is light (sandy loam, sand or soddy-podzolic), then you can simply cast a monolithic concrete slab.
The base of a standard tandoor is 100x100 cm, the thickness of the monolithic foundation slab for such a structure is 10 cm. We select soil along its perimeter to a depth of 15 cm, and in the corners of the slab we use a drill to make recesses to a depth of at least 70 cm and a diameter of 12-15 cm.
We reinforce the resulting holes (as a reinforcement rod we recommend fiberglass reinforcement with a diameter of 6 mm, connected by a quadrangle), and fill it with concrete. Concrete is prepared in a ratio of 3:1:1 - for three parts of sand, take one part of gravel (with a fraction diameter of no more than 1 cm) and one part of cement of a grade not lower than PC 400. The consistency of the batch should resemble thick sour cream (more liquid forms porous formations , and a thicker one will not fill all the voids).
We fill the recesses 5 cm above the level of the bottom of the pit. This can be done using formwork 5 cm high, laid on the bottom. To simplify the installation of formwork, you can use container tape, rolling it into a ring or any similar material.
After this, we pour sand onto the bottom of the pit, which will act as a damper cushion. The height of the sand layer should not be higher than the formwork of the recesses. Then we spill the sand generously with water so that there are no cavities in it, and lay the formwork for the monolithic slab on top.
As formwork we will use a 15 cm wide edged roofing board (10 cm in the ground and 5 cm above the ground). We lay a reinforcing mesh on the sand cushion (ideally, if you secure it 5 cm from the level of the sand cushion). Be sure to level everything using a level and then fill it with concrete.

Concrete sets for at least 72 hours, during which time we will prepare the rule and bricks of a certain shape.
Laying the tandoor base
We will use refractory (fireclay) brick as the main building material for the tandoor. It is dense enough not to absorb moisture during temperature changes, and, as a result, practically does not collapse under the influence of seasonal temperature fluctuations.
The base of the tandoor is a circle; to form it, we draw a circle according to the pattern (diameter 75 cm). Then we lay out the bricks, numbering them in order so as not to get confused, and using a cutting wheel we carefully cut off all the excess from each brick.
We lay roofing felt on the concrete base to waterproof it from groundwater.
As a connecting solution, we will use a refractory oven mixture for fireclay bricks (sold in any specialized store). The usual clay-sand mixture cannot be used because it:
- quickly cracks due to temperature changes;
- does not form a rigid adhesion with fireclay bricks.
Mix the mixture thoroughly and then apply it to the roofing material using a spatula. We lay scraps of bricks on top of the mixture, according to their numbering.

Making “rules” for tandoor
Now we make a rule for laying walls, as indicated in the photo above. According to tradition, the width of the base of the tandoor should be equal to its height, while the neck should be 1/3 smaller than the base.
Therefore, we collect the following size rule:
- pole height - 1 m;
- base length 30 cm, second level 25 cm and third level 20 cm;
- step between guides 25 cm;
- a piece of plywood was used as a pattern for the vertical wall (you can use a bed slats on which the mattress is placed).
Raising the walls of the tandoor
All bricks are laid upright. Therefore, the strength of the installation of the first row is very important for the entire work.
We place the bricks on the base of the tandoor, place the inner edge closely, and coat the seam with mortar.

After the first row is laid out, we tighten it with steel wire. We twist its ends and hide them in the seam between the bricks (the wire will remain on the tandoor).
We lay out the second row in the same way. However, starting from the second row, the bricks will have to be cut (every other) into a wedge.

At the same time, we also lay the inner end faces as tightly as possible, and carefully coat the outer edges with the solution.
After the third row has been laid out, we begin to plaster the tandoor with the stove mixture.

The total layer of plaster on top of the tandoor must be at least 10 mm. We form the upper edge in the form of a roller.

After the layer of solution has dried (at this time the tandoor should be covered with cellophane film from the rain and shaded so that it does not dry out from direct sunlight), we cover it with acrylic fireproof paint, although in the East it is customary to whitewash the tandoor.

Once the solution has completely dried (no earlier than 72 hours), the interior of the tandoor is cleaned of build-up, dirt, etc. - it is best to do this with a hard broom.

The tandoor is ready. You can fry flatbreads and serve them to your guests.
Anyone who likes to relax in the countryside cannot help but love barbecue. What could be tastier than meat grilled over charcoal, topped with a fragrant sauce, and flavored with a pinch of oriental spices? The answer is simple - only meat baked in a brick tandoor.
A brick tandoor is a Turkish oven that allows you to cook simply incredible kebabs. The secret is that the meat is baked as evenly as possible. A similar effect can be achieved due to the balanced distribution of heat.
You've probably had to deal with a situation more than once when some pieces of kebab are fried to a black crust, while others are almost raw. The fact is that the coals under the skewers are unevenly located and also have different temperatures. The result of such baking is obvious.
A brick tandoor is a completely different matter. The unique design of the oven allows you to forget about undercooked meat. Each piece will be exceptionally tasty and crispy. Moreover, you can not only bake lamb, veal or pork in the tandoor. You can make delicious oriental flatbreads in it. Which will not only pamper your family and friends with exquisite taste, but will also be healthy.
What is tandoor

This furnace is similar to most structures of this type, but has some differences. The main material of the inner surface is ceramic. Coal, brushwood or firewood can be used as fuel.
In appearance, a brick tandoor resembles a clay jug lined with brick. The fuel is placed directly inside and ignited. As soon as the wood turns into coals, the kebabs are placed inside the tandoor. They can be placed with a sharp end on the foundation or hung by a hook on a pre-prepared perch.
Important ! The undeniable advantage of a brick tandoor is its long-term heat retention. This allows you to make more than one batch of delicious baked meat.
This stove came to us from distant Mesopotamia and later became extremely popular among the peoples of Asia. As a result, it’s hard to imagine many oriental cuisines without this miracle machine.
How does it work

Let's look at an example of a classic Uzbek tandoor made of brick. In appearance, such a stove can be compared to a clay cauldron. Only they turned it upside down, changing the top and bottom places.
There is a special hole at the bottom, it is also called an inlet. The clay base is traditionally covered with bricks. A small layer of air forms between the clay base and the brick. It needs to be filled with salt or sand. The first option is preferable.
Coal is placed inside through the top hole. There are also versions of a brick tandoor with a side hole, but in the traditional Uzbek version, such a design is practically not used.

Important ! A DIY brick tandoor has one significant drawback. The ash has to be removed through the top hole, and this is not very convenient (this does not apply to portable structures).
For greater convenience in preparing shish kebab, the Uzbek version has a special grill. Of course, you can just as easily put vegetables or pieces of fish on it. Equally good baking is guaranteed.
Attention ! If you make a brick tandoor correctly with your own hands, then you can cook food in it for 6 hours after one kindling.
The secret of such incredible heat-saving characteristics lies in the materials used to create the structure. All of them have phenomenal heat storage properties. With due diligence, the furnace walls can be heated to 400 degrees Celsius.
If you are preparing flatbreads and not meat, the walls will first need to be cleaned of soot and ash that may have accumulated from previous heating sessions. It is in a brick tandoor that you can cook the now popular Uzbek flatbreads.
Types of tandoor

The type of tandoor primarily depends on the location of its installation. Depending on this parameter, the following varieties are distinguished:
- pit tandoor,
- portable tandoor,
- ground tandoor.
We will consider the process of building a ground-based brick tandoor. The fact is that a pit tandoor is mainly used for heating rooms, and a portable one is a kind of variation of a regular barbecue.
Step-by-step instructions for building a tandoor
Preparation

Any important project begins with preparation. Of course, from the point of view of construction science, a brick tandoor cannot be called a complex structure. However, to create a stove that is durable and easy to use, careful preparation is necessary.
The preparatory process begins with collecting the necessary materials. Since there are several brick tandoor designs, the basic set can vary greatly. In our case it includes:
- one hundred and fifty kilograms of sand and gravel mixture;
- mesh (each cell 5 cm) - two square meters;
- six or seven kilograms of cement M40050;
- asbestos fiber - six kilograms;
- fireclay bricks 50-70 pieces;
- fireproof paint 1 liter;
- fiberglass reinforcement six millimeters in cross-section (at least 15 meters);
- fireproof mixture for masonry - 20 kilograms;
- steel wire with a cross-section of 3 millimeters -15 meters.
When the entire set of materials for creating a stove has been assembled, you need to take care of a set of tools. Most of them can be found in the utility room of any country house, but some will still have to be purchased. To build a brick tandoor with your own hands you will need:
- plaster rule
- container in which concrete will be mixed,
- putty knife,
- Bulgarian,
- diamond wheels for working on ceramics,
- paint brush.
As you can see, the list of necessary tools is not very long. Assembling this kit is not difficult.
Foundation

A brick tandoor will work outdoors. Therefore, he needs a reliable foundation that can ensure a stable position of the structure. A lot depends on the soil on which the building will be built. If the soil is clayey, a reinforced foundation will be needed.
The best option for working on heavy soils is a columnar foundation. If the soil is light and consists mainly of sand, simply cast a monolithic concrete slab. This will be more than enough.
The area of a brick tandoor will be 100 by 100 centimeters. To support such a structure, the thickness of the slab must be at least 10 centimeters. Along the entire perimeter of the foundation, soil must be removed 15 cm deep.
Important ! In the corners of the future slab, you need to make recesses of 70-90 cm. Their diameter should be no more than 12-15 cm.
After the holes are drilled in the corners, they need to be reinforced. Here we need diameters of six millimeters. Finally, the steel structures are poured with concrete.
The recipe for creating concrete of the required consistency is as follows: take three parts of sand, add one part of gravel (fraction size up to 1 cm) and the same amount of cement of a brand no worse than PC 400. As a result, the mixture will resemble thick gray sour cream.

It is very important to correctly calculate the amount of solution needed for pouring. It is best to focus on the pit. To prevent discrepancies in levels, use formwork. Place it on the bottom of the pit five centimeters high. To avoid wasting time knocking together wooden structures, take container tape.
You need to pour sand at the bottom of the pit. The height of the layer cannot exceed the height of the formwork. The sand is watered. This helps prevent the formation of cavities. Only after this can the formwork for the monolithic slab be laid.
Important ! The layer of sand in the foundation plays the role of a damper cushion.
The formwork for a monolithic slab for a brick tandoor, built with your own hands, is best made from ordinary roofing boards. Their width should be exactly 15 centimeters, ten of which are buried in the ground, and only five rise above it. A reinforcing mesh is laid on the sand.
Important ! Before pouring concrete, everything must be leveled using a level.

The setting time of concrete is at least 72 hours. Ideally, you should wait seven days before installing the tandoor oven on a new foundation. If pouring occurs in the summer, then the foundation must be moistened with water from time to time to prevent drying out and, as a result, the formation of cracks and chips.
Base

For the base you need fireclay bricks. Please note that the combustion temperature of coal is very high and ordinary red blocks of baked clay may simply not withstand such a load.
Fireclay brick not only has outstanding fireproof properties, it also does not absorb moisture and is quite dense in order to withstand the weight of the tandoor.
Another important advantage of fireclay bricks is its resistance to temperature changes. That is why it is ideal for creating an outdoor tandoor oven. Such bricks tolerate frost well and do not crack with the advent of warming.

The base of the oven should be made in the shape of a circle. To do this, take a suitable pattern and outline it with chalk. The diameter of the pattern is exactly 75 centimeters. Place the bricks in order. And only at the end, using a cutting wheel, cut off unnecessary parts and corners, forming an ideal base.
Attention ! Place the required roofing material on the concrete base. It will provide reliable waterproofing.
Take the refractory oven mixture for fireclay bricks and mix it thoroughly. Next, use a spatula to apply it to the roofing material.
Rule
The rule for masonry is made with the expectation that the brick base of the tandoor should correspond to its height. The ratio of neck to base is 1/3. To assemble the rule you will need a pole at least one meter high. Base length 30 cm.
Attention ! The step between the guides should be 25 centimeters.
To make a pattern, take a piece of plywood. The bed slats are ideal. The part on which the mattress is placed.
Making tandoor walls

Bricks must be laid vertically. Therefore, you need to spend a sufficient amount of solution so that the structural elements are firmly held together. The inner edges of the tandoor bricks should be close to each other.
Important ! All seams must be thoroughly coated with the solution.
The first row of brick tandoor is tied together with steel wire. After the structure is fastened, the ends of the wire are twisted and hidden in one of the seams. The same needs to be done with the second and third rows.
In the second row of a brick tandoor built with your own hands, the bricks are cut into wedges. In this case, the internal edges are laid as tightly as possible, the external ones, in turn, are carefully coated with the solution.
After the construction of the main brick tandoor structure is completed, you can begin plastering. To do this you will need a special oven mixture. Its thickness should not be less than 10 mm. The upper edge is made in the form of a roller.
Wait for the layer of plaster to dry. For this entire period, the brick tandoor is covered with cellophane film. This precaution is necessary to protect the structure from harmful external factors such as rain and direct sunlight.
Important ! Excessive heat can damage an unfinished brick tandoor just as much as high humidity.

After the plaster has hardened, you will need to cover the surface with acrylic fireproof paint. You can also use whitewash. Before use, it is necessary to clean the interior of the brick tandoor from dirt and deposits. A special broom is ideal for this job.
Unlike the barbecue and grill fireplaces that have become traditional for a country house, a tandoor made with your own hands from brick allows you to additionally bake flat cakes, boil water or cook pilaf in a cauldron without additional equipment. It has the shape of a cylinder, ideally a barrel or large jug.
The main advantage is the high efficiency of fuel combustion, high-temperature processing of products and a long service life. However, the unusual placement of kebabs (vertically, not horizontally) did not allow this fireplace to gain a sufficient rating, like that of a barbecue grill and a barbecue grill.
To build a tandoor with your own hands on the site, you need to know what dishes this hearth is intended for, the temperature conditions and design features. There are tandoors buried in the ground and structures raised above the surface. 
Depending on the qualifications of the home craftsman and the availability of power tools in his arsenal, a cylindrical “barrel” or a jug-shaped structure is constructed. Usually a simpler version of the classic barrel with arched sides is chosen.
Assortment of dishes
The main task of an outdoor fireplace is to prepare dishes during a reception or family vacation in a country area. However, the tandoor is quite suitable for regularly baking bread/cakes, preparing large meals, side dishes, and boiling water. Therefore, it is considered a full-fledged summer kitchen.
Information on how to build a brick tandoor in the yard should begin with the assortment of dishes:
- flatbreads - require the skill of fixing the formed dough on the inner surface of the hearth;
- kebab - skewers are arranged vertically in a circle, so special devices are needed to fix them in a “pot” or “barrel”;
- barbecue - by analogy with the previous dish, the grate must somehow be placed in the “well”, and then safely removed without getting burned;
- first courses - cooked in a large cauldron placed on the neck of the tandoor;
- shish kebab, roast - are also prepared in a cauldron in a similar way.

If necessary, you can boil water for tea in a large-format saucepan on this fireplace.
Temperature
Using different sizes and shapes of the inner surface of the hearth, it is possible to ensure a temperature inside it of 250 - 400 degrees, which is unattainable for barbecues and grills by default due to significant heat loss.
Initially, an earthen tandoor looked like a pit in which firewood turned into coals, and the wind could not blow out the flames. Then the walls began to be made of clay, which turns into ceramics when fired at high temperatures.
There are vertical and horizontal tandoors, however, it is the first designs that are considered multifunctional. The horizontal barrel hearth is more suitable for industrial baking of flatbreads.
Dimensions external and internal
For the above reasons, the construction of a tandoor must take into account the following factors:
- ease of maintenance - firewood and food are loaded inside, and the ash is removed out through the same neck;
- dimensions - the standard for a tandoor is 1 - 1.5 m in height, 1 m in diameter in the middle part of the barrel and a hatch 0.4 - 0.6 m in diameter, reinforced with a metal ring.

To preserve heat and increase efficiency, additional masonry is usually erected around the tandoor (a well or a square of 4 walls), the space between them is filled with refractory material (expanded clay, slag).
The quality of the combustion process can be improved by a blower from below, and operation by a chimney on the side and an ash chamber under the grate (only for ground-based tandoor structures). The neck is sealed against bad weather with a sealed lid. 
Even with occasional use of the fireplace, the brick is exposed to extreme temperatures. Therefore, it is better to use refractory fireclay, and make the outer structure from ordinary or facing ceramic bricks.
Brick tandoor technology step by step
Any brick structure erected on the ground is subject to the forces of frost swelling and shrinkage, since it has a significant weight and is made of small-format structural elements. Therefore, a brick tandoor must be based on an individual monolithic slab foundation.
There are several masonry options, each will be discussed below in detail. After which, the internal walls of the structure are necessarily coated with clay. It is also better to plaster the outside of the tandoor with clay and fill the space between the decorative outer masonry and fire-resistant material that is not subject to frost heaving. Therefore, clay is not suitable for this; slag or fine expanded clay (sand) is used. ![]()
The tandoor is decorated at the discretion of the owner. If necessary, a chimney, a cutting table, a washbasin/sink are attached to the fireplace, and the structure is equipped with a weather canopy.
With an uneven increase in the volume of clay soil, which has absorbed moisture in the fall and frozen at subzero temperatures, the masonry will inevitably crack. In addition, the organic matter in the fertile layer of chernozem/serozem will rot underneath it, and the heavy structure will sag. Therefore, the tandoor foundation is made using the following technology:
- soil extraction - the topsoil layer is removed entirely (usually 0.4 - 0.6 m deep), can be used in landscape design or in beds, ideally it is better to dig a pit 20 cm larger around the perimeter of the outer masonry to a depth of 0.6 m;
- separating layer - the bottom of the pit is lined with geotextiles, which prevents mutual mixing of the soil with non-metallic material poured on top of it;
- the underlying layer is a “foundation cushion” made of a layer of crushed stone with a fraction of 5–20 mm, each 10–15 cm layer is compacted using a manual tamper or vibrating plate;
- waterproofing - crushed stone is leveled with a thin layer of sand, on which a waterproofing membrane or pieces of rolled bitumen material are laid in one layer with an overlap of 10 cm along the edges of the sheets;
- reinforcement - since the structure is mounted on a shallow foundation and has a large weight, two lattice reinforcing belts made of bars of periodic section (“corrugated”) with a diameter of 6 mm, a cell of 20 x 20 cm should be used;
- concreting - layer thickness 8 - 15 cm depending on the budget, the formwork should be 10 cm higher than the surface of the concrete so that the structural material does not spill over the edge when compacting the depth with a vibrator or a piece of reinforcement;
- care of concrete - the surface is covered with a plastic film or sawdust/matting, periodically moistened with a watering can for at least two days.

Attention: To provide a protective layer for the reinforcement, the bottom grille is laid on waterproofing, on polymer or concrete pads 2–4 cm high. It is prohibited to use scraps of reinforcement and pieces of crushed stone.
If the external decorative masonry is designed in the form of a square, classic panel formwork is used on 4 sides. For masonry of a ring shape and a foundation under it of a similar configuration, the boards are not suitable. Therefore, the formwork is constructed from thick fiberboard or sheet steel strips.
To increase the service life of the masonry, it is better to raise the upper edge of the foundation above ground level by at least 5–10 cm.
Brickwork
The main mistake a home craftsman makes is making a ring-shaped first row of tandoor for the following reasons:
- the foundation is, in principle, not intended for high-temperature exposure;
- making refractory concrete at home is very difficult and not economically feasible;
- therefore, the ring masonry of the first row should be filled entirely with brick, and the seams should be clogged with masonry mortar;
- “under” a brick stove will last much longer than concrete, and it is easier to remove accumulated ash from it.

Depending on the budget of the home craftsman and the skills of the mason, masonry is carried out in several ways using various devices. Regardless of this, in the second row a hole is left for the ash pan door, through which the corresponding combustion products will be removed. The “blower” hole is located slightly higher, but under the grate. The metal hoop is mounted on the neck of the last row of masonry.
First, the tandoor itself is laid out, then decorative walls of the required configuration are erected, and expanded clay sand or slag is poured between the two structures.
Attention: Instead of cement-sand masonry mortar, it is better to use special mixtures for stoves or clay packaged in bags containing special additives to increase plasticity.
Cylinder
The easiest way to make a tandoor is in the shape of a cylindrical well. However, with a diameter of 1 m, a whole brick with a spoon is unsuitable for this. It will be difficult to cover the inner surface with clay, which is later fired into ceramic. When doing masonry by pushing, twice as much material will be used, which is very expensive for the construction budget. 
Therefore, a brick split in half or installed vertically with a spoon or poke is used. A cylindrical fireplace is easier to maintain, but retains heat less well.
Barrel
It is more difficult to make a brick tandoor in the shape of a classic barrel with convex sides, narrowing at the bottom and top. But the temperature inside such a fireplace is higher, lasts longer, and the internal volume and wall area for attaching the cakes increases. 
The arched shape of the vertical walls of the tandoor is considered more durable, which makes it possible to increase the service life of the structure. For laying stoves of this configuration, it is recommended to use devices, since it is impossible to control the arc with a plumb line and a rule.
For the home craftsman, it is recommended to pay attention to the domed tandoor made of fireclay bricks, which is easy to make on your own. Since refractory bricks are easily cut with abrasive angle grinders, such a design is quite accessible for self-production. 
From halves
In principle, an ordering scheme is not needed for a tandoor, even if it is supplemented with a chimney. When using halves of standard bricks, they are laid with a poke, taking into account the following nuances:
- along the internal diameter of the masonry, the width of the joints is 1 cm maximum;
- the outer diameter seams are additionally filled with mortar;
- Depending on the configuration of the internal surface, a brick tandoor is laid out with your own hands using the following devices.

Attention: In this masonry option, it is easier to choose the size of the holes for the ash door, the vent hole and the chimney. 
You can watch another video on the topic:
Vertical spoon
When using any brickwork made from edge-on bricks, it is recommended to use 4 full rows in the tandoor. This corresponds to 1.04 m in height; when choosing the “well” shape, the bricks are absolutely parallel to each other, the two lower rows of the “barrel” expand outward, the upper ones narrow inward.
These technologies require order drawings to correctly place the grate, the chimney and ash pan openings, and the ash pan door in the internal space, as in the bottom photo. 
Vertical spoon is called masonry in? bricks on edge. This is a budget version of the tandoor, practically unsuitable for the cylindrical shape of the hearth. In a “barrel”, such masonry is strengthened due to the self-wedging mutual arrangement of individual elements in space and relative to each other.
Here is a video on how you can also make a portable structure:
Vertical poke
For this technology, step-by-step instructions look like this:
- trimming the ends of the bottom row - a wedge of 1 - 2 cm is cut off from one corner;
- installing bricks on edges close to each other - the last brick should jam the ring, so it should be cut to the appropriate shape;
- masonry of the second row - the upper and lower ends are trimmed with a wedge.

When installing the third and fourth, last, rows, the operations are similar to the previous ones, but in a mirror image. In principle, it is not necessary to cut the brick, laying the mortar with a wedge for each row. In this case, it is necessary to use a special device - a template.
Devices for ring laying
Before a novice mason makes a tandoor on his own, it is recommended to study devices that dramatically reduce the labor intensity of the work and improve the quality of masonry to a professional level. The main ones are:

The last device rotates freely in a circle, allowing you to control the geometry of the masonry at all its levels.
A simpler version of the tandoor is the design of a dome inside a well. The lower part of the dome is laid out in a circular masonry of halves to a height of 0.5 - 0.6 m. Then the ring rows are narrowed with each row until a neck of 0.5 m is obtained. 12 - 25 cm are retreated from the finished structure, a cylindrical well is laid out without narrowing. The gap is filled with refractory material, a chimney pipe and an ash door are installed. 
Reinforcement and coating
When placing a tandoor in the ground, only its inner surface is coated with clay mortar. 
For a ground-based structure, the outer surface should also be coated, as in the lower video.
Reinforcement is made with a soft mesh, which can be bent according to the configuration of the hearth:
- spray is applied to the brickwork without leveling the mortar;
- after 5 – 7 minutes the mesh is pressed into this layer;
- then the next layer is applied to level the surface.

The photo can be enlarged by clicking on it
Filling the space between the main hearth and decorative masonry is possible after the mortar has completely dried.
Earthen (pit) tandoor
When building a homemade brick tandoor below ground level, you should take into account the following nuances:
- the diameter of the pit must be at least 80 cm larger than the design size of the furnace;
- for convenient maintenance, it is better to raise the neck above the ground by 15 - 20 cm;
- refractory bricks for tandoor will dramatically increase the service life, since the structure of the underground hearth is practically irreparable;
- the grate is not used here, the ash is removed through the top, a blower is absolutely necessary;
- external masonry of a square, ring or rectangular shape is not needed; these walls are replaced by the soil itself.

After coating and reinforcing the outer walls, all layers of clay mortar and concrete must dry within half a month. The clay is then fired for 3 to 8 hours. Ideally, when tapping the inside of the fireplace, a ringing sound should be heard.
Only after this can the pit be backfilled. Moreover, not with extracted soil, but with non-metallic material, in which the forces of frost swelling cannot arise. 
Sand, slag and crushed stone are suitable for these purposes. However, the first material has capillary suction at negative pressure, so in 90% of cases crushed stone is used. Non-metallic material is compacted using a manual tamper.
Attention: Waterproofing the tandoor from the outside is not necessary, since with intense heating it will collapse and create an unpleasant bitumen odor.
Decorating the hearth
Decorating the outer surface will allow you to make your own tandoor attractive when entertaining guests or to satisfy the aesthetic needs of family members. There is no need to decorate facing bricks, however, to reduce the construction budget, ordinary ceramic stone is often used.
Its surface can be coated in several ways:
- coat with fireproof mortar and sink decorative natural stone of any size into it;
- putty and cover with acrylic paint that is not afraid of moisture and ultraviolet radiation;
- faced with tiles or porcelain stoneware.

There is no point in decorating a pit tandoor, since the structure is recessed into the ground by default.
To improve operating comfort, additional functions are used:
- canopy – protection from precipitation;
- countertop - cutting food;
- washing – ensuring hygiene;
- woodpile - storing fuel in close proximity to the fireplace;
- ring with slots for placing skewers.

Thus, the construction of a tandoor is much more complicated than a barbecue grill and a barbecue oven. However, the temperature regime of the hearth ensures a high speed of cooking and a wide range of dishes, not inferior to a full-fledged summer kitchen.