

-
Choose your clay. Once you've chosen the method you'll use, you can choose the type of clay. Most clays require kiln firing, but most new brands can be fired in the oven. If you just want to play with the wet clay, don't even worry about firing it. Basic rule: wet and dry clays will not work together - be sure to make sure the clays are the same consistency.
- If you are going to fire clay, make a choice between high-temperature and low-temperature firing.
- Low temperature firing is most suitable for vibrant colors and detailed designs. Glazes are very stable at this temperature, the colors remain bright and do not shift during the firing process. The disadvantages are that the pieces are not completely vitrified (the clay does not completely fuse), so you will have to rely on a glaze to make the piece waterproof. This makes such products less suitable for use as cookware or for storing water. Since the glaze did not interact with the ceramic, as happens during high-temperature firing, there is a high probability of glaze chipping. However, when using the right clay and glaze, the latter can be quite durable. The clay used for low-temperature firing is called pottery clay.
- Medium and high temperature firing uses clays called finestone or porcelain. Vibrant colors can still be achieved in oxidizing atmosphere (electric) ovens, and to a lesser extent in reducing atmosphere (gas) ovens. After firing at temperatures where the product itself is waterproof, greater strength is achieved and such products can be used as tableware or ovenware. Porcelain can be made very thin and still have sufficient strength. At these temperatures, the glaze interacts with the clay shard to create colorful and unique pieces that many people find interesting. Typically the glaze will move (either a lot or slightly), so the detailed design will be blurry.
- If you are going to fire clay, make a choice between high-temperature and low-temperature firing.
-
Prepare yourself and prepare your work area. Working with clay can be messy, especially if children are involved. Cover areas you don't want to get dirty by placing a tarp or newspaper on the floor, or working in a garage or outbuilding.
- Never work in clothes that you are afraid of getting dirty. If you have long hair, tie it back. This way they will become less dirty and will not get into your eyes.
Shaping on a potter's wheel
Prepare the clay. Air bubbles on an otherwise perfect piece can have disastrous consequences, so get rid of them before you begin. Knead or roll out the clay with your hands in small portions - start with a portion that fits in both of your palms.
- Knead the clay like dough, form it into a ball and hit it, placing it on the plaster (it absorbs moisture well). Repeat the operation several times until the bubbles disappear. If you are not sure whether there are any bubbles left, split the ball in half using a wire and inspect it.
-
Start the circle. Using a little force, drop the clay into the center of the circle. Since you are just starting out, use no more than a large handful of clay at this time. Wet your hands in a plate of water, which should be placed close, and begin to shape the clay.
- Begin to pull the clay mass upward. Grasp the clay with your hands and begin to squeeze upward.
- At each stage of working with clay, make sure that your elbows are pressed against your inner thighs or knees, whichever is more comfortable for you. This will help you keep your hands steady when you work.
- Begin to pull the clay mass upward. Grasp the clay with your hands and begin to squeeze upward.
-
Center the clay. Using this method, the clay is spun to a perfectly smooth state, without bumps or beatings. Once you have the cone, you are ready to work further.
- Push the tower with one hand and hold it with the other. If you are right-handed, then press the tower with your right hand: the main force is directed from above.
- Once the clay looks like a wide piece at the surface of the circle, begin to level the sides by applying pressure to them. There may be some clay on your left hand - just set it aside.
-
Form the product. Specific instructions end at this stage - each product (plate, pot, etc.) needs to be shaped differently. But regardless of the type of product, make deliberate and slow movements - the circle should make about 5 revolutions before you complete each movement. All clay in 360 degrees must receive the same treatment to ensure the product is round. Remove accumulated water with a sponge.
- When you're finished, scrape the piece with a wooden knife and smooth the surface with a scraper.
- Please note: if everything goes wrong and you mess up the clay mass, then you should not try to make a ball out of it and try to repeat everything. The clay will not take on the desired thickness the second time and will not be moldable in the future.
Modeling by hand
-
Make sure there are no bubbles in the clay. If you put a clay piece with bubbles in the oven, there is a chance that it will explode. As outlined in Shaping on the Potter's Wheel, hit the clay on top of the plaster (it absorbs moisture) and roll it out like dough.
- If, to be sure, you want to check the mass from the inside, then take a wire and cut the mass in half. If the bubbles do not disappear, continue working.
-
Use the pinching, tape or sheet technique. There are three techniques you can use to sculpt ceramics. Products obtained using each technique have their own characteristic appearance. The sheet method is best suited for large items.
Applying glaze
-
Fire the clay at least once. After that you can apply icing on it! Get access to a kiln if you don't have your own and let the professionals take care of the rest. If you have your own oven, be sure to double check that you can operate it correctly and find out what the requirements of your product are.
- Different clays react differently to heat. Read the instructions on the clay package and do a little research online. Also take into account the dimensions of your product.
-
Choose your frosting. As with any step, there are many options. Each type of glaze will have its own distinct look.
- Slip: You can buy glazes and underglazes in slip form, which are usually created for brush application. All you need to apply this glaze is a brush. Some glazes are difficult to apply with a brush to achieve a smooth layer; As a result, marks will remain on the product. Others will melt well enough that the brush marks will disappear.
- Dry: You can purchase glazes in powder form, which are usually created to be applied by dipping, pouring, or spraying. In addition to a brush, you will need a bucket, some water, something to stir and a mask to avoid inhaling dust. The benefit of dipping is that you can get a more even glaze coverage, and you can do interesting techniques that you can't do with a brush, like double dipping, which allows you to get different colors on the same piece. More advanced people apply glaze by spraying, since it requires good ventilation, a spray gun, a compressor, an application booth, etc.
- Do it yourself: This is the most advanced form of icing work. Guided by recipes, you buy the raw materials yourself and mix them. Among other things, you will need recipes, which can be found in books and on websites. You will also need the chemicals used to make the glazes, a scale, a sieve, and an experimenter's spirit. Sometimes your glazes won't come out quite right. You will need to learn how to modify these glazes to solve problems that get in your way. Sometimes the results will be amazing.
-
- Be sure to dry the clay completely before firing it. Otherwise, cracks may appear in it or it may explode.
- When carving designs into the clay, wait until it becomes as hard as leather. Also, don't "scratch" by making deep, thin cuts. Make the cuts wide enough for their depth.
- If you are working on a piece for several days, store it under a plastic bag overnight to prevent it from drying out too quickly.
- Clay forgives mistakes, but working with it during prolonged contact with water or with significant manipulation can cause you to get tired and lose your mood.
- Always dry the clay completely before firing. The moisture in the clay turns into steam, which when released from the clay causes the pot to explode.
- An easy way to make small animals is to make small balls and connect them, then smooth out the attachment points.
- Sometimes colleges will give you enough clay to play with for a bit. They may even let you work in their studio.
- Ideally, you'll want to find someone who has at least a little experience to teach you. This is a very practice-based process, so it's important to have someone around who can lead by example and interact with you. This guide is intended as a reminder or rough instruction, but in reality, the position of the hands is different for each sculptor.
-
- When you're finished, scrape the piece with a wooden knife and smooth the surface with a scraper.
Select a method. It's important to do this first because the method determines the type of clay you'll be working with. Don't rule out choosing clays that require a kiln - if you're serious about this hobby, you can buy a small home kiln. The following is a summary of the methods and their corresponding clay varieties:
Polymer clay was invented relatively recently. Masters have known about this material for no more than half a century. Today, sculpting with it is a very popular hobby for amateurs and a professional activity for experienced designers.
Buying polymer clay a couple of years ago was very problematic. Residents of various Russian cities ordered it from the capital or from other countries. Now almost all art salons or craft stores offer such plastic, where it lies next to knitting yarn, dyes and floss that are familiar to us. You can make many interesting crafts from this amazing material. These are not only souvenirs, but also a huge number of other things that will decorate our lives. You can also decorate a mug with polymer clay, a master class for which is described in this article.
Principle of operation
Today, polymer clay is one of the most common materials used for handicrafts. Craftsmen are attracted by its elasticity and non-toxicity. In addition, the crafts made from such material look simply fantastic.
You have decided to decorate the mugs. Then you should learn how to work with this material. Half the success of your event will depend on the right choice of polymer. It is worth keeping in mind that ordinary self-hardening clay can be used to decorate mugs and other dishes. However, this material hardens in air after a certain time, which is not enough for beginners to give the product the required shape.

What is the best thing to buy in order to decorate a mug with polymer clay? The material can be of any variety. The main thing is to study the instructions and learn the rules of handling it.
Brands of polymer clay
Today, art salons and handicraft stores offer their customers many varieties of material. Which one should you buy to decorate your mug with polymer clay? Let's take a closer look at the brands of this material:
- A domestic manufacturer offers St. Petersburg plastic called “Tsvetik”. This is the cheapest option, but it is somewhat difficult to work with. Tsvetik brand products are quite hard and easily soiled. However, a person who has patience and skill can make beautiful things out of them.
- In order to decorate a mug with polymer clay, you can buy material from the German manufacturer Cernit. For some, it may seem, on the contrary, too soft in work. However, many craftsmen are attracted by the quality and color range of this plastic.
- The most popular brand in our country is “Fimo”. It is produced by the German company Eberhard Fabe. There are several varieties of this polymer. So, “Fimo Classic” is harder. The Fimo Soft brand is soft and easy to knead. Both types of material are available in a wide range of colors. The manufacturer offers polymer clay with glitter, transparent, and also glowing in ultraviolet light. All these types are perfect for those who decide to decorate a mug with polymer clay.
- Some craftsmen use material brought from America. This is polymer clay of two brands - “Kato” and “Scalpi”. It is not offered in Russian stores, but those who were able to purchase it need to be prepared for a fairly strong smell of the material, similar to the smell of Soviet gouache. In terms of its other qualities, this polymer is similar to other brands.
- A whole line of polymer is offered by Poliform Products. But this material is usually chosen by sculptors.
In addition to solid plastic, all of the above companies produce liquid plastic, which is a gel. This is a viscous transparent material that hardens after heat treatment. Decorating mugs and spoons with polymer clay can also be done using gel, the possibilities of which are also endless.

Before you buy this amazing material, you should choose the product that will be decorated. Based on its color, you will need to decide on the tone of the plastic. Let there be two or three of them to begin with. Among them there should be a white block that can be used to dilute more saturated colors.
Varnish
If you are decorating a mug with polymer clay, how can you make the finished item more attractive? To do this, it should be varnished. This will give the mug gloss and greater expressiveness of the colors. In addition, varnish is necessary to enhance the strength of the item. In addition, it fixes the tinting paint on it.
What types of varnishes are there for plastic clay? The manufacturer offers matte, semi-matte and glossy coating materials. Such varnishes are sold in construction stores. What can you do to make a mug with polymer clay decor look most attractive? Experienced craftsmen advise purchasing acrylic water-soluble varnishes with a polyurethane base. This material is practically odorless, dries quickly and is easily washed off the brush. Within a day, a mug with polymer clay decor, coated with a similar varnish, will become resistant to mechanical damage and moisture.
Those who are doing this kind of work for the first time should remember that before applying varnish, the surface should be washed with dishwashing detergent or degreased with alcohol, and the coating process itself is best done with a synthetic brush.
Working surface
How to prepare for sculpting with polymer clay? To work with this material you will need the smoothest possible surface. This could be glass or ceramic tiles, or a simple sheet of white paper. The main condition for such a surface is the absence of pores into which plastic can eat.
Knives
The polymer clay block must be cut into pieces of the required size. To do this, a craftsman decorating a mug with polymer clay (see photo below) will need knives.

They should be sharp enough. This will prevent the product from deforming during cutting. To decorate the mug, a regular or blade can be used.
Rolling pins and stacks
These tools do not have to be purchased at art stores. Stacks when working with plastic can be knitting needles or toothpicks.
In order to roll out plastic, many amateurs take a glass bottle. Other material at hand is also suitable for these purposes, which could be, for example, a bottle of hairspray or deodorant.
Gloves
After heat treatment of polymer clay, fingerprints of the master may remain on it. To ensure that the product is neat and does not waste unnecessary time polishing it, you must wear latex gloves. You can buy them at any pharmacy. Sometimes they are not very convenient when sculpting, but they greatly increase the quality of the work done.
Gloves should be selected according to hand size. After all, the tighter the latex adheres to the fingers, the more convenient it is for the craftsman to decorate the mug.
Other
What other materials will be needed to complete the planned work? In general, in order to make a thing from thermoplastic, you can use:
- special shapes (cutters) with which shapes can be easily cut out;
- a special syringe (extruder) equipped with various nozzles;
- pasta machine;
- texture sheets;
- powders, etc.

However, all this can be bought after you understand that sculpting products from polymer clay is your calling.
What a beginner needs
As a rule, girls decorate mugs with polymer clay. A master class on carrying out such work begins with an explanation of what beginners in this business should prepare:
- the mug itself;
- nail polish remover or glass cleaner;
- polymer baked clay;
- wooden skewer or toothpick;
- clean wet cloth;
- epoxy-engesive glue;
- stationery knife;
- varnish for plastic clay.
Preparatory stage
So, you have decided to decorate your mug with polymer clay. How to do this kind of work with your own hands? To begin with, you should take some boring mug, which should become bright and original.

It should be laid on the surface in such a way as to make working as convenient as possible. For this, you can use, for example, a baby blanket.
Beginning of work
If your idea is to decorate a mug with polymer clay, how to make this work? First, cut a piece of plastic to the required size. Next, you should knead it thoroughly. Only in this case will the clay become soft and plastic. To improve the working properties of the material, you can use a special product. It's called a plasticizer. Experienced needlewomen advise purchasing Moldmaker brand products. A few peas of this product are enough to soften a whole pack of clay. Alternative materials may include Vaseline or creams. The warming procedure is also suitable for softening.
It happens that clay, especially fresh clay, sticks very strongly to your hands. In such cases, experienced craftsmen mix it with a harder brand or leave it on a sheet of paper for several hours. However, it is worth keeping in mind that all the above-described manipulations will not help the material into which paint has already been applied.
It is very important that there are no air bubbles left in the clay. This will damage your product in the future. When heated, the air will expand, which will warp the plastic.
After this, you should take a cotton swab and, moisten it in nail polish remover or glass cleaner, wipe the surface of the mug. After that we make an applique on it.
Baking
A mug with an applique made of polymer clay should not be afraid of water, fade or lose its original appearance over time. To preserve all these qualities, the product must undergo heat treatment. What device is suitable for this? To bake polymer clay, use a gas or electric oven, as well as an electric mini-oven. Microwaves are not suitable for this purpose. The hardening process of polymer clay occurs only when exposed to high temperature. The principle of heating food in a microwave is to create waves. However, exceptions to the rules are possible here too. Some models of modern microwave ovens are equipped with a function that allows you to set the required baking temperature. If such a possibility exists, then clay can be placed in this household appliance.
What else should you consider when decorating a mug with polymer clay? MK (master class) involves accurate monitoring of the temperature indicated on the clay packaging. Exceeding it will cause the material to begin to burn and release toxic substances. As a rule, this temperature ranges from 110 to 130 degrees. That is why it will be very convenient for the master if the oven he uses has a built-in thermometer. The clay does not bake for long. The hardening time for the application applied to the mug is ten minutes.
End of the process
After heat treatment, the mug should be removed from the oven. You need to carefully separate the baked applique from it. Next we need epoxy glue. It is made independently, adhering to all the requirements of the instructions. A thin layer of glue should be applied to the back of the completed application, as well as to the mug, which we wipe again with nail polish remover or glass cleaner. After this, the applique is pressed tightly against the mug and subsequently adheres to it very well.

At the next stage of work you will need a matte or glossy varnish. They cover the finished application. The varnish will protect the surface of the product from damage.
How does the application behave in operation? A cup made in this way can be safely washed. But you should not put it in the dishwasher or use abrasive products on the decor.
Recently, it has become very fashionable to make dishes and various interior items from clay with your own hands. We at the How to Green editorial office decided to figure out the reasons for the popularity of handmade ceramics, and turned to ceramic artistElena Subbotina . She named as many as 7 reasons (in addition to the obvious - creative self-realization and acquiring new craft knowledge) why it is worth making dishes for the home and various small items for the interior with your own hands.
Reason 1: uniqueness
Obviously, you can make a 100% unique set or tea pair for your kitchen either to order or with your own hands. Doing it yourself will be much cheaper. You have the opportunity to bring to life the most daring ideas and make exactly what will fit perfectly into your interior or will be suitable as a gift for a loved one. And not only the design you need, but also the size you like. So it’s up to you to decide whether you’ll drink tea at home from huge cups and saucers, like in Tim Burton’s Alice in Wonderland, or from delicate tiny ones, like Kirsten Dunst’s heroine in the movie Marie Antoinette. By the way, making dishes for the home with your own hands is also convenient because, by creating, say, a service in the same style, you won’t have to overpay for soup or dessert plates that you don’t need, and then think about where to store them in your small kitchen. You will make for yourself only those plates, bowls, cups and mugs that you need and will use.
Reason 2: environmental friendliness
Did you know that some factories still use hazardous materials, including lead and cadmium, when making tableware? Lead glazes are very beautiful; the content of this metal gives the product a special shine. The amount of lead, of course, is small, but using this glaze is strictly prohibited. It is not recommended to even store dry food in such containers, let alone pour hot soup into a bowl of lead. In some countries there is a law that prohibits the use of lead in foodware in any quantity. However, in Russia, China, Africa, and the countries of the Southeast region, there is often no strict control over manufacturers who neglect the issue of ethics and consumer health, since purchasing bright, glossy, lead-free glazes is much more expensive in large-scale production. So think ten times before you buy a cheap, bright cup or bowl. Why do you need dishes that poison you with harmful substances? By creating your own pottery, you can control which materials and glazes you use to create your plates and cups. By the way, ceramics can be bright and without colored glazes at all. There are natural colored clays: blue, green, black, and even ordinary light types have a beautiful natural color. In order for the products to be functional and not allow water to pass through, they must be covered with colorless or white glaze, but you can completely refuse colored glaze or choose safe, proven options.
Reason 3: replenishment
If suddenly careless guests or you yourself dropped your favorite mug and broke it, it’s okay. Your service will not suffer from this, because you can always make a couple more plates or cups. The same is true in the case of a new addition to your family - the birth of a baby or the marriage of a beloved brother. You can always make the missing set of dishes in a couple of hours. If you went on a trip, you probably noticed very interesting interior items - large vases, picture frames, candlesticks. Sometimes things are so beautiful, you just fall in love with them, but taking them with you from a trip is difficult and too troublesome. And why? It’s enough to take a couple of photos on your smartphone and, when you return from vacation, make copies of your favorite interior items or dishes, but in your own style and to suit your tastes and needs.
 Photo: ceramics studio Ceramic Forest
Reason 4: quality
A fairly common story: you bought beautiful dishes from an online store, but they turned out to be of poor quality. The bright pattern on the mug began to peel off after washing, and knife marks appeared on the plates. When producing your own dishes, especially in a ceramic workshop under the supervision of a master, such excesses are excluded. First of all, you will be taught how to handle clay correctly and will be explained the sequence of the technological process that will make your dishes high-quality and practical. So you can put it in the microwave and wash it in the dishwasher without any problems. There is no risk of cracks or peeling paint.
Reason 5: saving the family budget
If you haven’t decided to produce a whole set, but just for the sake of interest, you took an introductory course on ceramics and made a couple of mugs, then even this knowledge will be enough for you to begin to understand tableware, types of clay and glazes, and the artist’s skill. If suddenly in a store a saleswoman begins to assure you that a pair of coffee costs 20,000 rubles because it is rare blue clay, then you can safely clarify whether it is natural or just an artificial color (a pigment mixed into ordinary white clay)? Dyed clay carries no value and you are paying solely for the brand. Expensive ceramics stores also like to use stamping. This means that the shape of the products is not unique: the patterns that are applied to them can simply be printed, and not drawn by the master. It’s another matter if you see on a market somewhere in the mountains of Andalusia a designer jug made of expensive materials, unique in shape and painted. You will immediately understand how much work the master has put into it and why it costs a decent amount. By the way, if the author of this work of art is suddenly exhibited in some gallery or museum of modern art, then the purchased jug can also be sold at a profit to collectors.
Reason 6: the issue with gifts has been resolved
Unique DIY ceramics are also exclusive gifts for family, friends and colleagues. You can personalize the dishes, leave initials on them, create any images and write wishes. For example, if you have unique lace left from your grandmother, then you can make an entire service with a unique print based on it. Thus, each family member will have a memory printed on a mug, plate, dish or teapot. Clay is an amazing living material that allows you to bring any idea to life. We use ceramic products every day, so these gifts are not only beautiful and unique, but also very useful for any person, regardless of their gender and age. By the way, it is not at all necessary to give dishes as a gift. You can create almost anything from ceramics. For example, floor tiles are an excellent gift for renovating the bathroom in your beloved mother’s apartment. Other interesting options:
- ceramic handles that will transform an ordinary stamped wooden chest of drawers into a real work of art for the chest of drawers;
- decorative sculpture, for example, for the garden;
- pots for indoor or garden flowers;
- tray;
- whistles for children;
- brooches for friends;
- soap dish and other bathroom accessories.
 Photo: ceramics studio Ceramic Forest
Reason 7: additional income
After you learn how to make dishes with your own hands, make all the necessary plates for your own home, and give gifts to your friends and colleagues, it is quite possible to monetize your favorite hobby. Create, say, an online store on Instagram and produce unique dishes in your own style to order. By the way, the most popular are craftswomen with a fairly narrow specialization, who make, for example, beautiful openwork cake stands, unusually shaped mugs, or fruit dishes with unique designs. Who knows, maybe one day you will make plates not only for your beloved man or relatives as a gift, but also for an entire restaurant.
Where to make your own dishes?
You can make your own cookware at home. To do this, you will need the necessary materials - clay, stacks, glaze, and so on. You can fire finished products at home; for this, there are furnaces that are suitable for a voltage of 220 W. But they are quite expensive - from 100,000 rubles. Therefore, at the initial stage it is easier to carry out firing in special kilns in ceramic workshops. They usually accept items not made by them for firing without any problems and for a very reasonable fee. Before purchasing materials for your home, we would recommend that you take an introductory course on working with clay from a specialist. Typically, ceramic workshops offer different options. Depending on the amount of information, such training will take you from 2 hours to several days and will cost from 2-3 thousand rubles, taking into account the cost of all materials. If you haven’t yet decided what exactly you want to make from ceramics, it makes sense to purchase a subscription to the workshop and attend master classes that interest you. It will be easier and cheaper than immediately taking long, expensive courses. Typically, such master classes are held for several people at once, so you have an original option for spending leisure time with a friend or loved one.
By the way, you can make all the dishes that you see in the photo in this article with your own hands already in the first lesson...
Experienced potters create such beauty in just ten minutes that you are amazed. But is it possible to make beautiful ceramics yourself?
What kind of clay is needed
To make ceramics you will need natural clay - this is the main ingredient. Glazes, varnishes, pigments and enamels will be needed to coat the finished ceramics and color them in the desired color.
Natural clay is:
- White - after firing, the product acquires the color of ivory, in the original state of clay it has a grayish tint;
- Red – the color is due to iron oxide. The clay molds well, is convenient and easy to work with, and turns red after firing.
- Blue – used in medicine and cosmetology.
There are also porcelain and dark brown clay, but we will focus on the first two types.
Basic methods of making ceramics
There are different technologies for making clay products:

Clay crafting
This section will be of interest to parents who want to keep their children busy with useful and educational activities. And clay modeling develops motor skills and imagination, and will keep the most restless child occupied.
For adults, clay sculpting can be a fun and refreshing hobby. 
Helpful Tips:
- Cover your work area with plastic wrap.
- There should be a container of water, a dry towel and a wet sponge nearby.
- The main condition for successful work is plastic clay. If you see that cracks have appeared on your product, cover them with liquid clay. If the clay crumbles, brush it with a wet brush until the material becomes plastic.
Polymer clay is popular - it consists of PVC and plasticizers.
There are two types of polymer modeling material:
the first requires firing at a temperature of 110C;
the second is self-hardening, the products do not require heat treatment.
Pottery according to all rules
To make round pottery you will need a potter's wheel. There are foot and electric controlled circles. Various modifications are manifested in faceplate dimensions, rotation speed, power and engine type.
Working on a pottery wheel requires basic skills and dexterity. For beginner potters, modeling and pouring slip paste is suitable. What we will talk about next.
Slip casting
Clay of liquid consistency is used and is poured into plaster molds. In words, everything is simple, but in practice, ceramic products crack and are of uneven thickness. Let's take a closer look at the technological process using the example of pouring a simple mug. 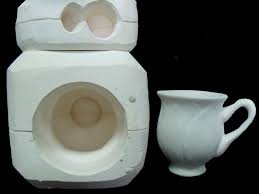
Why plaster molds?
Plaster absorbs moisture, it will draw excess moisture from the clay slurry. It’s easy to work with plaster; you can make a homemade mold, giving it the required pattern and size.
Solid or collapsible forms?
The configuration and type of mold does not affect the quality of the ceramics, only the simplicity and convenience of removing the product from the mold. It is easier to remove the finished product from a collapsible mold. 
Requirements for clay slip:
- A liquid solution without impurities, large particles and debris is used. Before cooking, sift the dry clay, remove debris, etc.
- Strain the finished slip through an old nylon stocking.
- The thicker the solution, the thicker the walls of the mug will be.
Pour the solution into the mold
Attention! Problem! Air bubbles in the clay solution affect the strength of the product. You need to pour the slip along the wall of the mold, like beer.
Now we wait. You will see how the walls of the future mug appear along the contour of the plaster mold. The optimal wall thickness is 5-6 mm. If you see that the slip has become less, add more. When the walls have the required thickness, you need to drain the remaining solution.
How to do it right?
Carefully pour the remaining slip out of the mold. Use a knife to cut the sides of the mug flush with the mold. You can’t just turn the mold over and put it upside down: a droplet will form at the bottom. You need to leave the mug at an angle.
When the clay has set and become hard, remove the product from the mold. The fact that the mug is ready is indicated by the fact that it has begun to peel off from the plaster mold. If it is a collapsible form, then remove the bottom and separate the parts of the form.
Not only mugs and cups are made using the shlinker casting method, but also souvenirs and gift ceramics. 
You can buy ready-made forms for pouring in hardware stores or online.
Ceramic tableware
There are good reasons to start making your own ceramic tableware:
- Uniqueness - original dishes that you would like and suit you in all respects, you can buy to order or make it yourself. But homemade options will cost several times cheaper.
- Quality and environmental friendliness. Not all purchased ceramics are pleasing with their quality and durability: cracks and chips appear, and after a month the design becomes not so bright and clear. Some manufacturers use harmful substances - lead and cadmium. Lead glaze looks beautiful, but it is not environmentally friendly.
- Savings and even the opportunity to earn extra money. A beautiful service costs money, but you can do it yourself.
There are different technologies, a simple way is to sculpt a plate or bowl with strands. As shown in the photo below, you can sculpt a lot of interesting things with ropes. 

The main thing is that the clay must be plastic; any cracks must be covered with slip. Securely glue the fragments of the future plate to each other.
- After this, use your fingers or a stack to remove the excess and give the bowl the desired geometry.
- All cracks and irregularities are covered with slip.
Final decoration
Decoration is carried out depending on your imagination. The pattern can be cut out with a toothpick or a needle. You can use improvised means to make an interesting impression on clay that has not yet set.
Basic requirements for such modeling
The bottom should not be too thick, otherwise it will crack during firing. The edges of the bowl should not be thin: chips and damage are inevitable.
All cracks and crevices are covered with liquid mortar.
Jewelry ceramics
Have you heard of ceramic jewelry? Is it possible to make them yourself? Jewelry ceramics is a material consisting of crushed and compacted particles of non-metallic materials from inorganic chemistry.
In furnaces, the material is fired at a temperature of 1600 degrees, after which the material becomes durable, resistant to scratches and mechanical damage. Light weight and strength are the advantages of jewelry ceramics.
No matter how much you would like to, it will not be possible to make durable ceramic jewelry using technology.
Bottom line
Making ceramics with your own hands at home is a feasible task. The main thing is desire and a little patience.
How to make ceramic dishes with your own hands, watch the video lesson - courses on ceramics
Ceramic vases, pots, tea sets, candlesticks, plates, whistles and even musical instruments - you can create all this yourself.
To learn how to make ceramics with your own hands, the main thing is desire. Before becoming a ceramicist, try making a simple trinket out of clay, and you will understand whether it is worth spending money on buying equipment for the work. If something doesn’t work out, it doesn’t matter, soak the scrap and make a new figure out of it; before baking, the product can be modified endlessly.
What is ceramics made from and where to get materials for work
Ceramics is fired clay, which is the main material in the work of a ceramist. In contrast, natural is of natural origin; it is extracted from the bowels of the earth without subjecting it to chemical or other types of processing.

Experienced craftsmen, in order to save money, extract and prepare raw materials themselves. This process involves several stages and is unlikely to deserve attention if you are just starting out and live in the city.
Clay for making ceramics must be greasy and free of pebbles and other debris, otherwise the craft will crack during baking. The finished mass is stored under certain humidity conditions.
Natural clay happens different types:
- White is the most common, initially has a grayish tint, and after heat treatment it acquires a pleasant ivory shade.
- Red – contains iron oxide, which gives the raw material a greenish tint. The main color of the raw material is brown, after firing the products become red. It lends itself well to modeling, does not crumble, and is ideal for sculptures and large items.
- Porcelain – gray when raw and white after baking.
- Blue - more often used in cosmetology and folk medicine.
- Black or dark brown ceramic mass is the hardest clay, taking on an ivory hue after being kilned.

Also clays for ceramics classified by temperature processing for low-melting, medium-melting, refractory.
It is most convenient to buy ready-made pottery clay, focusing on the fraction size, color after firing at different temperatures and other characteristics and quality indicators. The cost depends on the manufacturer, packaging, texture. There are ready-made masses with additives for various tasks - modeling, molding, potter's wheel.
In addition to clay, you need glazes and enamels to coat products, pigments to give hand-made ceramics the desired shade, special additives to improve properties and heat treatment.

Used for gluing parts slip mass- a kind of glue made from diluted clay. If you simply connect the elements, they may fall off when heated. All this is sold in specialized stores for ceramists.
Methods for making ceramic products
There are several ways to transform clay into a beautiful ceramic product.
Modeling- the most affordable way to make ceramic products with your own hands at home. Souvenirs, sculptures, dishes, toys or other crafts are sculpted by hand, as if from plasticine, helping themselves with special stacks or improvised devices.

Pottery requires a rotating circle. With the help of this ancient craft, vases, jugs, pots, plates, and cups are still created today.

Cooldown– the easiest option for making ceramics for beginners. The work uses a plaster mold, into which soft clay is placed, and after hardening, the figured product is removed. Plaster molds are attractive because they absorb excess moisture, helping the clay product to harden and dry.
Casting– forms are also used here, but of a different type. The diluted clay is poured into molds, the blanks are dried, removed and painted.

Clay crafts gain strength only after firing - processing in pottery kilns at temperatures from 900 to 1300 degrees. Finished souvenirs are coated with acrylic paints or a special glassy glaze for ceramics. In the case of glazes, another firing is required after coloring.
If you want to get a natural shade, use milking - cover an unpainted baked ceramic figurine with milk in several layers and bake again at lower temperatures.

Pottery kiln - types and preferences
Previously, kilns for firing ceramics were furnaces dug in the ground and heated exclusively with wood. Modern pottery kilns come in gas, electric and wood. The latter, as a rule, are made by hand and are suitable for use in private households. In apartment conditions, it is most convenient to work with electric ovens; for larger volumes, you can choose a gas oven.

The metal body of such furnaces contains a refractory brick or other material that retains heat and is not afraid of heat. Ventilation holes are provided to remove moisture; the ceramic firing process is controlled by a program controller. Electric pottery kilns are not a cheap pleasure. The price depends on the manufacturer, volume, power.
There are models with vertical and horizontal loading and bell-type ones on sale. According to the type of location of the heating element, pottery kilns are divided into muffle and chamber kilns. IN muffle it is located around a container made of refractory material (muffle). In chamber heaters, the heater is located inside, which reduces heat loss and makes the equipment more economical.

With a little effort, you can make a kiln for firing ceramics at home with your own hands, using refractory bricks and something for the body, for example, an old washing machine.
Baking is the most important process that does not forgive mistakes. Sometimes even experienced craftsmen see a worthless defect instead of the expected masterpiece. The products are never taken out immediately; they must cool in the oven.

How to choose a pottery wheel
Pottery wheels are needed for sculpting round objects, so you don’t have to buy this tool right away. If you are just learning ceramics, start with sculpting or kneading. Circles come with manual, foot and electric control.