

Having conceived the construction of such a structure, you should immediately take care of the plan, which must be drawn up in full accordance with the dimensions of the future structure and its geometry. This will help you accurately create an estimate for all the necessary materials.
As an example, we offer step-by-step instructions for building a gazebo with a barbecue in various ways. This will help in organizing your own construction and will set the right direction for the entire event.
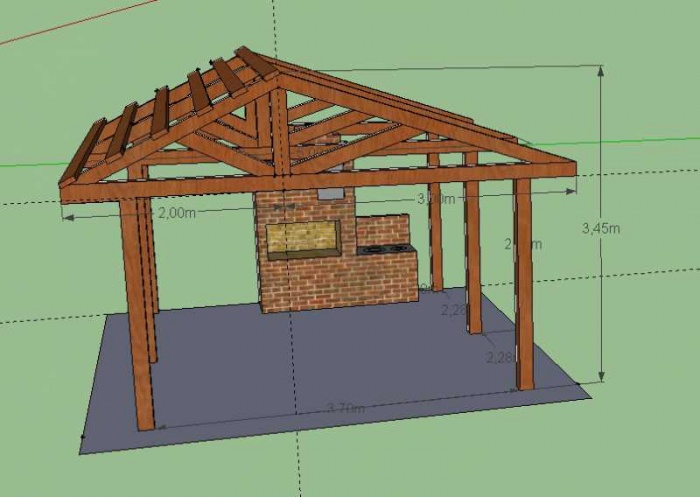
DIY wooden gazebo with barbecue
And first we will look at an example when the gazebo is made of lumber and the grill is made of brick. Immediately important advice: look for 6-meter timber and board. There will be much less waste this way.
The first point in building a wooden gazebo with a barbecue with your own hands is choosing a building site and its configuration. We take into account several important points:
- Entrance the entrance to the house and the entrance to the gazebo should face each other (this is more convenient for setting the table).
- We respect the rules fire safety. There will be a barbecue with an open fire in the gazebo; you should not build it very close to the house.
Having decided on a place, we outline with the help of construction sand circuit foundations of the building. Our drawings of a gazebo with a barbecue suggest that the gazebo will be octagonal, and the base for it will be in the shape of a circle. You can “draw” a circle using a pipe fixed in the ground and a rope tied to it.
In our case, the fertile soil layer was only about 20 cm thick. Behind it was excellent clay soil. The building is relatively small, so concrete pillars were chosen as the base. It is better to select the soil underneath and replace it with a sand-gravel mixture. This way you can equalize the height.
Material for bottom trim serves as a beam with a cross section of 100x100 mm. To avoid mistakes with cutting angles, use a cardboard template. To install cross beams, it is better to use a 50x100 board. To make the harness more reliable, it can be fastened with metal corners from the inside and outside. Galvanized 105x105x90x2 mm at 135 and 90 degrees are perfect. Don’t forget about the waterproofing layer of roofing material between the base posts and the trim.

Do-it-yourself gazebos with barbecue step by step photos
Floor in the gazebo it is made from edged boards 50x100. Immediately cut out the required amount of material to size. It is better to plan the front side of the board with a plane, and treat the inside with an antiseptic (preferably in several layers). We secure the floor with a screw and be sure to check the bottom trim again using a level. 
Upper harness It’s more convenient to build at the bottom. This will make it more convenient to adjust the locks and rafter lengths. We use the same 50x100 edged board as the material for the rafters and top trim. 
In our case, a wooden gazebo with a barbecue with your own hands has octagonal roof. Therefore, the rafter lock will also be octagonal. We make it from 100x100 timber. Pay attention to the placement of supports under the timber. To install them, the octagon had to be enlarged using boards 1.5 cm thick. 
Do-it-yourself gazebos with barbecue. Photo
Let's move on to production rafters. We make a triangular cut at the lower attachment point. We will use it as a lower lock. 
Like the upper ligament, we also assemble the rafter structure at the bottom. It will be easier to correct minor bugs. 
Our drawings of a gazebo with barbecue include the installation of ten support pillars. We make them from 100x100 timber. To make it more convenient to install them, we saw off the ends exactly at an angle of 90 degrees. We attach the pillars to the base of the gazebo using corners 105x105x90x2 mm made of galvanized steel. We check the structure using a level. In our case, installation of slopes was not necessary. 
DIY gazebo with barbecue. Photo instructions
Now we are installing the rafter system and the top trim. For fastening we need:

Roof made of inch boards 100 and 150 mm wide. Let's lay it close; We start from the bottom and go in a circle to the top point of the structure. For ease of marking, we use a cardboard template. It makes it easier to mark the cutting line. We fasten each board with two screws on each side. This way the roof does not deform over time. 

Let's not forget about brick grill with your own hands, which will be located in the gazebo. We dig a hole under the foundation of the barbecue, 40 cm deep. 
Formwork can be made from boards from transport pallets. 
Covering the formwork roofing felt. The most convenient way to do this is with a construction stapler. 
We place reinforcement (10 mm rods class A3) and reinforcing mesh (d=4, 100x100 mm) in the hole under the foundation. We fill the foundation with a mixture of cement and construction sand in a ratio of 1 to 3. Cement grade M 250 is ideal. In our case, 5 bags were needed. 
After this, you can sew up the gazebo around the perimeter log simulator 45x146 mm. This will not only make the building more attractive, but will also add rigidity to the frame. 
Window sills made from boards 50x100 mm. To secure them, we use corners 50x50x40x2 mm. This part of the design is optional, but it will make the gazebo more comfortable for guests. 
Reasons benches made from 50x50 timber. We fasten them at an angle to the walls using corners 50x50x40x2 mm. This is the most durable and ergonomic design option.
The material for the manufacture of the upper part of the benches is a tongue and groove board 28x121 mm. To increase strength, all benches are connected at the ends with 80x40x2 mm plates.
To visually divide the gazebo into two functional zones, we decorate the grill side wooden lattice. 15x20 mm timber is well suited for its manufacture. 


DIY wooden gazebo with barbecue. Photo
At this point, work on the gazebo comes to an end and you can move on to construction brick grill with your own hands.
The simpler the design, the easier it is to install it without errors. Therefore, it is better to use simple drawings of a brick grill without any frills. For construction you will need:

For proper and accurate masonry, a number of conditions must be met. Firstly, the solution should not be too thick. Once installed, the brick should be easily adjustable by hand. Secondly, the ideal seam has a thickness of 3 mm. This must be achieved so that the structure is as durable as possible. Be sure to maintain the same thickness of the seam throughout the entire structure. Thirdly, you can't rush. The laying is carried out strictly according to the level. With this, the step-by-step instructions for building a brick grill in a wooden gazebo can be completed. The entire sequence of masonry is clearly visible in the photographs.

Brick grill in the gazebo. Photo
All that remains is to cover the roof bitumen shingles(red Shinglas tiles were used in the example) using nails and a construction stapler, and also treat the gazebo with antiseptic and varnish. Apply the antiseptic in two layers. Glossy yacht varnish works well as a varnish. 

Brick gazebo with grill and barbecue
For those who are more of a mason than a carpenter at heart, we offer step-by-step instructions for building a gazebo with a brick barbecue. Let's skip the steps of finding a location and marking the structure. All this was described above. Let's get straight to the point.

Construction of a brick gazebo with barbecue. Step by step instructions
The brick structure will weigh quite a lot, so this time foundation must be made solid and reinforced. After it is ready, we lay the walls. 

The rafter system can be made in the same way as for a wooden gazebo.

It is better to lay out the first row dry.

We are constructing firewood. It will also be the basis for the barbecue and smokehouse. 
We continue to lay out the brick barbecue with our own hands. Next up is the firebox and tabletop. If desired, you can arrange a niche for dishes.

DIY gazebo with barbecue. Step by step photos
For the cauldron we need to install stove. Below is an option with removable rings.

The barbecue base is ready. It's time to lay out the tabletop fireclay bricks.

We definitely use it in masonry refractory mixture.

The next stage of building a gazebo with a brick barbecue with your own hands is the organization chimney and forming a channel for the smokehouse.

In our gazebo there will be Russian stove. We form a pod for her.

Each row must be reinforced wire.

We put up the walls at the same time. We check the accuracy of the work using a level.

We finish the stove vault.

In our case, the back wall of the oven had to be pulled out.

The work will take quite a lot of time, but the progress will warm the soul.

We continue to build a brick barbecue with our own hands. Installing doors smokehouses We finish the arches over the barbecue, hob and stove.

You can always entrust the stitching to an assistant.

Can be installed above the stove stainless steel mesh. In the future, it will be good to dry berries and mushrooms or dishes on it.

We have already described how to sew up a roof.

Do-it-yourself gazebo with barbecue and barbecue. Photo
This concludes the step-by-step instructions for building a brick barbecue. The gazebo-barbecue complex is ready for delivery.

We supply water to the sink from behind the gazebo. It can be covered for the winter.

pipe we make it three-channel. This way the traction will be more stable.

Do not forget to cover the entire masonry with a special impregnation with water-repellent effect.

It will take about a week to dry the structure. At this point, the construction of a gazebo with a brick barbecue with your own hands is completed.

Homemade brick grill. Step by step instructions

DIY barbecue. Blueprints
We begin the construction of a brick structure by installing a strong foundation. We select the size in accordance with the size of the future barbecue.


We dig a pit at the chosen location. We arrange formwork along its edges (it can be made, for example, from boards from pallets). We pour concrete and reinforce the base. It will take 1-2 weeks for complete hardening.

Base ready and you can start building the barbecue.

Drawing up drawings and plans is useful. They will help you create an accurate estimate. Here is a sample list of required materials:
- Fireproof brick;
- Wire for masonry reinforcement;
- Sand and cement;
- Corners made of galvanized metal;
- Mesh or reinforcing bars;
- Lime.


DIY brick grill. Photo
To carry out preliminary calculations, lay out the bricks as they should lie in the structure. Now it is clear where the masonry seams will be and how many halves and quarters of brick will be needed.

The material absorbs moisture very well. Therefore, it is better to put it under a brick waterproofing material. A couple of layers of roofing felt will do just fine.
It's time to start building the barbecue.

Cooking solution. To do this, mix cement, sand and slaked lime in a ratio of 1:3:0.25. We will lay the prepared brick on top of the resulting mixture.

Masonry will require care, attention and patience. We monitor the seams and level the bricks.

The technology of work requires laying rows in checkerboard pattern. We focus on the first row, start laying from the corner, gradually filling the side space.

The grill will be exposed to high temperatures. Therefore, it is better to lay the second row using a clay-fireclay mixture.

To make a base for the brazier, you need to install rods fittings between opposite walls. The base of the firebox is installed on them. For example, it could be a metal pallet.


The combustion process requires a constant supply of oxygen. To do this, it is necessary to leave several gaps in the firebox masonry without mortar.

All that remains is to install the grate on the rods or protrusions (depending on the masonry of the barbecue) and select the tabletop.


Brick barbecue in the country
A brick barbecue is an ideal option for a summer cottage. This is a simple, convenient and reliable design that looks quite presentable.
We offer a detailed guide that will help even a person inexperienced in construction to build such a structure in the shortest possible time.

The first stage of work is drawing up detailed plan. We will provide only an approximate diagram of the structure. You must take into account the features of your own stove, its appearance, decorative elements, etc.

Arranging a brick grill. Photo
Don't forget about the niche for firewood and coal. We calculate the place for the grill at a height of 65-70 cm from the ground. The stove should be placed 10 cm lower.

Laying bricks for a barbecue. Photo
After working with a pencil and ruler, you can move on to the practical part. As in previous instructions, we start with foundation.

The same foundation is suitable for a barbecue as for a barbecue. This is a monolithic reinforced base. We dig a pit about half a meter deep for it. Cover the bottom with a layer of a mixture of gravel and crushed stone, water it and tamp it down.

We install the reinforcement and form the frame. All that remains to be done is the formwork. Now you can proceed to pouring the base with concrete.

The foundation will take up to two weeks to dry completely. A little patience and you can move on to building a brick barbecue.

Fireclay brick is an ideal option for masonry ovens. It won't hurt your pocket too much, but is quite durable and can withstand high temperatures. We prepare cement, construction sand, and red clay in advance. They are necessary to create a solution. Fill the clay with water ahead of time and leave it there for several days.

Having prepared the solution, you can proceed to masonry. We work slowly, according to plan, laying out row by row. We constantly check the masonry using a level.

First we lay out pedestal barbecue ovens. It should not be too high (up to 70 cm).

We lay out the second row, shifting the beginning of the tier by half a brick.

When you reach the stove, keep in mind that its depth must be at least three bricks, and its length must be at least six. We use fireclay bricks. We install reinforcement bars on the ceilings.

The next stage is construction chimney. If the diagram is drawn up correctly, then there will be no problems. When laying rows, do not forget to make a “chimney tooth” on the back wall of the stove. It will significantly improve the draft in the pipe.


All that remains is to add decorative elements and clean the masonry from splashes of mortar and other construction debris. You can decorate your barbecue using paint applied to the brick. This will visually highlight the seams of the structure. In general, the design is already completed and can be used for its intended purpose.


Do-it-yourself barbecue from a barrel
If there is not enough space on the site to set up a gazebo with a barbecue, you can always make a barbecue out of a barrel with your own hands. For this we need:
- Metal barrel (preferably food grade);
- Paints and varnishes (primer, paint);
- Brackets and loops for fastenings;
- Chimney pipe.

We will install the barbecue on a special structure. To make it we will need small diameter pipes (up to 50 mm) and boards. During the work you will need the following tools:
- Drill with a set of drills;
- Angle grinder;
- Measuring tape;
- Set of wrenches;
- Fastening elements (clamps, bolts).
The preparation process is complete and production can begin. We cut it in the side of our barrels rectangular hole as shown in the photo. 
Now we need 6 pipes small diameter. If they are concreted, then we cut them using a grinder. From 4 pipes we will make the legs of the structure on which the arbecue will stand. 


Barbecue from a barrel. Photo
We use the remaining two pipes to connect each pair of legs. We use bolts to secure the structure.

They will also record the position of our barrel. The length of the pipes is adjustable depending on the size of the barrel. The result should be a structure of two parts, each of which will consist of a pair of legs and a connecting pipe.
To connect two parts, you need to take 5 boards 150-200 mm wide. We use four of them to fix the legs (two boards on each side). We fix one board at a height of 5-10 cm from the ground. The second should be slightly above the middle of the legs.

Using a drill, we drill holes in the boards with a diameter equal to the diameter of the pipe legs. We install the structure upside down and install the boards on the legs. In our case, bolted clamps were used to fix the boards at the required level. We turn the structure over and the boards fall into place, preventing the legs of the structure from moving apart.
We use the last board to connect the upper tier of boards. This is the final touch in creating grounds for barbecue. Now you can install a barbecue from a barrel in its place with your own hands.

The next stage of work is the arrangement of the barrel. For cooking we need lattice. To secure it inside the structure, we install a pair of brackets on each side using bolts.


Let's remember that piece of the barrel that we cut out at the very beginning. We will use it to make a lid for the barbecue. We install the hinges and attach it back to the barrel. The grille brackets will prevent the lid from falling inward when closing.


You can use anything as a handle for the lid of the structure, for example, the handle of a shovel.


After installing the lid, wash the barrel thoroughly.
At the end of the barrel we drill holes for ventilation and make a shutter for them.


After this you can attach chimney and paint the barbecue.


This concludes the step-by-step instructions for building a metal barbecue.
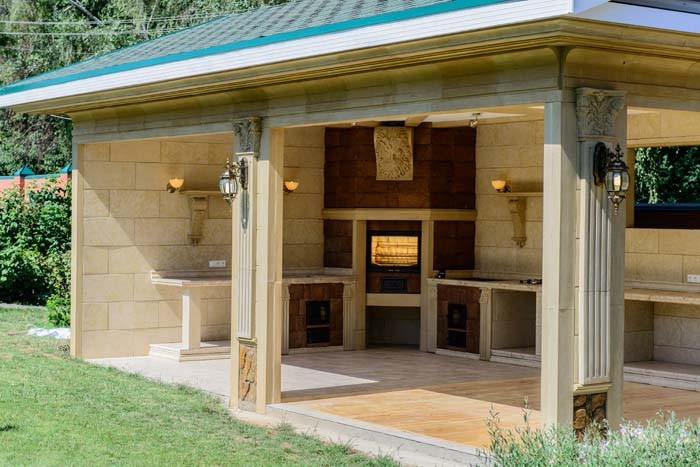
Projects of gazebos with barbecue
There can be many variations of wooden gazebos with barbecues. This option has an octagonal base and open walls on one side. There is enough light in the gazebo, and benches and a table can be installed as needed.

It is not at all necessary to make the entire gazebo out of brick. A special feature of this gazebo are the forged elements from which the walls are made. The design looks light and is naturally illuminated from all sides.

Even if there is not much space on the site, you can always build a canopy and decorate the walls using ordinary boards. This version of a gazebo with a brick barbecue will fit in a very small area.

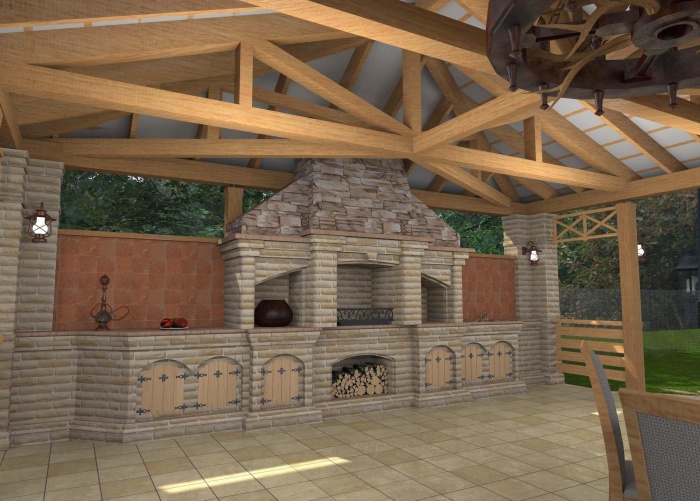
If time and resources allow, then on your site you can build a real work of construction art. A wooden gazebo with a brick barbecue, stove and tabletop decorated with tiles looks rich. Although its installation will not take much time.

A large family will need a lot of space. It’s better to do without building bulky walls, and build a canopy and a brick barbecue with a tabletop underneath on a reinforced, durable foundation. The dining room furniture set can be easily stored in the house or utility room for the winter.

Project of a gazebo with barbecue. Photo
Outdoor recreation accompanied by a feast can be ruined by both the scorching sun and drizzling rain. An open gazebo is an excellent shelter option. The installation of a brick grill on its area will ensure comfortable cooking over an open fire in any weather. In addition to traditional barbecue, you can use it to cook food in a cauldron, smoke meat, poultry, and fish. It is better to plan the construction of the stove at the same time as the construction of the gazebo.
What is this article about?
Selecting a location
An open flame dominant in a barbecue can harm the health of the owners and their guests, and cause material damage if the structure of the gazebo or the surrounding vegetation catches fire. Carefully study the wind rose on the site and choose a free place on its leeward side.
Close proximity to trees, bushes, utility and sanitary buildings, and parking is not allowed.
A brick grill is a heavy, monumental structure. A gazebo with such a stove cannot be placed on unstable soil that is prone to subsidence. You can build a strip foundation for the entire gazebo or make a monolithic concrete pad on a sand bed. When building a barbecue on a finished site, you need to make sure that it is level. A slight slope is compensated by an additional amount of mortar in the bottom row of masonry. If the height difference within the barbecue area is more than 1 cm, the base is leveled with another layer of concrete about 4–5 cm thick.
The gazebo must be roughly divided into cooking and relaxation areas. Both the cook and the guests need comfort and room to maneuver. When calculating the area of the future gazebo, provide enough space for a table and the required number of benches and chairs. Think about creating conditions for storing kitchen equipment, a supply of firewood, and coal.
Construction of a gazebo
By choosing any of the gazebo options, you are guaranteed to decorate your site with it and diversify your leisure time. Build a wooden one faster, but a brick one will take longer.
Wooden
The advantages of wooden gazebos are the high speed and ease of construction, the relative cheapness of the material, and ideal harmony with the natural landscape of the local area. They are environmentally friendly, durable, and practical. Such buildings are assembled from:
- carpentry products (boards, beams, slats, plywood sheets, etc.);
- chopped logs.
The design is very simple: pole supports and a roof. Building shape: square, circle, polygon. Openings can be either open or closed with panels made of slats, window and door blocks. You can decorate the perimeter of open-type gazebos with climbing plants, make a fence from thin rods, and cover them with clapboard. The floor is made of wood or laid out from paving slabs. The roof is covered with tin, metal sheets, slate, bitumen shingles, polymer materials, or simply covered with thick fabric.
Brick
A cozy permanent brick building does not require maintenance (impregnation, painting), remains consistently beautiful and durable for many years. Such gazebos can consist only of supporting columns and a roof (open type) or have a full-fledged fence that retains heat during the cold season. Open openings are often filled with forged metal or wood spans. Panoramic façade glazing with sliding systems or traditional casement windows is popular.
Partially enclosed square or rectangular buildings are popular, where brick walls have one or two sides and the rest are left open. More compact structures are in the shape of a hexagon or octagon. Corner gazebos in the shape of a truncated triangle are the simplest option.
The requirements for the location of a brick gazebo are the same as for their wooden counterparts. For construction on normal soil, a shallow foundation (30–40 cm) is suitable: strip or monolithic). After it hardens, the lower part of the walls (basement) is erected using ring masonry technology, in one brick. For insulated structures, it is often made three-layer (two parallel half-brick walls are separated by an opening of about 5 mm, filled with loose insulation, lightweight concrete). The base is erected, observing the dressing rules and reinforcing every fourth row with metal mesh.
Then columns with a metal core are laid out to support the roof. At its base there are wooden rafters. The shape is hip or tent with a different number of slopes. The covering is wooden, slate or tile. Be sure to arrange the floor. The main requirement for it is fire resistance. Various types of tiles or concrete are used.
In open gazebos, the floor should have a slope of several degrees towards the entrance to drain rainwater falling into the openings.
The main element of the gazebo - a brick barbecue - will function perfectly in a building made of any material.
We are building a grill
Projects of barbecues for gazebos are quite varied in design: from miniature castles to a stylized Russian stove. Their required structural elements:
- brick walls (most often U-shaped);
- firebox;
- wood niche;
- metal grille;
- protrusions for installing the grill;
- chimney.
The grill can be decorated with a decorative arch over the hearth. By covering its sides with concrete slabs with stone or wooden countertops, they create spacious work surfaces that serve as a cutting table. Below them is a cupboard for dishes.
A mandatory element is a pipe for removing flue gases outside the gazebo. If it is absent, people relaxing in the gazebo will suffocate from the smoke.
Project selection
The project of a standard small barbecue suitable for installation in a gazebo looks like this:

Also, in addition to the stove, you can attach a work surface, sink, etc. Such a composite grill might look something like this:

However, when choosing such a complex project, it is better to turn to a professional, since in this case, in addition to a large volume of masonry, chimneys are also needed for such a heavy structure.
Features of barbecue masonry
For construction, ordinary industrial production is suitable. The structure is laid out of refractory bricks (most often grade shb -5) in accordance with the strict order attached to each project. The recommended joint width is 10 mm. Markings are made on the base and the first row is laid out. The verticality of the corners is confirmed with a level. The second row of bricks overlaps the seams in the bottom row. Next, it is also necessary to observe the dressing. Each pair of layers is covered with reinforcing mesh.
You can improve the appearance of the fireplace façade using:
- its masonry is made of facing bricks;
- plastering the surface;
- finishing with natural stone and tiles.
Many owners of country houses try to make them more comfortable, trying to arrange a place for recreation. That is why gazebos are increasingly being created with.
Features of wooden gazebos
Wood is a relatively inexpensive material, so many site owners choose it to create a gazebo. Moreover, such structures fit well into the landscape design of any site. Wood is easy to process, so if desired, you can create an original gazebo.
Structures are often created from rounded logs. To understand which design will be more suitable for a particular area, it is worth considering photos of designs for gazebos with barbecues.

When choosing the type of gazebo, it is worth remembering some features:
- Structures made of wood treated with protective compounds can last quite a long time. At the same time, damaged building elements can be easily replaced with new ones.
- If the soil on the site is dense, you can create a gazebo without a foundation. In this case, it is enough to lay a massive slab of concrete on the ground. Concrete can be covered with boards or paving slabs.
If you wish, you can find ready-made ones so as not to draw up a building diagram.

Brick gazebos
If there is a brick house on the site, brick gazebos are often created, as they are combined with the main structure.
It is worth remembering that a brick building will cost more than a wooden one. At the same time, construction will require more time. Also, for such a gazebo you need to build a massive foundation.

But the advantages of such buildings are undeniable:
- brick gazebos are not afraid of fire and moisture;
- the described structures can be used for several decades without requiring replacement of structural elements, as happens when using wooden gazebos.

It is worth noting that brick gazebos are often made in combination:
- Often a wooden structure is created, one wall of which is brick. This is necessary to create a furnace.
- Many people also build a gazebo, the seating area of which is made of wood, and part of the structure near the stove is made of brick.
- If the brick structure has large openings, they are decorated with forged elements or wooden gratings.
Having considered the designs of bathhouses and gazebos with barbecues, you can choose the most suitable design.
Metal structures
Forged gazebos are brought to the site already assembled or assembled from several parts. Such designs have a high cost and can be an original decoration of the site. It is worth noting that the described gazebos do not require preparatory and finishing work.

But it is important to treat the metal so that rust does not appear on it. One of the advantages of metal structures is that there is no need to create a foundation.
Often wrought iron gazebos are complemented by wrought iron benches. If desired, the gazebo can be painted in the color you like.

Choosing a stove for a gazebo
It is worth noting that the foundation for the furnace is poured separately. It is important to make it above the level of water that can accumulate on the floor after rain. This is due to the fact that the masonry is done on a sand-clay mortar, which is resistant to moisture.

Many experienced builders recommend placing the barbecue in the middle of the building or on the northeast side. In front of the stove, it is necessary to secure a material that is not afraid of fire. This is necessary to protect against fire if sparks from the stove fall on the floor covering. It is also worth considering that the stove should not be located close to a wooden wall.

Stoves installed in gazebos can be divided into several types:
- Barbecue oven, which can be stationary or portable.
- Russian stove, which has an oven, grill and barbecue grill. Sometimes such ovens are equipped with a smokehouse.
- Kitchenette. When choosing this option, additional furniture is installed.
The size of the stove installed in the gazebo depends on the expected number of people.

Creating a foundation
The simplest option is to install a concrete slab. Such products can withstand the weight of any gazebo. It is worth noting that the slab can be laid on dry soil. But before that, you need to dig a hole of the required size and fill it with crushed stone. After such actions, it is necessary to lay a layer of waterproofing. Roofing felt is most often used.
But it is worth remembering that the described option is not suitable if the groundwater is located high or if the site is in a lowland. Due to exposure to moisture, the gazebo may warp over time. That is why it is important to take into account all the conditions that may affect the structure.
Pile and column foundation
If the gazebo is being created at the same time as the house, the piles should be driven in while creating the foundation for the main structure. If you don’t want to hire professional builders, you should install brick pillars or block supports. They are laid to a height of approximately 900 mm. The height above the ground is about 30 cm.

Important! To create pillars you need to use only solid red brick.
The pillars are installed at the corners of the structure, as well as along the walls. It is worth remembering that the distance between the pillars should not be more than 2 meters, since the reliability of the structure depends on this. Lightweight gazebos are often installed on wooden poles.
Tape base
This type of foundation is chosen most often, since it can be created with your own hands. To create it, you need to dig a trench around the perimeter of the future structure and create formwork. A sand cushion is created at the bottom of the trench. The depth of pouring the tape for gazebos is usually about 40 cm, since such structures are light in weight.
After creating the sand cushion, a reinforcement cage is placed in the formwork, which is then filled with concrete. It is worth noting that such a foundation can be prefabricated and consist of reinforced concrete blocks. In this case, the process of creating a gazebo is significantly accelerated, since there is no need to wait for the concrete to harden. From the moment the concrete is poured into the trench until the walls are created, you must wait about 7 days.
Construction of the furnace
The area of the furnace foundation usually does not exceed 1.5x2 m. To connect the bricks, a solution of clay, sand and cement is used in a ratio of 2:3:1. It is important to make the mixture homogeneous, otherwise it will not hold the bricks together securely.

It is worth remembering that the thickness of the seams should not exceed 5 mm. Otherwise, the solution may begin to crack during oven operation. When laying bricks, excess mortar must be removed immediately before it dries. The first 6 rows of brickwork are the base of the oven. During work, it is important to ensure that each brick is positioned evenly relative to the rest of the structure.
On the 7th row, an overlap is created, for which metal corners are installed. After this, you need to start creating a brazier for the grill. It is worth noting that the second row in the grill moves inward. This is necessary to create a protrusion for the skewers.

After the 9th row, you can begin to build the furnace roof. After the 19th row, an overlap of the frying chamber is created, which ends at the 21st row. The hole above the frying chamber gradually narrows, forming a chimney. When creating a gazebo roof, you should properly remove the chimney and seal the hole between the bricks and the roofing material.
If desired, you can make a winter gazebo, creating an enclosed space. In this case, it is necessary to properly insulate the building so that it can be used comfortably at any air temperature.
Self-made grill for a brick gazebo - option for a comfortable holiday all year round. If built correctly, it will provide you with pleasant impressions and delicious dishes that do not require much time and effort.
To correctly design a brick grill in a gazebo, you need to know the size and type of structure:
- Open gazebo(with a canopy) - the simplest type.
- Small open(pillars with a canopy) - a variation of the first type.
- Capital– a large partially enclosed building divided into several zones.
Choosing a grill
Which barbecues are better to install in a gazebo - brick or metal?
The disadvantages of metal devices are strong heating (you can get burned), burnout and deformation, as a result - an unaesthetic appearance and a short service life. Steel gives off heat unevenly - some of the meat will be raw, some will burn.
Devices made from refractory bricks do not deform, look beautiful, heat food evenly, last a long time, and can be multifunctional (smokehouse, cauldron, barbecue grill).
Material Variations
 To build a brick grill with your own hands, prepare materials and tools.
What to build from:
- fire brick;
- cement;
- clay;
- sand;
- water;
- crushed stone;
- poles made of wood or metal;
- reinforcing mesh;
- steel sheets;
- steel corners;
- roofing material;
- grate;
- hob;
- doors (to the firebox, ash pan and smokehouse).
Required Tools:
- Master OK;
- drill;
- level;
- roulette;
- Bulgarian;
- hammer;
- mallet;
- hacksaw;
- jointing;
- shovel;
- buckets;
- troughs for solutions and mixtures.
There are several types of brick barbecues in the gazebo.
Choose a design with a chimney.Classic barbecue grill
Traditional barbecue with or without roof – the most popular option. It looks like a brazier with a niche for firewood and a pipe for removing smoke. To cook food on the grill, they are threaded onto skewers.
It is easy to build a brick barbecue in a gazebo - it is a simple design, but it can be complicated to increase its functionality. The pipe can be connected to the brazier using a smokehouse niche.
Furnace complex
Russian stove for gazebo allows you to cook any dish. Equipped with a wood burner, barbecue grill, pilaf cauldron, smokehouse, and hob. It is convenient because during the warm season you can move cooking from the hot kitchen to the open air.
The drawing of a stove for a gazebo is quite complex - an inexperienced person cannot cope with it.
Invite specialist stove-makers to arrange the gazebo.Brick BBQ
Barbecue cookers are in fashion today - American-style cooking does not require much time and effort, and the food turns out healthy and tasty. The device looks like a roasting pan for frying meat on a removable grate.
A brick barbecue can be stationary or mobile, complemented by countertops and a hood. It is installed quite simply.
DIY making
Create a simple cooking space in your pavilion yourself maybe even a beginner. The choice of design depends on your needs and the size of the building.
Nowadays, almost any construction supermarket sells barbecues for the dacha. However, this does not mean that you will be spared the work of installing them. A do-it-yourself place for preparing food outdoors will save at least half the amount.
Selecting a project
 The choice of a gazebo project with a brick barbecue depends on financial capabilities, needs and the availability of free space.
Think it over:
- design;
- dimensions and placement of elements;
- the presence of a roof and additional structures.
Projects that include chimneys are universal - by insulating the gazebo with PVC film and heaters, you can cook and eat there even in winter.
Foundation preparation
A brick grill weighs a lot, so the foundation for it needs to be formed thoroughly:
- remove the top layer of soil;
- dig a pit 25-60 cm deep;
- level the bottom;
- cover with sand or medium crushed stone 10-15 cm;
- Compact the cushion with a vibrating plate or tamper.
After compaction, place the formwork along the edges of the pit and fill it with M250 concrete.

Pile and column foundation
If the grill installation is heavy, and the soil is weak or there are differences in height, a pile foundation is suitable:
- screw(screw the finished piles into the soil);
- bored(pour the reinforcement with formwork dug into the soil with concrete mixture).
A “fast” columnar foundation is suitable for lightweight structures - it is mounted from pillars at the corners of the pavilion. The pillars can be made cast (monolithic) or laid out from solid brick, wrapped with waterproofing and filled in the hole.
Tape base
The strip under the foundation, made of reinforced concrete, will support any building. It resists soil heaving and distortion, and evenly distributes the weight of the gazebo.
Longitudinal reinforcement in a strip-type foundation must be ribbed for better adhesion.How to place a brick grill?
The location of the cooking area is determined by its design:
- a small grill with a chimney is placed in the middle or against the back wall;
- a barbecue without a chimney is placed only against the wall;
- a large stove is placed on the side to save space.
Perfect option– the place for cooking is not in the recreation area, but a little further.
Drawings with dimensions
For all structures, the barbecue drawing is the most important point in preparation for construction.
You can choose one of the following options:
Bricklaying
The simplest masonry according to the markings is carried out from the corners to the center with a shift in one direction or the other by half a brick. The 1st and 2nd rows are solid. Every 3 rows a plumb and level check is done and a reinforced mesh is laid.
The arched center of the barbecue - the firebox - is laid out using a circular arc made of boards. Matches inserted between them will help distribute the bricks evenly.
After filling with a solution of clay and sand 1:4, the arch dries for 2 days, then you need to remove the circle, cover the arch with an iron corner or beam, drive the walls up to the 22nd row and narrow the top by ¼ brick in each row.
The day before laying, pour water over the brick for better adhesion.
It is better to make the space under the firebox out of hollow bricks, line the firebox with refractory bricks, and lay the rest out of red solid bricks.Installation of a chimney with good draft
After a row of 10 bricks remains on top, create a smoke collector by securing a metal pipe to the support columns and gradually narrowing the hole. Exit the pipe through the top of the gazebo or from the side.
You can enjoy the draft and not be afraid of precipitation by installing an exhaust metal umbrella or canopy on the chimney or above the fire.
Finishing and canopy
For long service life of the structure make a canopy over it:
- common over the entire recreation area;
- local - only above the grill.
The canopy can be installed on supports made of metal or wood (the latter should be more than 16 cm away from the grill).

Fire safety measures during operation
To avoid fires, a gazebo with a barbecue must be located at a distance of at least 5 meters from trees, bathhouses, wooden log houses and sheds.
The floor of the gazebo must be stone or concrete, the place where the pipe touches the roof must be protected with asbestos. Wooden elements should be impregnated with a heat-reducing agent. There should be a fire extinguisher in the gazebo and a water tap nearby.
Watch the video for step-by-step construction
Proper care
A pavilion with a barbecue is needed:
- cover with PVC film for the winter;
- regularly clean the chimney and firebox;
- put metal parts in a dry place for the winter;
- cover the stove with a cover.
Advantages and disadvantages
Pros of a brick grill:
- durability;
- reliability;
- wear resistance;
- preservation of shape and aesthetic appearance;
- fuel economy;
- good uniform heating;
- low cost.
The design has one flaw– heavy weight and inability to change location.
What's a vacation without grilling meat over charcoal? But what to do if the weather has completely turned bad, and you are already fully armed with soaked kebab and bags of food? In this case, a gazebo equipped with a brick grill will help. You can shelter from bad weather under the roof, and also safely cook food over coals even in the rain.
Below we will look at the options for brick barbecues, as well as their step-by-step construction. Let me draw your attention to what we have already considered.
Undoubtedly, the masonry process is quite labor-intensive, especially for an unprepared person. But if you do not pretend to be a jewelry form and are making it for yourself, then our analysis will be quite enough for you.
In tandem with the stove
At the end you will see several interesting gazebos, in which a brazier under a canopy has already been implemented. You will probably be able to glean useful information from the buildings presented and take some ideas into account.
Classic barbecue grill
The simplest and most budget-friendly option is considered to be a classic brick grill, which is designed for cooking shish kebab on skewers.

In shape, it is completely different from its metal counterpart, because it is closed on all sides, and the smoke escapes through a special chimney.
The problem with all these small structures is poor draft, which must be calculated directly on the spot. In an open gazebo this is not so critical, but still unpleasant. Soot appears, which does not add aesthetics at all.

At the same time, for little money you get a full-fledged installation for cooking in any conditions, even the most extreme.
Brick BBQ
The difference between a barbecue and a regular barbecue lies in the method of cooking the meat.
In this case, a grid is used on which the meat is placed and periodically turned 180 degrees. For some, this approach is considered more comfortable and interesting.

The meaning of the building does not change much from this. Brickwork is also used, inside which wood is heated and meat is fried.
A more global approach to cooking can be realized using an oven complex. It may include a grill, oven, stove, etc.
The whole thing is equipped with good hoods, as a result of which you can cook in several formats at the same time.

Such a design can cost as much as the gazebo itself, since in addition to a large amount of building material, calculations are required.
It would be a shame to invest 100 thousand rubles in such a project and get a complete lack of traction or a brick that collapsed after the first fire.

Therefore, in this case, construction must be approached as responsibly as possible and with a decent wad of money in your pocket. Pleasure costs money, in this case there is no way to avoid it.
Step-by-step construction of a barbecue inside a gazebo
Video instructions
The process of creating a barbecue can be seen most clearly in the video. We have prepared several videos, each of which shows a different approach to this action.
Since everyone’s gazebo is different, the placement of the barbecue, its size and shape can differ radically. Therefore, we believe that it is better to look at various options, and then choose the one you like.
Drawings with dimensions
Interesting project provided stove maker Roman, who prepared a complete 3D model of a brick barbecue. She is presented in a video that he posted on YouTube (see below).
In the form of photographs, we have collected the most interesting drawings, from which you can calculate the size of the future building, as well as the consumption of materials for it.
Pouring a slab foundation
The weight of the barbecue can reach up to several tons (together with the brick chimney), so it is imperative to fill it. The structure of such a base is shown in the photo below.

You will need to adjust the size of the site to suit your project. It is quite possible that you will need a small area, but you need to do it with a rating of 5 plus.
Bricklaying
It is better to watch the masonry visually on video, so in this block of information we will present schematic step-by-step masonry, which shows all the bricks individually.
Each master has his own quirks in terms of applying the solution and leveling the entire structure, but everyone has the same order, and this is precisely the point we want to convey to you.


Installation of a chimney with good draft
One of the most important points in creating a brick from a barbecue is considered to be traction, in the absence of which all the work goes down the drain. To do this, you need to think about the hood and chimney, which should be not only efficient, but also aesthetic.

We discussed this point in detail in the publication about barbecue hood (). It will be a shame if the calculations turn out to be initially incorrect and the smoke goes in the opposite direction into the gazebo, so work on this point in advance.
Variety of gazebos with photos
Below we have prepared a small selection of photographs that you can use as a guide for your future construction.
If you want to find even more examples, then go to the publication about gazebos with barbecue, barbecue and stove (). There you will find them in abundance.


If you still have any questions about this topic, then do not hesitate to ask them in the comments. We will try to answer you within 24 hours.