

This article will address the issue of how to set up a plane with your own hands, we will talk about the simplest hand plane, which our grandfathers used. To correctly install a cutter on a plane, you need to have certain skills. The plane is taken with the left hand, and the thumb should be on top of the back of the plane, and the remaining fingers on the sole near the span. With your right hand, take the cutter and insert it into the span to the sole of the plane. Moreover, the cutter must be placed on the base with the edge down. At this time, the base of the plane is in a horizontal position, and the knife must be supported with your thumb. Then they install the wedge, striking it with a weak blow with a mallet.
By tradition, we will mention the sponsor of the article, this is the ART-Group company, which offers blinds for the balcony, perhaps you will find it useful.
Next, you need to set the knife to the same amount along the width of the plane sole. To do this, the plane should be positioned with the sole up and at a distance of 30-35 centimeters from the eyes. Now you need to determine by eye the uniformity of the protrusion of the knife blade over the sole of the plane. If necessary, this protrusion can be increased by hitting the cutter with a mallet, and if you need to decrease it, you need to hit the rear end of the block. For larger chip thickness, a larger protrusion of the blade is installed above the sole of the plane. If the blade and the sole are not parallel, this can be eliminated by hitting the edges of the cutter with a mallet. To finally secure the cutter, you need to hit the end of the wedge.
To determine how correctly the cutter blade is installed, you need to place the plane with the sole up against the light and look at the protrusion of the cutter. In this case, the projection of the cutter will be clearly visible on the surface of the sole. You can finally check the adjustment of the plane only during trial planing. If the chips are of the same thickness, this means the plane is set correctly, but if not, then you need to check the installation of the cutter again.
It is also necessary to know that when setting up the tool correctly, the lower edge of the cutter should fit tightly to the surface of its base. And the wedge should tightly clamp the knife along the entire length of the stop of the taphole wall. To jam or release the wedge, you need to lightly hit it with a hammer.
The length of the wedge should ensure that there is no gap on the top surface of the cutter and that the end of the chip does not fall there. At this point, the question of how to set up a plane can be considered closed, now you know everything.
 To work on wood processing, specialists use special tools - planes. They are used in any wood-related industry.
And gradually electric planers began to come into fashion, which can be bought on a specialized website - price.ua. With their help, not only does the processing speed of wood increase significantly, but also the specialist does not spend a lot of effort and energy on mechanical work.
Even in ancient times, people tried to process wood, but only by the 15th century did they learn to use a plane, an almost exact analogue of which is modern planes.
It was created for processing the top layer of wood by cutting and sanding irregularities.
How to work with an electric planer correctly?
With the help of this tool, the ideal smooth result of the final product was achieved for the construction of huts, the manufacture of furniture and necessary household items.
The electric planer has several differences from its ancestor. Firstly, you do not need to make any visible effort when working with this tool, since it runs on electricity.
The second positive quality is the abundance of some attachments that can process wood at certain angles or bends, which makes it almost indispensable in furniture production.
It is also often used to give certain visual characteristics to any piece of furniture or wood decor. For example, interesting carved patterns or alternating smooth and rough stripes on wood. This tool is quite inexpensive and its purchase is affordable for everyone.
When working with conventional tools, the workbench, sawhorse or other supports must be stable during planing. Planes should be placed on the side of the block with the sole facing away from you so as not to accidentally cut your hands.
You cannot work with tools with blunt pieces of iron, as well as with tools with a piece of iron that is too far out of the plane's crack, since due to excessive physical stress, the hands will be torn off the plane or other planing tool and the worker may receive abrasions and bruises on the hands.
You need to sharpen the bits carefully, especially on a sharpening wheel, and do not allow your fingers to touch the sharpening tool.
The peripheral speed of the grinding wheel should not exceed 20-30 m/s.
How to properly install a knife in a plane
When sharpening a tool, you should wear safety glasses or install a protective screen made of transparent material, such as plexiglass.
You should not determine the sharpness of the blade by moving your finger along the blade, as this can easily injure your finger.
You cannot work with dull chisels. Most often, cuts and abrasions are the result of working with a poorly sharpened tool, since in this case the worker makes increased physical effort and uses incorrect techniques.
When working with a sharp chisel, the cutting edge should always be directed away from you and cut the wood only from left to right. When cutting a layer of wood, hold the workpiece with your left hand so that your fingers are not in the cutting zone and do not fall under the chisel blade in case the chisel breaks off while cutting the wood.
When cutting with a chisel, it is forbidden to press the workpiece against your chest or knees; it is better to secure it in the clamp of the workbench. Do not place the cutting tool on the workbench with the blade facing you or close to the edge of the workbench.
Excess tools should always be put away in the closet.
When working with hand saws, you must be careful to avoid injury. You cannot work with dull or poorly set saws, as in these cases the saw blade may break and lead to injury to the hands and face of the worker.
You need to be especially careful when sawing, when some workers guide the saw blade along the risk using the thumb of their left hand. This technique is dangerous: to guide the saw, it is better to apply a piece of wood or lightly nail a plank near the mark.
You should not use a screwdriver to open saws, as it can come off the tooth and a person pressing the handle of the screwdriver with his hand can severely damage his hand on the sharp teeth.
The teeth should be set only with special safe tools. You cannot use a saw if some teeth of the blade are set to the side more than others.
When working with hand-held power tools, you need to know the structure of these tools and the rules for their operation.
Do not operate the tool unless it is grounded at an operating voltage exceeding 40 V.
You can start and carry out work only after making sure that the power tool is in full working order and that the cutting tool is securely fastened.
When the electric motor is turned on, it is prohibited to troubleshoot.
For any repair, it is necessary to disconnect the power cord from the network.
The electric motor should only be turned on just before starting the work operation.
During any break in operation, the engine must be turned off.
It is necessary to ensure that the insulation of the power cord is in good condition and prevent it from being twisted.
If this cannot be avoided, the cord must be suspended or covered with boards to reliably protect it from damage.
It is not allowed to leave a power tool connected to the electrical network unattended; Changing any parts of the tool cannot be done while the electric motor is plugged in.
After repair, the power tool should be subjected to a control test (mainly the electric motor) in accordance with the control test program for electrical machines.
To connect the ground to the mains, the power cord of the power tool must have an additional wire, the end of which is painted a different color to distinguish it.
For power tools designed to be connected to a 36 V network, protective grounding is not required.
When working with circular saws and grinders, it is not allowed to remove the safety guard.
Specific safety precautions for operating power tools are given in the instructions supplied with the tool.
The main malfunctions of a power tool that can be detected during operation and methods for eliminating them are given in table.
When working with power tools, work clothes should not have hanging ends, and the cuffs of the sleeves should be buttoned or covered with an elastic band.
When working with wood, it is recommended to use a plane in some cases and a planer in others. What are the specifics of each of these tools, what is their purpose, and how is a plane different from a jointer?
Let's try to figure this out.
general information
The general concept in our case is a plane.
How to use the plane
This invention, which dates back to the distant past, is used to design wood. Using such a tool, you can level the surface of the material, correct the shape and size of the workpiece, and, if necessary, make large cuts. This is similar to the plane traditionally used in carpentry:
But since the tasks in material processing can be different, then there are many different types of popular settings.
They differ in size, device characteristics and accessories. Here are some examples: Sherchebel, It is designed to process empty parts that have just emerged from a saw or axe; carry, operated by two carpenters; falsgegel, worker to handle commas.
Fuganok is also a sub-scheduler. Here's the tool:
comparison
Thus, both adjustments belong to the same class. That's why their device has a lot in common. In both cases, the base is shoes. In this place where the knife is attached, pressed tightly with a wedge. The cutting tool is set at an angle. The position of this element can be adjusted to remove the desired chip thickness.
From the common symbols, we will note that the difference between scheduler and connector is different.
They relate to both the intended purpose and the design features that arise from the use of these devices. It should be noted here that the standard plane, which has a more compact and proportional position, works at an early stage of material processing. The goal is to remove the outer layer of wood and do a general leveling of the surface, removing sediment, knot drops and other serious defects.
However, to complete the turn, use a jointer.
Her body is elongated, allowing for better alignment. Ultimately, if the short plane moves along the projections and cavities, as in waves, then the jointer lies on the heights and gradually breaks off. In operation, the tool first produces a steep facing, and when it achieves a perfectly level surface, it begins with a continuous belt.
What is the difference between a plane and a joint?
The fact that this other device becomes indispensable if it is necessary to give the correct shape to large or long pieces of material. In addition, the direct purpose of the binder is to ensure that the edges of the parts, for example, are perfectly matched to their adhesion. It should be noted that both tools are available not only in manual versions, but are also equipped with an electric motor.
In addition, specialized machines are widely used for this purpose.
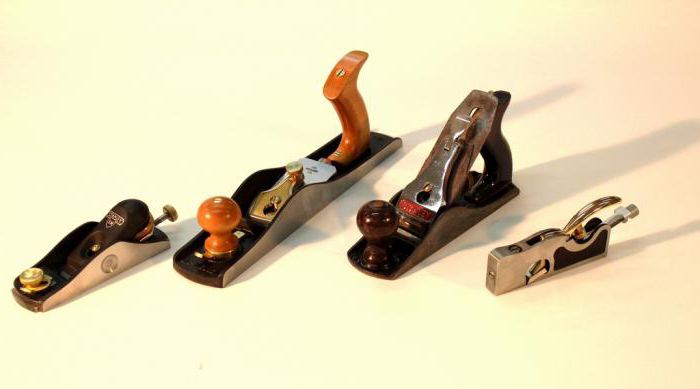
Plane- a carpentry tool designed for manual planing of wood, consisting of a wooden or metal block, a cutter (knife) and a clamping wedge.

Hand Planing Tools: a - wooden plane; b - metal plane; c - jointer; 1 - body; 2 - holder; 3 - entrance; 4 - wedge; 5 - knife; 6 - emphasis; 7 - plug; 8 - clamp; 9- screw; 10 - handle.
All planes are divided into planes for planing flat surfaces and planing profile surfaces.
The plane has a wooden block, the lower part of which is called the sole.
To install the knife and release the chips, a slot is provided in the block - a tap hole. To allow cut chips to enter the tap hole, the sole of the block ends with a slot 5...9 mm wide, called a span.
The narrow slot (span) of the block allows you to obtain a smooth wood surface. To reduce the width of the span, the sole at the slot is secured with a hardwood insert. The knife is secured in the block with a wooden wedge resting on the shoulders of the block's taphole. The knife is pressed tightly and evenly against the block with a wedge, which allows you to obtain a high-quality processed surface. Planer knives are made of U8A or U9A steel.
Planing with a hand plane
The front of the block has a wooden horn, and the back of the jointer block has a handle. The block and wedge of the plane are made from hardwood (pear, ash, maple, hornbeam, beech, white acacia, etc.). Planer blocks are made of metal.

Planer components: a - block; b - planing knife; c - wedge; g - insert; 1 - shoulders; 2 - cheeks; 3 - entrance; 4 - bed; 5 - sole; 6 - span (slot); 7 - handle-horn.
Installing a knife into a plane
Setting or adjustment consists of setting the amount of extension of the tip beyond the plane of the sole. Determine the degree of release by looking along the sole of the plane from its front part towards the “back of the head”. If the knife blade is extended too far from the block, it will catch too thick chips and tear the wood. This can be done with a sherhebel, intended for rough, rough planing, and the plane should remove thin, even chips. A knife set too low will slide over the material being processed and remove too thin chips, which greatly increases the processing time. With a skewed knife, it is impossible to plan a smooth surface.
Now there are many types of planes, we will analyze all the suitable planes.
1.Installing the knife into a wooden plane with a single knife.
Place the knife on the plane tap hole with the chamfer down (Fig. 20)
(Fig.20)
Holding the plane knife, secure it with a wedge (Fig. 21)
 (Fig.21)
Lightly tap the wedge with a hammer, then turn the plane over and, holding it by the front handle, look along the sole of the plane (Fig. 22),
 (Fig.22)
then we begin to tap the plane knife until the blade comes out above the surface of the plane (Fig. 23)
 (Fig.23)
the blade should extend 0.2-0.3 mm above the sole. evenly across the entire width of the sole; if the blade comes out uneven, it is leveled with gentle blows of a hammer on the side edges of the knife (Fig. 24),
 (Fig. 24) after leveling the plane knife, we knock in a wedge to finally secure the knife in the plane.
2. Installing the knife into a wooden plane with a double knife.
Assembling a double knife with a chipbreaker (Fig. 25)
 (Fig.25)
Then we repeat all the steps when installing a single knife (Fig. 20 to 24).
3.Installing the knife into a metal plane with a single knife.
We place the knife on the plane tap hole with the chamfer down (Fig. 26)
 (Fig.26)
Holding the plane knife, secure it with a wedge (Fig. 27)
 (Fig.27)
We press the knife with a screw, but not too hard, then we begin to tap the plane knife until the blade comes out 0.2-0.3 mm above the surface of the plane (Fig. 28)
 (Fig.28)
After aligning the blade, secure it with a screw completely.
4.Installing the knife into a metal plane with a single knife and adjusting screws.
Place the knife on the plane's tap hole with the chamfer down. Hold the plane knife and secure it with a wedge (Fig. 29)
 (Fig.29)
Then we press the knife with a screw, but not too hard, then, by tightening the adjusting screws, we extend the blade 0.2-0.3 mm from the sole of the plane (Fig. 30),
 (Fig. 30)
After aligning the blade, we finally secure the knife in the plane.
5.Installing the knife into a metal plane with a double knife.
We assemble a double knife with a chipbreaker (Fig. 25). Place the knife on the plane tap hole with the chamfer down
Holding the plane knife, secure it with a wedge (Fig. 31)
 (Fig. 31)
then we extend the knife using the adjusting screw (Fig. 32),
 (Fig. 32)
using the adjusting rack, we align the parallelism of the knife to the sole of the plane (Fig. 33),
 (Fig. 33)
then finally secure the knife with a wedge.
The plane is one of the main tools of the carpenter and its good work depends on the correct sharpening of the knife and the correct settings of the plane. Depending on what material you have to deal with, the setting of the plane depends. Proper sharpening and adjustment of the plane is the key to half the success in the planing process.
With a regular hand plane. But working with hand tools is quite labor-intensive and, if necessary, planing a large number of boards becomes ineffective.
To speed up the process, it is more advisable to use a power tool. Modern electric planers are capable of performing large volumes of work with much less physical effort.
Let's find out how to use an electric planer correctly to get the job done with the quality we need.
Adjusting electric planer knives
An electric planer can be used to perform both rough processing of wooden planes and finishing, after which sanding may not even be necessary. Therefore, it is important to be able to adjust the knives correctly so that the planing depth provides the surface cleanliness you need.
On electric planers, the planing depth is set by switching the handle. The adjustment step can be up to tenths of a millimeter. Therefore, when buying a plane, pay attention to this parameter as one of the most important. Depending on what work you plan to perform, you should select a power tool with a sufficient adjustment step for this purpose.
Before you start processing the surfaces of boards or bars that you will use in the future, make several test passes on a workpiece that you won’t mind throwing away later. It is during these test runs that attention should be paid to possible processing defects.
Most often, such defects are beveled surfaces or incisions. Both of these indicate incorrect settings of the knives in the drum of the electric planer.
To eliminate the defect, it is best to contact the experts in a service workshop or a self-taught specialist who has already adjusted the electric planer knives more than once. But if you don’t have this opportunity, then you can try to adjust the blades of the electric planer yourself.
To do this, loosen the fastening of the knives on the drum using a hex wrench in accordance with the operating instructions for the electric planer, and very carefully position the knives in the correct position. To align the knives, apply a ruler and determine the desired position.
After adjusting the knives, all the bolts must be tightened securely and, turning the drum by hand, see if the knives touch the body of the electric plane.
 Before you begin processing the wooden surface, the workpiece must be securely fastened. How well it is secured affects not only the cleanliness of planing, but also directly affects the safety of the work performed.
The board or block being touched should not have even a slight play. Otherwise, when in contact with the rotating knives of the electric planer, the workpiece may be torn out and thrown to the side with force, which can lead to injury to both the worker and people nearby.
After the workpiece is securely fastened, you need to stand so that, starting to plan from one edge, you can freely move next to the workpiece parallel to the movement of the plane. The body position should not be tense, and nothing should interfere with holding the power tool firmly with both hands.
Before turning on the electric planer, its knives should not come into contact with the surface to be cut. Only after starting should you carefully move the knives from the end of the board and start moving forward.
With each pass, try not to tip the electric plane onto your toe or heel. The sole of the plane must always be positioned strictly parallel to the surface being processed.
The pressure on the front and rear handles of the electric planer should be the same. In this case, at the beginning of the passage you should press a little harder on the front handle, and at the end - on the back. This will avoid blockages. The required pressing force is determined only by practice.
While the electric planer is moving along the surface being processed, jerking, acceleration or stopping is unacceptable. Otherwise, the surface will not be able to be made perfectly flat and various pits will be visible on it.
The speed of movement of an electric plane over the surface being processed is usually 1.5-2 meters per minute. In this case, you need to make sure that the shavings removed by the plane do not get under the sole.
Selection of quarters with an electric planer
 Often there is a need to select a quarter in the workpiece being planed. Modern electric planers have this option and can make this task much easier for you. However, when selecting quarters using an electric planer, there are also some features that should be taken into account when performing work.
As you know, when cutting a quarter, the side stop of the plane moves along the edge of the board. Therefore, in order for the groove to be smooth, you should be sure that this edge does not have any bulges or dimples.
When planing a quarter, the pressure on the plane handles is slightly different from the pressure when planing flats. With one hand you need to point the plane forward, and with the other, press its side stop to the edge of the workpiece.
Safety when working with an electric planer
When used correctly, an electric planer will help you quickly complete large amounts of work, but if handled carelessly, it can also cause serious injuries.
As mentioned above, the workpiece must be securely secured before starting work. Otherwise, there is a risk of it being pulled out and injuring the worker or other people nearby.
During any inspections of cutting edges or adjustments of knives, be sure to completely turn off the power to the electric planer by disconnecting the electrical cord from the network. Any accidental start can leave you without fingers.
Start processing the surface by first turning on the plane and allowing the knives to reach maximum speed until they touch the board.
If you put the electric planer aside to check the surface you are working on, place it only on its side.
The electrical cord should not have significant kinks or tangles during operation. The electrical insulation must not be damaged, all current-carrying structural elements must be reliably insulated.
In the video below you can watch tips on working with an electric planer (click on the triangle to view):
***
Now you know how to properly operate an electric planer in order to process wooden surfaces with the desired quality. Next time we’ll talk about how to properly sharpen knives for an electric planer if they have become dull and the cleanliness of the processing has decreased.
The HeARTwood channel, in preparation for an interesting project that many of you will enjoy, made a video lesson on how to set up and prepare a hand plane for use.
This is an ordinary Chinese, as it is called, Raftul, nothing remarkable, of course it is good to plan, it is pleasant to hold in your hands, but nevertheless, such a tool needs to be adjusted and brought to mind.
And today’s video will be devoted to what needs to be done to bring such a purchased plane into working condition so that it can work normally and comfortably.
I bought it for pennies, I was literally surprised, because the first thought arose that either a zero on the back or a one or two on the front was lost, but nevertheless I specifically kept the receipt, the real cost of this plane is 813 rubles.
This Chinese store is a haven for woodworkers.
Such a tool is already obviously good, if only because for such a price, even if it suddenly did not live up to your expectations, you did not give a bag of money for it. 813 is not that expensive. If you look at branded planes, the price goes for 20-30 thousand.
And it should be noted how expensive ones differ from cheap ones. First of all, geometry. Naturally, the smoother it is, the better the surface it gives, the second is the quality of the materials used, the blade itself, how good the steel is, how well it holds an edge, the quality of the threaded connections, the quality of the milling cutter, etc.
But the most important parameter, if we talk about cheap planes, for example, is the base material. This base is ordinary gray cast iron, just a living example.
Here is the very first iron plane, in those ancient times, when I bought it, our traders literally brought all the garbage from China, literally all the trash, things that the Chinese even disdain to buy for themselves.
This took quite a bit of work. Everything about it was crooked - from all sorts of threads, adjustments, the only good thing was that it was made of iron, and that the steel of the cutter was quite good. The steel holds an edge well, but everything else leaves much to be desired.
After I brought the tool into working condition, I worked with it a lot on different types of wood, most often during the work the tool does not move straight, but slightly obliquely. That is, these are his main working movements, so that there are fewer chips on some problematic wood.
And due to the fact that the plane moved diagonally, at an angle to the working surface, the sole of the hand tool was worn out, became a propeller, part was wiped out, and other parts remained convex. Naturally, after this he began to write propellers, that is, it was impossible to plane them - here is a living example of the fact that the base is not made of good material.
For more information about setting up the plane, watch the video from minute 5.
How did it all start, why was this video tutorial made? Here one thing clings to another, another to a third, etc. Along the chain. You can’t just take it and make a master class; first of all, you need to make a special hammer for profiling metals. You can go to the store and buy such a hammer for around 1,500-2,000 rubles with a smooth spherical striker.
After weighing all the pros and cons, I decided that it was better and easier to do it myself, so I went to the store and bought a Soviet hammer. We will make a special one from it with a spherical striker on one side and a sharp striker on the other. And in order for it to have a finished look, it is necessary to make a beautiful handle, because it is pleasant to work with a beautiful tool. This is why the plane needed to be adjusted.
Despite the wide range of electric planers offered by stores, ordinary hand tools are still quite popular among carpenters. The fact is that with their help, wood processing can be done somewhat better. Most often, modern carpenters have both types in stock and use them for initial processing of workpieces, and use manual ones for finishing them.
Design Features
To know how to choose a good hand plane, you should have an understanding of its design. Such instruments consist of the following main parts:
Frame. This structural element is most often made of wood. It is in it that all the main components of the plane are attached.
Knife. Sharpened at a certain angle.
Clamp Can be made from different materials. This can be a metal plate or bar.
Chip breaker. Installed slightly higher than the knife. As you can already judge from the name of this element, it serves to break chips and guide them.
Adjustment screw. This structural element is responsible for changing the position of the knife relative to the surface being processed.
All universal hand planes for wood have this design. The basic elements described above are also present in other, specialized varieties. On the body of any plane, among other things, there are two handles.
What to look for when choosing
The main element of the planer design is the knife. It is its quality that you should pay attention to first. This element must be made of high quality steel. In this case, the plane can be used for as long as possible without the need for sharpening. Of course, it is visually difficult to determine how well the material was chosen for the plane knife. Therefore, first of all, you should pay attention to the reputation of the manufacturer.
Of course, under no circumstances should it wobble. When purchasing, you should also check the front handle. It must also hold tight. In addition, when choosing a plane, you should pay attention to the size of the handle for the right hand. The length of this element varies. A tool with a small handle may simply not be suitable for a person with large hands.

Varieties
Of course, you should choose a hand plane based on the specific purposes for which it will be intended. There are several types of planes on sale today. The most popular are:
Universal. This is a regular plane that can be used to do most carpentry work.
Jointer. The body of this instrument is longer than that of a conventional one. A jointer is used to process large workpieces.
End plane. The knife of such a tool is located at a flatter angle. This allows high-quality processing of end grain fibers.
Zenzubel. A plane of this type is used mainly for cutting out various types of folds.

Reviews of plane brands
This type is sold on the modern market from different manufacturers. Many brands are of very good quality. For example, planes from companies such as Bailey and Handyman have earned good reviews from craftsmen. Bailey tools are valued primarily for the excellent quality of their knives and long service life. Sharpening the knife of a hand plane of this brand is done quite rarely. Sometimes there are comments that mention the build quality is not very good. But even if any shortcomings are found in the purchased tool, they can usually be easily and quickly eliminated, and on your own. Handyman planes, judging by the reviews, are also convenient and reliable. Their only drawback is their not very neat design.
Experienced craftsmen do not advise purchasing Groz brand products (India). Despite the fact that the products of this brand are classified as expensive, judging by the reviews, they are not of particularly good quality. Their build quality is simply disgusting, and at the same time it is inconvenient to work with them.
How to use
Hand planes for wood are simple in design and quite easy to use. The main thing is to do the work smoothly, without jerking. This is especially true for very long workpieces. If this condition is met, the surface of the finished product will be very neat and smooth. When planing, you should stand to the side of the workpiece, with one foot forward.
The top and bottom surfaces of the products are very easy to process. It is somewhat more difficult to do work on the edges. In this case, it is important to secure the knife very firmly. Under no circumstances should it vibrate in the block. Edges should be planed exclusively in the direction of the grain.
There is also a technique that allows high-quality processing of very wide workpieces. In this case, the product is first planed diagonally, adhering to the direction of the fibers. Next, the plane is checked for evenness using a special ruler. At the final stage, finishing is carried out. In this case, a thin layer of chips is removed from the workpiece parallel to the edge.

How to sharpen a knife
Of course, a hand plane, like any other tool, requires some care. No matter how good the steel the knife of this tool is made of, sooner or later it will still become dull and will have to be sharpened. Most often, this procedure is performed on a special stone called a touchstone. The latter is pre-wetted with water. When sharpening, it is advisable to moisten the knife itself. You should press it against the stone as tightly as possible.
The sharpening angle of a hand plane may vary depending on the model. Most often this figure is 30 degrees. When working on a whetstone, you usually just pay attention to how the blade was originally sharpened.
Sometimes experienced carpenters sharpen a plane knife on a wheel. In this case, it should be pressed not against the edge, but against the side surface. When using a wheel, you can also get a pretty high-quality sharpening. It will be very convenient to use a hand plane with such a knife. But only if you use an abrasive fine-grained abrasive wheel. After sharpening on such a tool, finishing is usually done. This procedure is performed either on a piece of sandpaper mounted on a table or on a block. Checking the quality of sharpening is quite easy. To do this, you just need to carefully examine the blade. If it does not shine, then the knife is sharp enough to be used.

How to set up a hand plane correctly
To perform this procedure you will need a special screwdriver. Such tools are designed specifically for setting planes. Their distinctive feature is their large width and short length. The main purpose of setting up a plane is to set the amount of blade protrusion above the surface of the sole. If the knife protrudes too far, the plane will begin to remove very thick chips. A slightly exposed blade will simply slide across the surface of the wood.
For initial processing of workpieces, the knife yield should be about 0.5 mm. If the plane is to be used for finishing, the blade should protrude slightly less over the sole.

How to store it correctly
Experienced craftsmen believe that a knife for a hand plane becomes dull, for the most part, not even during operation, but because of improper storage. After finishing planing the workpieces, this tool should be cleaned of chips and placed in a box specially designed for it. In this case, the position of the tool should be such that the knife blade protruding from the body is not at the bottom, but at the side.
If the hand plane is going to be stored for a very long time, it must be disassembled and thoroughly cleaned before putting it in the box. Knives and other metal parts should be wiped with an oiled rag.