

A master class on creating topiary with your own hands will allow you to master a new type of needlework. There is an opinion that the presence of this ornamental tree in the house brings happiness. And if you decorate it with bills and coins, then there will be prosperity in your home. That is why it is often called the “tree of happiness.”
A decorative tree can be made from a variety of materials - ribbons, organza, colored paper, coffee beans, shells, dried flowers, candies, etc. As a rule, the craft consists of three parts - a pot, a trunk and a crown.
How to make topiary with your own hands
Crown
The crown of topiary is usually made oval. However, it can be another shape - oval, cone, heart, etc. Let's take a look at the most famous methods of making it.
Base from newspapers. To create it you will need a large number of old newspapers. Take one piece of newspaper and crumple it thoroughly. Then wrap it with the next piece of paper and crumple it again. Do this until you have a crown of the required size. After this, secure the crown with a stocking, sock or any suitable fabric. Sew the base, and cut off any excess. Use another method as well. Wrap newspapers tightly in cling film, form into a ball, wrap with thread, and cover with PVA glue.

Polyurethane foam base. Thanks to the foam, you can give the crown a variety of shapes. Take a thick bag, squeeze a small amount of foam into it, let it dry, get rid of the plastic. As a result, you will end up with a shapeless piece. In order to give it the required shape, use a stationery knife. This base is very convenient to work with. You can easily stick pins and needles into it, as well as glue various decorative elements.
Foam base. It is also very convenient to work with such a crown. Take a piece of foam, cut a suitable piece and shape it using a knife.

Papier-mâché base. To work you will need a balloon, PVA glue, toilet paper. Inflate the balloon to the required size and tie it. Pour glue into a small container. Tear small pieces from a roll of paper and stick them onto the base. Glue layer by layer. As a result, you should have a layer of about 1 cm. Let the mixture dry, take out the balloon.
Other base options. To create a crown, you can use Christmas tree toys, plastic or foam balls, as well as ready-made balls sold in craft stores.

Trunk
You can use sticks, pencils, twigs, etc. as material for the trunk. Barrels made of strong wire will look great. Decorate the blank with twine, colored paper, ribbon, thread and regular paint.
Pot
Use any containers as a pot - glasses, jars, small jars, cups, flower pots, etc. The main thing is that the diameter of the container is not larger than the diameter of the crown. As for the decor and color of the two elements, they can be completely different.

Assembly and decor of topiary
To give the craft strength and stability, fill the pot with filler. Alabaster, liquid silicone, cement, gypsum, and polyurethane foam are suitable for this. In addition, use sand, grain, foam rubber, polystyrene foam, etc. Stick the stem into the filled pot and secure it with glue. Now you can start decorating. To attach decorative elements, use a special glue gun. Finally, place decorative details in the pot - shells, beads, pebbles, etc.
DIY topiary: step-by-step instructions
Necessary materials:
- decorative pot
- boxwood sprigs
- gravel
- foam ball
- artificial flowers
- twigs
- wire
Manufacturing process:
1. Stick boxwood branches one by one into the foam ball. Be sure to ensure that there are no voids. Tie the branches with wire.
2. Make a hole in the base and place it on the remaining sticks.
3. Place the topiary in a pot, fill it with gravel, and add moss.
4. Place several pine cones side by side to give the craft some New Year’s charm. A bunny or teddy bear would also work.

Option of decorative ribbons
Necessary materials:
- invisible
- decorative pot
- tapes
- wooden stick
- foam ball
Manufacturing process:
1. Cut the ribbon into small strips, forming into rings. Attach the resulting rings to the base. Make sure you don't create voids. Place the ball on a pencil and secure it in a pot, covering it with gravel.
2. Place decorative frost on top or sprinkle with small remnants of tape.
DIY topiary for beginners
You will need:
- a handful of moss or artificial grass
- pencil or wooden stick
- artificial flowers
- bright mug
- foam ball
- ribbon
- ball for the base (you can take polyurethane foam)

How to do:
1. Wrap a pencil with tape, stick it into a small ball, and secure with foam.
2. Stick each flower individually into the ball. String the finished crown onto the trunk. Decorate the craft with grass or moss. Place a butterfly on the edge of the cup.

It turns out very beautiful and DIY rose topiary
You will need:
- 9 roses
- wire
- decorative tape
- floral sponge
- putty
- twig or chopstick
- plastic bag
- decorative pot
How to do:
1. Wrap the inside of the pot with a plastic bag. Fill with putty, leave 5-7 cm of free top. You will need to place moss here. Stick a stick into the container and leave it for a day to harden. Cut the edges of the bag with a knife.
2. Cut a circle from a floral sponge and fill the edges of the pot. Moisten it with water and place moss on it. Move the moss in the center, stick 6 roses. Secure with decorative ribbon. Stick in 3 more roses, but on short legs. Decorate the composition with a bow.
DIY topiary made from candy canes
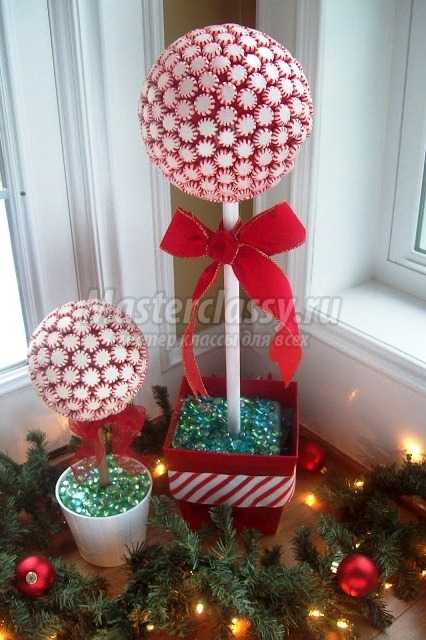
Necessary materials:
- foam ball
- pot
- ribbon stem
- beautiful lollipops - 200 g
Manufacturing process:
Insert the rod into the container. Cover the ball with red ribbon. Take a glue gun and glue the candies one by one. To make the process more accurate, use tweezers.
Balloon topiary

Necessary materials:
- pins
- decorative container
- putty or glue
- small balloons - 70 pcs.
- large balloons - 70 pcs.
- pencil or wooden dowel
- and a foam ball
- a handful of small sawdust
Manufacturing process:
It is made according to the same principle as all other options. There is no need to inflate the balloons; they are simply pinned onto the balloon using pins. Putty is poured into the container and decorated with small sawdust.

DIY autumn topiary
Necessary materials:
- staples and stapler
- hot glue and hot melt gun
- dry pool ball
- floral organza
- pot
- satin ribbon
- wooden skewers
- alabaster
- artificial apples
- artificial leaves
- scissors
Manufacturing process:
1. Cut the organza into pieces 7x7 cm. Fold the piece in half diagonally. Bend the left corner halfway forward. Bend the right corner halfway back to create a fan.
2. Connect 2 “fans” with a stapler. You should have 200 of these blanks.
3. Connect 4 wooden skewers together. Fasten them and coat them with glue. Wrap the barrel with satin ribbon. Its width should be 2.5 cm.
4. Make a hole in the ball. Its diameter must match the diameter of the trunk.
5. Proceed to pasting the ball with organza blanks. In the same way, gradually fill the entire crown.
6. Fold the decorative leaves into 3-4 pieces. Glue them to the crown. Cover the base of the leaves with artificial apples.
7. Secure the finished tree with alabaster.
8. Decorate the “soil” with artificial apples, leaves or organza blanks. Also decorate the trunk with leaves.

Coffee bean option

Necessary materials:
- wand
- pliers
- toilet paper
- wire
- leg-split
- glue gun
- sackcloth
- construction gypsum
- small disposable cup
- PVA glue
- newspapers
- sewing threads
- coffee beans
- cup
Manufacturing process:
1. Make a ball from sewing threads and newspapers. Crumple the newspaper into a round shape. Rewind each layer with threads, smoothing, giving the shape of a ball. The diameter of the base should be 12-13 cm. Tear the paper into pieces and cover the base.
2. Make a cross-shaped cut on the ball into which the tree trunk will be inserted.
3. Add a small amount of coffee to the glue, coat the ball with this mixture, and let it dry thoroughly.
4. Take the wire, fold it several times, give it the shape of a snake. Fold a strip of paper lengthwise into 3 layers and wrap it around the snake. Apply glue thoroughly and let dry. Decide on the height of the trunk, wrap it with twine.
5. Assemble the tree trunk: insert the trunk into the middle of the snake, insert it into the cut in the trunk, secure with a glue gun.
6. In a disposable cup, dilute the plaster with water and secure the crown in it.
7. Now start gluing the grains. It is convenient to glue them using a glue gun. Glue grain to grain, at the closest possible distance. If you can’t pick up the grains with your fingers, use tweezers.
8. Take a regular glass - it will be your pot. Glue a 4 cm wide piece of burlap along the edge and bend it downwards.
9. Apply glue to the bottom of the cup, glue the topiary, and fill the free space with coffee beans. Decorate the tree with decorative elements.
10. Make a flower from a piece of burlap. Using 10 threads pulled from burlap, make a bundle with threads of different lengths. Glue coffee beans to their ends. Glue 2 grains together, insert a burlap thread between them. Insert the blank into the middle of the flower. Glue 3 coffee beans onto the flower, glue the element onto the crown of the tree.
In the interior you can often find a homemade topiary or a tree of happiness, which attracts good luck, financial wealth and good mood.
Topiary in a mug

How to make a tree of happiness with your own hands? Everything is very simple. To do this you will need the following set of materials, namely:

Master class: DIY tree of happiness in a mug
Let's prepare necessary materials:
- a ball-shaped piece of polystyrene foam;
- a beautiful mug;
- artificial flowers;
- a wooden stick or a regular pencil;
- decorative ribbons for winding the barrel;
- ball. It should be the same diameter as the mug;
- some artificial moss or grass.
Wrapping pencil with tape and insert it into the ball. Alternatively, you can fix it using polyurethane foam in a mug.

Next, you need to insert and artificial flowers so that there are no empty spaces. After this, the finished crown is strung onto the trunk. Decorative moss or grass is used as decoration. Also, in addition, you can plant an artificial butterfly on the edge of the mug.

Photo of a tree of happiness with your own hands from corrugated paper. This topiary is made according to the same principle as topiary in a cup. Only to decorate it, instead of artificial flowers, you can use flowers made of multi-colored corrugated paper.

How to make a coffee tree?
Topiaries made from aromatic plants are very popular. They serve not only to decorate the interior, but also to fill it with aroma. Happiness trees made from coffee beans are very popular.

To make such a tree you will need the following materials:
- roasted coffee beans - 100 gr.;
- sippy cup;
- whitewash brush;
- blank in the shape of a plastic ball. The optimal diameter of the ball is 8-9 cm;
- scissors;
- brown threads;
- two rubber bands for money;
- universal colorless glue;
- sand, gypsum or cement - 200 g;
- branch or stick 20 cm long and 1.5-2 cm thick;
- twine 50 cm.
Coffee Tree Making Guide
Using scissors, you need to make one hole in the plastic blank.

Let's sort it out whitewash brush on strands.
Attach the strands to one end of the branch. For these purposes we use an elastic band for money. Coat the future “trunk” with glue and glue it in a spiral threads. You can secure the thread at the other end of the stick with an elastic band.

We glue the ball-shaped blank with brown threads. You can also take fibers from poplar fiber for these purposes.
Using super glue, liquid nails or a glue gun, glue the ball with the first layer grains.

Tip: it is best to glue the grains in a chaotic order. Glue must be applied directly to each grain and quickly glued to the workpiece. All work must be carried out in a well-ventilated area.
The second layer is done in the same way.
Create an original one tree pot. To do this you will need strands from the brush. We coat the bottom of the container with universal glue and place it on the strands laid out on the table. Threads that protrude beyond the edges must be trimmed.

We cut the strands of the brush. They should be 3 cm longer than the height of the container. Next, you need to apply glue to the glass. Moreover, the glue is not applied to the entire surface. You should leave 2.5-3 cm on top. Next, the container is glued with strands prepared in advance. After this, it is tied at the bottom with twine, and the excess is cut off. It is also necessary to trim the strands from above. As a result of this, the threads should rise two centimeters above the glass.


Pour into a container filler. This could be sand or gypsum. You can also use polyurethane foam for these purposes. Next, you need to move the strands at the top and place a funnel with a barrel on the container.


The container should be tied at the top twine.

Finally, you can place a few coffee beans near the barrel. You can also lay moss at the base of the composition and place an insect on the crown.
Flat coffee topiary

To create such a flat coffee topiary with a magnet, you need to stock up on the following materials:

Step-by-step instruction
The first thing you need to do before starting work is to turn on heat gun so that it warms up.
While the heat gun is heating up, you can do blanks. To do this, you need to draw a circle and a pot on cardboard and cut out these details using scissors.

Assembling the tree parts. Crown and pot connect using a flat stick. To do this, you need to insert the stick into the cardboard blank so that it is between two layers of paper.


To fix the parts together we use glue.

The workpiece must be glued burlap on both sides.

Tip: the burlap on one side should be equal to the diameter of the workpiece, and on the other side - slightly larger. This way you can hide the ends of the cardboard and the tree will look beautiful from behind.
Improvised potty decorate as well as the crown.

We glue it on the back magnets.

Decorating the crown coffee beans. They are attached with glue along the edges of the workpiece. Moreover, the grains should be arranged with the cuts downwards.


We glue the next row so that the grains are arranged with the cuts facing up. We alternate subsequent rows in the same way as the first and second rows.

To give the crown volume, it is necessary to glue several layers in its central part.

Finally, you will need to glue decorative ribbons and lace.

Topiary - tree of happiness made of boxwood

To make this decoration you will need the following materials:
- boxwood branches. Both artificial and natural branches are suitable for topiary;
- decorative container;
- artificial flowers;
- a little moss;
- filler. In our case it will be gravel;
- wire.
Step-by-step instructions for making topiary - the tree of happiness
Inserted into the workpiece boxwood branches so that there are no voids.


The branches that will serve as the trunk must be tied wire.

A hole is made in the spherical blank and the ball is placed on the barrel.


A layer of moss must be placed on top of the gravel.

The crown can be decorated with artificial flowers.


DIY money topiary

Topiary can also be made from artificial paper money. Such decoration can attract financial well-being to its owner. Making such a money topiary with your own hands is not particularly difficult.

For manufacturing you will need the following materials:

Step-by-step instruction
Decorating the pot. Colors the upper part, about one or two centimeters. For these purposes, it is best to use acrylic paint. Cover the rest of the pot with twine. For these purposes, apply a thin layer of glue over the entire surface using a toothpick. The end of the twine is securely fixed with glue.


The basis for the crown we make it from old newspaper and thread. To do this, simply crumple newspaper sheets and wrap them with thread. In our case, the workpiece is about 10-11 cm in diameter. In order for the ball to be durable, it must be coated with PVA glue. After the glue has dried, you need to make a hole three to four centimeters deep in the workpiece.


12-15 skewers need to be tied together. Their number depends on the diameter of the paper blank. We tie the skewers on both sides with thread. Using a hot glue gun, pump hot glue into the hole and immediately insert the tied swords there. After the glue has dried, you can begin wrapping the trunk with twine. During the wrapping process, coat the barrel with glue. We fix the ends of the twine.


Napkins or newspapers must be torn into pieces. PVA glue is mixed one to one with water. Next, one or two layers of the adhesive mixture are applied to the newspaper blank so that the threads and newspaper are not visible.

Let's do gypsum mortar and pour it into the pot. There should be about one centimeter left to the top edge of the pot. The trunk must be installed in the center of the pot. If necessary, hold the barrel with the workpiece until the mixture hardens. This process takes about 15-20 minutes.


While the plaster hardens, you can make blanks from artificial banknotes. To do this, they need to be cut in the shape of a circle. To make disks you will need artificial money measuring 15.5x6.5 cm. On average, our ball will need 17-18 disks. The paper blanks must be folded in the form of an accordion with a width of about one centimeter. We tie the resulting accordion in the middle with a ribbon, and glue its ends on both sides.


We glue the bills to the ball from bottom to top. Hot glue is used for these purposes. We close the gaps with coins.


From paper money We make elements of different shapes and attach them in a chaotic manner.

You can decorate plaster using sisal.

We place small ones under the tree burlap bags. To do this, cut out a circle from the fabric, the diameter of which is about 9-10 cm. Take a needle with a strong thread and stitch it along the entire circumference at a distance of 1.5 cm from the edge. After this we tighten the thread. We place a large coin inside the bag and fill it with cotton wool or padding polyester on top. We tighten the bag and secure it with several stitches.


Decorative parts should be glued to the pot, and the crown can be decorated with coins.


DIY ribbon topiary

Do-it-yourself topiary made from ribbons looks very impressive. To make such a decoration you will need the following materials:
- ball-shaped blank made of polystyrene foam;
- stick or pencil;
- ribbons;
- glue;
- decorative pot;
- invisible.
The tape is cut into small strips and wound around your finger to form rings. Then, one by one, you need to attach the formed rings to the workpiece. At the same time, make sure that there are no empty spaces on the ball. On one side, the pencil is inserted into a ball with ribbons, and on the other, it is inserted into a pot filled with gravel. As a decoration, you can put decorative frost or decorate with trimmings from ribbons.


Topiary - a tree of happiness with your own hands from fresh flowers

Topiary can also be made from fresh flowers. To do this you will need the following materials:
- decorative container;
- plastic bag;
- chopsticks or branches;
- putty;
- floral sponge;
- decorative ribbons and wire;
- Natural flowers. In our case, 9 roses.
We wrap the inside of the pot with a bag and fill it with putty solution so that 5-7 cm remains on top. Insert a stick into the solution and leave it overnight. After the putty has hardened, the remainder of the bag must be cut off.


Cut out a circle from a floral sponge and fill the pot with it to the very top. Next, wet the sponge and place a layer of moss on top. You need to stick roses in the central part of the sponge. They can be secured using decorative tapes with wooden rods. Bows can be used for decoration.


DIY paper topiary
DIY paper topiaries are very popular. They can be made according to any of the above instructions. For the base you will need a polystyrene foam ball, a decorative small vase, a pencil and paper flowers. To make flowers, you can use both regular and corrugated paper. To revive the topiary, you can use regular moss, which is usually placed in a vase.
Candy topiary master class
To make such a topiary you will need a standard set: a ball-shaped blank, a pot, stems, ribbons and about 300 grams of colored candies. The process of making such a topiary is standard. The rod is inserted into the pot, the ball-shaped workpiece is covered with a red ribbon. The lollipops are glued on top using a glue gun. To avoid staining the candies, it is better to take them with tweezers. The space around the trunk can be decorated with glass pebbles or large beads.


Topiary from lollipops
This decoration is easy to make with your own hands. On each lollipop you need to stick a drawn eye. Next, all the candies are stuck into a sphere-shaped blank made of polystyrene foam.


Balloon topiary
A topiary made from balloons looks beautiful. In order to make such a decoration you will need the following materials:
- polystyrene foam blanks in the shape of a ball and cube;
- pencil or flat wooden stick;
- multi-colored small size balloons - 70 pcs.;
- multi-colored large size balloons - 70 pcs.;
- small sawdust;
- glue or putty;
- decorative pot;
- pins or paper clips.
The process of making such a tree is standard. Only on the ball-shaped blank, instead of flowers, balloons tied together are attached.


DIY shell topiary

Another original idea is to make your own topiary from shells. Such a tree will long remind you of a summer vacation on the seashore. To create such a masterpiece you need to stock up on the following materials:

First we do tree crown. To do this, stick sisal and shells onto a foam ball using a heat gun.


Next, let's move on to the device. trunk. Our barrel will be made of wire, which must be wrapped with white thread and twisted. Two trunks will be made for our tree. Only the second one will be wrapped with twine.

The next stage is manufacturing pot. To fix the tree, foam will be used in the shape of a cylinder, which must be attached to the bottom of the pot with glue. The trunk is attached to the crown on one side, and stuck into the foam on the other. For fixation we use hot glue.


For strength, fill the distance between the flowerpot and the foam with paper, glue it and cover it with cardboard. Next, first beige and then white sisal is placed in the container. Seashells of different sizes and shapes will also be used as decoration.


To add bright accents, use a satin ribbon. The crown can also be decorated with beads on a fishing line.


An original version of making topiary from sisal and fruits

First, let's make crown For these purposes, you can take a ready-made base ball, or you can make it yourself from newspapers and threads. In our case, the base was made of newspaper, which was crumpled into a ball with a diameter of 6-7 cm.


Let's start filling the pot plaster. After the solution is poured, you need to insert the barrel there and leave it to harden.

While the solution hardens, you can begin making decor for the crown. To do this, you need to cut a small piece of sisal and make a ball out of it. In total, you will need to make about 25-40 lumps.

To decorate the trunk we use lace or twine. We fix the sisal balls on the workpiece with glue. We decorate the space around the trunk with sisal, decorative ribbons, beads, etc.


DIY felt topiary

This homemade felt topiary looks original. To make such a decoration, you need to prepare the following materials:

Manufacturing procedure
The most labor-intensive part of the work is considered making flowers. All blanks are made from fabric circles of different sizes. A minimum of 30 such blanks will be needed for a topiary. In order to make a voluminous rose from a circle, they must be arbitrarily cut in a spiral. The rosette turns out more magnificent if it has many turns. Also, small circles-bottoms are cut out before each flower, which are attached below. To decorate, attach a bead to the center of the flower.


Trunk can be painted with acrylic paint.

Crumpled wood was used as a filler for the pot. paper filled with glue.
Place a piece of green around the trunk felt, which will imitate grass.

We connect the trunk with the pot and the crown.
We attach flower and leaf blanks to the crown.


We decorate the product using ribbons, ribbons and beads.


DIY New Year's topiary

With the onset of cold weather, many people are thinking about making their own New Year's topiary. To do this, you need to prepare the following materials:

Manufacturing procedure
Using white acrylic paint, you need to paint the inside of the pot and fill it with foam. While the foam has not hardened, insert a branch there, which will be the trunk of the New Year's tree.


We fix New Year's balls, candies and pine cones on the crown using wire, toothpicks and glue.


The cones can be painted white and gold.

We decorate the topiary with New Year's tinsel.


The art of topiary came to us from Ancient Egypt. In those days, the talent of giving plants unusual geometric shapes was highly valued. An example of this is such a wonder of the world as the Gardens of Babylon.
Today, topiary is a small tree made from natural and artificial materials. We will share decor ideas with you and tell you what you can use to make a beautiful tree yourself.


Secrets for Beginners
Having created a tree of happiness, you can both decorate your own home with it and present it as a gift for a wedding, housewarming, or anniversary. The product sizes are different, depending on your preferences and range from 15 to 50 cm.
Important! Topiary has a purely decorative function. And it depends on your imagination whether you will make a small original tree in the shape of a heart, or unusual models from shells.


The simplest available materials for making topiary are as follows:
- pasta;
- money;
- branches;
- coffee beans;
- napkins;
- candies;
- cotton pads.


Advice! A popular option is a money tree. It is made as a gift using small bills. It symbolizes wealth, luck and business success. Suitable for placement in the kitchen or any other room.

Usually the money tree is made in mini versions for installation on window sills. Also, such a gift can be in a small pot on the floor, which is placed near a coffee table or sofa in the living room.


How to make topiary with your own hands
If you decide to decorate the house yourself, then before making the composition, consider the design of the main components:
- bases for topiary;
- crowns;
- trunk;
- stands.
Suitable bases include paper, old newspapers, polystyrene foam, polyurethane foam, and a children's ball. What to make it from is up to you.


Advice! Experienced craftswomen use foam plastic for shapes in the form of letters, numbers, and hearts.


You can simply make a trunk from strong wire, branches, and plastic tubes. When choosing what to make a topiary trunk from, consider the size of the future product. If it is a small model, use a simple pencil; if it is a floor model, use one even, thick branch.


The crown is the part of the craft that will attract attention the most. Suitable materials include paper, polymer clay, beads, buttons, and shells.


Depending on the size of the product and the idea, an ordinary flower pot, a toy bucket, or a flat wooden board will serve as a stand. Decorate it with fabric, lace, decoupage or paint it. How to do it is up to you.


Advice! An ordinary cup that you no longer use in everyday life is perfect for a stand.


Step-by-step instructions for crafts
For those who are carried away by this wonderful idea, we will tell you how to make a beautiful topiary step by step. Before you start crafting, carefully think through the idea of the future tree and prepare all the necessary materials for the trunk, crown and stand.
When creating your topiary, follow this sequence:
- prepare the crown. To make it, use scrap materials or specially stored shells, beads, and seed beads. For a non-standard crown shaped like a number or letter, cut out the required shape from foam plastic. Be sure to make a hole for the barrel;
- prepare the barrel. Depending on the idea, use branches, sushi sticks, or plastic straws. If you are planning to make a large outdoor topiary, which you will place in the garden or outside in a private house, use wooden sticks wrapped with twine or varnished in the desired color. Place the crown on the trunk;


Advice! If the crown is round, you just need to put the base on the trunk. If your topiary has a non-standard appearance, additionally secure it with glue.
- stand. Use pots or planters. First place polystyrene foam in the pot and fill it with weak cement mortar or alabaster, level it and dry it. This will serve as a reliable frame for the craft.


Advice! Since novice craftswomen do not always guess the proportions of the solution, experienced needlewomen advise using the consistency of liquid sour cream - too thick a mass will not fill the space between the pot and the foam.
This interesting craft can easily be made with children to decorate the garden or any room in the house.


Simple topiary master classes
Wonderful trees can be bought in souvenir shops, or you can make them yourself. A common topiary model is created from foamiran. Watch the video for a master class on how to make an unusual tree
Delicate original topiary from foamiran.


Make your own topiary from beads. The master class includes the following steps:
- preparation of materials. Buy beads, ribbons, twine, wire for the trunk, pot, plaster, glue. Use tweezers to easily glue the beads to the base;
Advice! Use a regular ball as the basis for the crown or cut out another shape, such as a heart, from foam. This topiary will be an excellent gift for Valentine's Day.
- glue the beads to the base;
- for the trunk, take a wire, wrap it with twine or tape, bend it as desired;
- insert the crown into the trunk and secure with glue;
- place the second end of the barrel in a pre-prepared pot with pieces of foam plastic;
- fill with plaster and leave to dry;
- decorate the stand.
The product is ready. This MK is used by many beginning craftswomen.

Tulle topiary looks beautiful. Watch the master class on video. They will tell you step by step how to make a craft with your own hands.
Some more interesting ideas for tulle topiary.


Interesting DIY topiary made from cotton pads. A step-by-step master class is presented in the video:
For advanced needlewomen, it is interesting to make a topiary from beads with your own hands. With this choice, various wood weaving techniques are used: knotted, French circular, tight oblique, American braid. A detailed master class is offered in the video:
Below are two more works of art - beaded trees.


The easiest option is to make your own pasta topiary. After all, every kitchen has pasta in the shape of shells, horns, and spirals. You can decorate the pasta glued to the base with various paints or cover it with an aerosol. The master class is similar in manufacturing principle to a tree made of beads.
Advice! Crafts made from pine cones, buttons and threads look interesting and creative.


Which crown to choose
Among the common types of crowns, you can choose the option that suits you best. So, the shape of the crown of your topiary can be as follows:
- hearts;
- flying cups;
- bicycles;
- Christmas trees;
- bird nests;
- ships;
- birdhouses;
- sunshine;
- apple trees;
- umbrellas;
- shoes;
- roosters;
- fairy houses with nests.
A craft made from beads in the shape of a glued nest with birds looks beautiful. For lovers of non-standard solutions, a floating cup will look great in any room or office.

Idea for a flying cup
A heart-shaped design or a tree with dollars are suitable as a gift. For a spring mood, make a fruit tree. For memorable events, build a product in the shape of letters or numbers.


Marine crafts decorated with shells, sand and other natural materials look great. Craftswomen like to additionally decorate the crown with a nest of branches and flowers. An interesting option is a vintage burlap topiary decorated with a real small clock. Marshmallow topiary looks festive. If you don’t have enough indoor plants in your home, make a craft from lagurus.

Coffee tree

“Green sculptures” were made in gardens back in the days of the Roman Empire. In the gardens of Julius Caesar, as described by Pliny the Younger in his writings, trees and shrubs were used to create complex animal figures, inscriptions, obelisks and pyramids.
The art of creating topiaries flourished during the Renaissance. In the gardens of France, which is considered a trendsetter in this type of landscape design, real green labyrinths and rooms were created; gardeners came up with interesting and very beautiful forms. It was the Versailles gardens in France with their exquisite topiary that became the source of inspiration for the creation of the Peterhof gardens in Russia.
In China and Japan, the art of curly pruning of trees - bonsai - is also popular. The gardens and parks in these countries are unique. Masters, cutting off all unnecessary things, create unique compositions with their own.
How to create a topiary garden
Creation is a very painstaking and lengthy process. To create an ideal figure, you need the imagination of a master and a good eye. Before you start creating a topiary, you need to carefully prepare the soil and mark out the places for planting. Fertilize the soil before planting, based on the needs of the crop. This will help speed up the growth of shrubs and trees and make them more lush. Plant the plants in the garden according to the prepared plan and after they take root, you can begin to create topiaries.
The choice of trees and shrubs for a topiary garden depends on the preferences of its owners; many plants tolerate pruning well. But it is best to form figures from shrubs and trees with dense, small foliage or needles.
Coniferous plants are the easiest to shape, such as:
- Thuja occidentalis Smarand,
- thuja Globoza,
- Cossack juniper,
- prickly spruce.
To create topiary from deciduous plants, the following will work well:
- boxwood,
- barberry,
- honeysuckle,
- cotoneaster,
- hawthorn,
- Noble laurel.
You can create unusual topiaries and large figures from elm or linden. You can grow a topiary garden very quickly using beautiful spirea, bladderwort, and Tatarian maple. However, only simple geometric shapes can be formed from these plants, for example, a ball or a cube, since the plants grow very quickly and require constant trimming. 
Step-by-step master class on creating topiary
Topiary in the form of a cubeStep 1. To form a topiary, make a frame. To create a cube shape. To do this, draw a square on the ground around the plant.
Step 2. At each corner of the square, install wooden slats and firmly fasten them together with slats located horizontally. Directly above the bush you will get a structure, the wooden slats of which will serve as parameters for cutting.
Step 3. Take trellis shears and cut off the branches that extend beyond the structure. Cut slightly above the line set by the slats so that you can correct it if you make a mistake.
Step 4. Move away from the bush about 3 meters and evaluate whether it turned out evenly. Take the pruning shears and bring the figure to perfection and remove the slats.
Topiary in the form of a ball
Step 1. Form a cube from the bush, as described in the previous master class.
Step 2. Make a frame out of cardboard. Measure the height and radius of the bush, subtract 2 cm from these measurements (per cut) and mark them on the sheet. Draw a semicircle and cut out the template.
Step 3. Attach the pattern to the bush vertically and cut off the branches that extend beyond the template. Then place the leaf on the other side of the bush and also cut off any excess branches. Periodically move away from the plant to evaluate whether you have trimmed the bush evenly. 
Having learned how to create beautiful geometric shapes with your own hands, you can begin to create creative shapes and form topiaries in the form of spirals, buttons, and complex shapes. New ideas will be suggested by the natural contours of the tree or shrub that you have chosen to form your topiary with your own hands. And your source of inspiration will be topiaries created by masters of famous gardens in the world, among which are the Ladue Public Garden in Maryland, USA, Longwood Gardens in Pennsylvania, Drummond Park in Scotland, the park at the Levens Hall estate in England, the terraced garden of the Chateau de Villandry in France, and lovers of garden art can admire not only their photographs, but also live ones. All of them are open to visits.
Gardeners form not only neat hedges, arches, geometric and creative shapes. They created topiaries, the ideas of which are suggested by the surrounding environment and which are real works of garden art.
Topiary care
Do not forget to regularly feed trimmed plants with complex fertilizers and water them so that they grow green mass and there are no bare branches. Please note that cutting stimulates tillering; accordingly, the buds located close to the cutting site begin to actively grow. As the branches grow, adjust the shape of the topiary.
It is best to start forming plants in the spring, after the foliage has appeared; adjustments to the shape can be carried out throughout the summer. Please note that it is not worth forming topiary before winter, since cutting is always stressful for the plant, and during a period when growth and development slows down, cutting can lead to the fact that it will be weakened and, as a result, susceptible to pests and diseases.
Topiary is a common interior decoration that has gained great popularity in our country. You can make topiary yourself; this will make the miracle tree unique and even endow it with magical properties. And topiary will be a pleasant gift for relatives and friends. Decorative topiary can be made from a variety of materials, you can use your imagination and bring your wildest design ideas to life.
The art of topiary tree cutting has existed since ancient Rome. Special topos masters worked on the creation of the original gardens. Hedgerows were popular in the Middle Ages and the Renaissance. Skilled craftsmen could create amazing designer garden sculptures.
Modern designers do not limit themselves to working with plants. They create unique works of art in the form of decorative trees using a variety of techniques and materials.

Topiary is a decorative model that can take on various forms, depending on the idea and imagination of the creator. A variety of natural and artificial elements can be used as starting materials. To make the crown, various feathers, stones, coffee beans, balloons, cotton wool, various types of fabric, moss, nuts, and dried flowers are used. Plastic tubes or wooden sticks are usually used as a tree trunk. Trees are planted in pots and decorated.
Winter topiary (video)
DIY winter topiary
Depending on the season and mood, you can make themed topiaries. There are many options for topiary for winter, each of which has an original design. Making a festive topiary called “Winter Cherry” yourself is not difficult. The main thing is to stock up on the necessary tools, materials and inspiration.
Materials you will need:
- A small pot made of clay or plastic;
- Gypsum;
- Water;
- Thick wire, approximately 15 cm;
- Cones;
- Acorns;
- Beads, lace, braid, ribbons, sequins;
- Threads;
- Scissors;
- Universal glue;

- Acrylic paints;
- Newsprint;
- Tassels.
Making a miracle tree will not take much time; you only need dexterous hands and a good mood.
Stages of making topiary:
- Dilute the plaster with water and pour the mixture into the pot. Insert a thick wire and wait until the plaster hardens.
- Bend the wire in the shape of a tree trunk, coat it with glue and wrap a white lace ribbon around the wire, moving from bottom to top. White lace will create the effect of frost on the tree trunk.
- Cover the pot with craquelure varnish and leave for a minute. Cover the top of the pot with acrylic paint. It should crack immediately, which will create a beautiful winter effect. You can simply coat the pot with paint, which will also look wintery.
- Crumple the newsprint to make a tight ball 10 cm in diameter. Wrap the ball with thread to give it the desired shape.
- Place the ball on the wire and secure with glue.
- Tint cones and acorns with acrylic paints.
- Cover the ball with decorative elements: pine cones, beads, acorns.
- Decorate empty spaces with small bows, rain, sparkles.
- The plaster at the base of the tree can be decorated with rain or sparkles.

The most important thing when completing the work is to make sure that the newspaper ball is not visible through the crown of the tree.
When painting decorative elements, it is important to ensure a harmonious combination of colors. It can be blue-blue, brown-green, gray-silver.
This topiary will harmoniously fit into any interior, add a festive mood or be a wonderful gift for family and friends.
Topiary “White Roses” made from cotton pads
Topiary “White Roses” is suitable for decorating a home in winter, but will also remain relevant when seasons and interiors change. It will be easy to make it with your own hands, and the materials from which the miracle tree will be made will surprise you with its simplicity and beauty.
Materials you will need:
- Plastic bucket (you can use a mayonnaise bucket);
- Wooden stick;
- Toothpicks;
- Styrofoam ball;
- Cotton pads;
- Transparent paper with a pattern (you can use flower packaging);
- Self-adhesive film of blue color;

Using cotton pads to create a “white roses” topiary, you can make a gift for any occasion
- Universal glue;
- White beads;
- Sequins (these can be snowflakes and flowers);
- White tinsel;
- Narrow white braid (15 cm for each flower);
- Scissors;
- Needle and thread.
After preparing all the necessary working materials, you can begin creating the topiary.
Master class for topiary “White Roses”
Making an original topiary from cotton pads will not take much time, but the result will delight you with its beautiful and sophisticated appearance.
Step by step steps:

The “White Roses” topiary is quite easy to make, and it won’t take you much time to make.
- Cover a plastic jar with self-adhesive blue film and carefully trim off the excess.
- Glue floral paper with patterns on top of the blue film. Decorate evenly with sequins and beads.
- Make flowers from a narrow braid using a needle and thread, folding the braid into figure eights. You can secure the flower with beads and sequins.
- Glue the flowers evenly to the pot.
- Take a foam ball. Make a centimeter-long depression in it, drop a drop of glue there and insert a wooden stick.
- Place glue on the bottom of the pot and insert a wooden trunk. Fill the pot tightly with paper to keep the trunk level. The top of the pot can be decorated with white tinsel.
- Take cotton pads (at least 30 pieces). Cut them into a spiral.
- Apply glue to the tip of the toothpick. Twist a cotton coil around a toothpick. Thus, a beautiful rose is formed. To make the rose more magnificent, you can string one or two cotton pads folded in half onto a toothpick from below.
- The finished roses will be decorated in the middle with sequins and beads.
- Insert the finished roses into a foam ball to form a tree crown. To strengthen the crown, before inserting a toothpick into the ball, you need to apply a drop of glue to its tip.
- Roses can be decorated with tinsel by passing it through an empty space.
- String beads on a thread and decorate the tree trunk with it.
Topiary with winter white flowers looks very festive and tender. The combination of white and blue gives it a frosty mood. Such a gift will be a wonderful interior decoration.
from cotton wool disks(video)Topiary is a fresh solution to the issue of unusual room decoration for any holiday. It will also be a pleasant gift for family and friends. Especially if it is done with your own hands. Making a decorative tree will require a minimal amount of time and effort. All you need is to decide on the decorative elements for the topiary, think over its shape and design.
Winter topiary (photo)


