

Washing machines, like any other type of equipment, become obsolete and fail over time. We, of course, can put the old washing machine somewhere, or disassemble it for spare parts. If you went the latter route, then you might still have a washing machine motor that could serve you well.
The motor from an old washing machine can be adapted in the garage and made into an electric sander. To do this, you need to attach an emery stone to the motor shaft, which will rotate. And you can sharpen various objects on it, from knives to axes and shovels. Agree, this thing is quite necessary in the household. You can also use the engine to build other devices that require rotation, for example, an industrial mixer or something else.
Write in the comments what you decided to make from an old washing machine motor, we think many will find it very interesting and useful to read.
If you have figured out what to do with the old motor, then the first question that may bother you is how to connect the electric motor from the washing machine to a 220 V network. And it is precisely this question that we will help you find the answer to in this instruction.
Before you begin directly connecting the motor, you must first familiarize yourself with the electrical diagram, which will make everything clear.
Connecting the motor from the washing machine to a 220 Volt network should not take you much time. First, look at the wires that come from the engine, at first it may seem that there are quite a lot of them, but in fact, if you look at the above diagram, we do not need all of them. Specifically, we are only interested in the wires of the rotor and stator.
Dealing with the wires
If you look at the block with wires from the front, then usually the first two left wires are tachometer wires, through which the speed of the washing machine engine is regulated. We don't need them. In the image they are white and crossed out with an orange cross. 
Next comes the red and brown stator wires. We marked them with red arrows to make it more clear. Following them are two wires to the rotor brushes - gray and green, which are marked with blue arrows. We will need all the wires indicated by the arrows for connection.
To connect the motor from the washing machine to a 220 V network, we do not need a starting capacitor, and the motor itself does not need a starting winding.
In different models of washing machines, the wires will differ in color, but the connection principle remains the same. You just need to find the necessary wires by testing them with a multimeter.
To do this, switch the multimeter to measure resistance. Touch the first wire with one probe, and look for its pair with the second.
A working tachogenerator in a quiet state usually has a resistance of 70 Ohms. You will find these wires immediately and put them aside.
Just connect the rest of the wires and find pairs for them.
We connect the motor from the automatic washing machine
After we found the wires we needed, we just had to connect them. To do this we do the following.
According to the diagram, you need to connect one end of the stator winding to the rotor brush. To do this, it is most convenient to make a jumper and insulate it. 
In the image, the jumper is highlighted in green.
After this, we are left with two wires: one end of the rotor winding and the wire going to the brush. They are what we need. We connect these two ends to the 220 V network.
As soon as you apply voltage to these wires, the motor will immediately start rotating. Washing machine motors are quite powerful, so be careful to avoid injury. It is best to pre-mount the motor on a flat surface.
If you want to change the rotation of the engine in the other direction, then you just need to transfer the jumper to other contacts and swap the wires of the rotor brushes. Look at the diagram to see what it looks like. 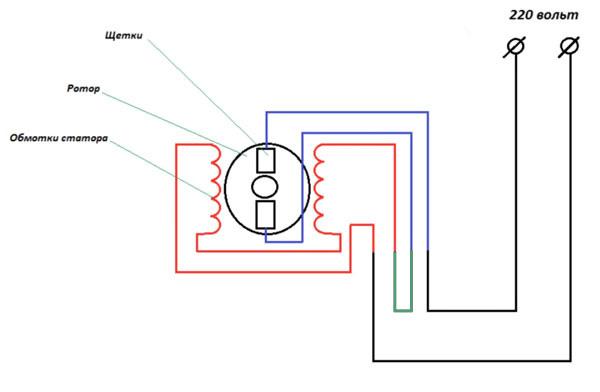
If you did everything correctly, the motor will begin to rotate. If this does not happen, then check the engine for performance and only then draw conclusions.
Connecting the motor of a modern washing machine is quite simple, which cannot be said about old machines. Here the scheme is a little different.
Connecting the motor of an old washing machine
Connecting the motor of an old washing machine is a little more complicated and will require you to find the necessary windings yourself using a multimeter. In order to find the wires, ring the motor windings and find a pair. 
To do this, switch the multimeter to measure resistance, touch the first wire with one end, and find its pair in turn with the other. Write down or remember the winding resistance - we will need it.
Then, similarly, find the second pair of wires and fix the resistance. We ended up with two windings with different resistances. Now you need to determine which of them is working and which is starting. Everything is simple here, the resistance of the working winding should be less than that of the starting winding.
To start an engine of this type, you will need a button or a start relay. A button is needed with a non-fixed contact and, for example, a doorbell button will do.
Now we connect the engine and the button according to the diagram: But the excitation winding (OB) is directly supplied with 220 V. The same voltage must be applied to the starting winding (SW), only to start the engine for a short period of time, and turn it off - this is why the button is needed ( SB).
We connect the OB directly to the 220V network, and connect the software to the 220V network via the SB button. 
- PO – starting winding. Intended only for starting the engine and is activated at the very beginning until the engine begins to rotate.
- OB – excitation winding. This is the working winding, which is constantly in operation; it rotates the engine all the time.
- SB is a button that applies voltage to the starting winding and turns it off after starting the motor.
After you have made all the connections, just start the engine from the washing machine. To do this, press the SB button and, as soon as the engine starts to rotate, release it.
In order to reverse (motor rotation in the opposite direction), you need to swap the contacts of the software winding. This will cause the motor to start rotating in the other direction.
That's it, now the motor from the old washing machine can serve you as a new device.
Before starting the engine, be sure to secure it on a flat surface, since its rotation speed is quite high.
When buying a washing machine, some apartment owners use the services of a specialist installer of household appliances. However, with the right approach to the matter, connecting is not difficult and can be easily done with your own hands. Sometimes it is advisable to save the family budget and carry out installation without service center employees. All you need is to have the most necessary tools at home and be careful.
How to install washing equipment yourself
Connecting a washing machine to the water supply with your own hands involves using two hoses (for supplying and draining water), as well as connecting an electrical wire. These products are usually included with the model you purchase.
However, in addition to these system elements, you will also need other parts, which are often purchased separately. These include:
- electric outlet with protection against moisture penetration;
- special ball valve, which stops the flow of water into the system;
- siphon on a washbasin with an outlet in order to connect the drain hose;
- for connection to cold water pipes you need tee.
Connecting washing machines must be done in stages. The step-by-step installation instructions are as follows:

Installing the product after unpacking
Immediately after delivery, you need to unpack your purchase and check the washing machine. The product must be free of defects and flaws. You must also make sure that the electrical wire and drain hose are in good condition. They are included in the package and are installed on the equipment immediately. If various types of damage, cracks or chips are detected on the case, you should replace the product by returning the faulty one to the seller. It is also necessary to check the integrity of all parts, pipes, and hoses.

Front-loading devices require special fastenings to transport the product. As a rule, these are special screws and spacers that prevent imbalance. Bolts to secure the machine are usually placed at the bottom. In order to remove them, you need to sequentially lift first one and then the other edge of the product and unscrew the fasteners with a wrench. In this case, you need to unscrew the adjusting feet as much as possible.
Such spacers and screws for transportation are also available on the rear panels of the equipment. These parts are necessary to fix the drum. They are unscrewed, the spacers are removed, and the holes are closed with special plugs that are included in the package.
If you have to install the washing machine yourself, you should know that the distance from the back panel of the device to the wall should be at least five centimeters. In order to position the product correctly, you can use a building level. If necessary, you can tighten the adjusting feet. It is necessary to level the device, as this will avoid strong vibration and the machine will last longer.
Connecting the machine to the water supply
Connecting a washing machine to the water supply is carried out in different ways. The connection method depends on the installation of cold water pipes in the room. Sometimes, when renovating a bathroom, owners plan to purchase household appliances and make a dedicated system for the washing machine, which has a ball valve.

Appearance of the ball valve
In this case, to connect you only need to install the hose that comes with the kit. If the installation of washing equipment was not planned, you will need to cut into the pipes or connect a tee at the point where the flexible hose of the washbasin is connected to the pipes.
Fittings are produced in two types - with internal and external threads. The diameter of the connection pipe should also be taken into account when purchasing this part. The hose that comes with the machine has a threaded nut. Therefore, the male thread at the tee outlet should be ½ inch in diameter.
Ball valve installation
Before you begin directly installing and connecting the machine, you need to turn off the water supply in the apartment. To do this, tighten a special valve, then open the taps and drain the remaining water in the system.
After this, at the desired mark, you should cut the pipe or disassemble the connection with the flexible line. When cutting, depending on the type of pipe, the threads are cut or the couplings are fixed.

The fitting is screwed using a fluoroplastic sealant tape and an adjustable wrench. Then connect the hose and liner. There is a plastic nut at both ends of the hose. To connect it to the tap, use a straight edge. In the case where household appliances do not have a special leakage protection mechanism, a ball valve must be installed between the hose and the tee.
The end of the hose that is bent at a right angle is connected to the washing machine. First you need to put a cleaning filter in it. It is attached with the protruding side towards the car. In this case, the nuts on the hose are tightened manually, without effort. A special rubber gasket ensures the tightness of the connection.
Discharge into the sewer
Before connecting the washing machine to the sewer with your own hands, you should decide on the method of water drainage equipment.

Organization of water drainage
It can be discharged directly into the sewer system, as well as into the bathtub. The second option does not provide for connection. You just need to lower the corrugated hose into the bath before turning on the equipment. However, this drain option is not very convenient and unreliable. When the wash cycle is running, you won't be able to use the bathroom. In addition, you need to make sure that during the draining process the hose does not fall from the edges of the bathtub, because then there is a risk of flooding the apartment.
Connecting parts when connecting to a sewer
The drain is discharged into the sewer using a siphon with an outlet or connected directly to the pipe. It is advisable to comply with the relevant requirements. The hose must be bent in such a way that at the top the distance to the floor is at least 70 - 80 centimeters and a special shutter is formed.

If the drain is connected to a siphon, you need to check the pipes for clearance and make sure that they are not clogged.
Power supply for washing machine
Since washing equipment is often placed in bathrooms, and this is a place with a high level of humidity, it is necessary to take care of safety. The electrical outlet into which the device will be connected must be moisture-proof. It must have a ground connection, since the body of the machine is made of metal.

In new buildings, as a rule, all grounding standards are met. And if you are connecting equipment in an old house, and only two wires are connected to the outlet, do the wiring through a residual current device with a leakage current of no more than 30 mA.
Test wash when first turned on
When purchasing a new machine, experts recommend turning on the first wash cycle to check that all connections are correct. As a rule, the instructions indicate the mode and weight of the loaded laundry for a test wash. These recommendations must be followed to ensure long-term use of the product. Before you turn on the machine for the first time, you need to make sure once again that it is level and not loose. If necessary, you need to adjust its position again.
We plug in the machine, open the ball valve on the hose, then select the washing mode. Pour or fill in the detergent into the powder compartment and press the program start button.

Starting a washing program
While the washing process is in progress, it is recommended to monitor the connection point of the hose on the panel of the washing machine and to the water supply. In this case, there should be no leaks anywhere. Faucets normally do not hum or make other sounds that may indicate a breakdown.
If water leaks in any place, after turning off the appliance and completing the wash cycle, you should check the connections for leaks. Leaks can occur due to misalignment of the nuts or insufficiently tight seals.
Subject to operating conditions and careful handling, washing equipment will not break down for many years. It is recommended to clean the filters on the water supply hose from time to time. To do this job, first stop the flow of water using a ball valve, unscrew the nut from the hose where it connects to the machine, pull out the filter and carefully remove any dirt from it. Such cleaning must be carried out frequently; if the tap water is bad, its quality leaves much to be desired.
Installation of washing machines without using running water
During the summer holidays, many people go to the countryside or to the village. Country houses do not always have running water, and they have to do laundry often. To solve this problem, many owners connect an automatic washing machine using various tricks, or install old models of equipment. A good choice in this situation is a washing machine without running water.

Washing machine for the cottage
To connect, you will need a special water pump and filters.
Step-by-step installation
To connect the automatic machine, you need to connect the drain hose. He is taken out into the yard. For this purpose, cesspools and ditches are used. In this case, water usually has to be supplied manually. The main thing is to ensure the supply of water on time and in the right quantity, but the method is not important. This can be a fixed connection or through a container for washing powder. Some people use rainwater to wash clothes because it is softer.
However, this method of connecting a washing machine has significant disadvantages. You'll have to bring a lot of water. In addition, you need to constantly monitor the operation of the equipment in order to fill it with water in a timely manner.
In the case where there is a source of clean water on a site near the house, you can build a small water supply system. To do this, you need a pumping station that provides pressure to supply the liquid. It also requires a filter. These important components are not cheap.

Water purification filter
For some models of washing machines, the option of installing a water tank above the appliance is also suitable. The mass of liquid in this container will provide pressure in the hose, but this may not be enough for the machine to fully operate.
Sometimes old models of rotary-type washing machines are used for dachas. There is no need for them to create pressure in the system. It should be taken into account that the quality of washing in such models of equipment is low, in contrast to an automatic machine.
When deciding to install washing equipment in a country house, you need to carefully consider which system and model will suit you best. It is imperative to take into account the quality of water in the area, since hard water without the use of special softening agents often leads to damage to the washing machine.
As it turned out, installing a washing machine in the bathroom yourself does not require special skills. But it will help you significantly save your family budget. The range of household appliances for washing today is very large, so you can always choose the model that you like for your home.

Set of parts for washing machine

Checking the integrity of all parts of washing equipment

Appearance of the ball valve

Unpacking the washing machine

Connection diagram of the washing machine to the sewer

Waterproof socket for bathroom

Starting a washing program

Washing machine for the cottage

Water purification filter

Organization of water drainage

Connecting washing machine hoses

Adjusting the position of the washing machine

Water supply hose

Installation of washing equipment
The washing machine is one of the most important household appliances in any home. To start using the washing machine, you must first properly connect it to the water supply and sewerage systems. For this purpose, a locksmith can be called in who will quickly and efficiently carry out this work, but in order to save money, you can carry out the installation yourself. Therefore, in our article we will try to clearly explain how to install a washing machine with your own hands.
In contact with
Classmates
Read the instructions
First of all, you should definitely read the instructions that come with each washing machine and find out all the possible installation details. You also need to strictly follow the step-by-step instructions, starting from unpacking the material and ending with setting up the first wash. When unpacking the machine for the first time, do not forget to save a few shipping bolts (usually 3 or 4 pieces), which may be needed to transport the equipment to a new location or, God forbid, to a workshop.
Selecting a location
After this, you need to choose the most convenient place in the room. The machine should not interfere or take up too much space in our not very luxurious apartments. The most popular installation option is used in the bathroom. But small bathrooms often do not allow this, so the second most popular option is to install a washing machine in the kitchen. Another installation option could be a corridor. It can fit perfectly into this part of the apartment without taking up much usable space, but then you should take into account that all communications must be nearby.
Initial installation stage
If you do not yet know how to connect the washing machine correctly, then we remind you that first of all you need to free the equipment from all fasteners that were installed for transportation and, most importantly, free all rotating parts of the washing machine from the latches. If this is not done, the drum may be damaged when turned on. And this is a sure case of partial or complete breakdown of household appliances.
Note!
After unscrewing the transport bolts, do not forget to put special plastic plugs in the holes.
Connection to sewerage
The next step should be connecting the washing machine to the sewer. When installing the device, some differences from the standards may occur. For example, if there is no washer and the water moves only in one direction, then the connection is made strictly according to the instructions with the specified level (its minimum and maximum value should be indicated) for the placement of the pipe. If the minimum level is specified as 50 cm, then the pipe should not be placed below this value. This is demonstrated more clearly by the diagram below.

Scheme No. 1
Your next action should be to connect the outlet pipe of the machine to the sewer pipe. To do this, you must first purchase a siphon, and then install it. The siphon will provide the most reliable fastening and protect against any leaks. Some users attach the drain hose to the edge of the bathtub or sink. But it is clear that this option is not very reliable due to the possibility of accidentally touching the hose, falling and pouring water onto the floor. After connecting, check that the hose is straight and has no kinks. Installation of drain hoses to the machine is done using clamps and adapters.
Connection to water supply
The next important step will be connecting the washing machine to the water supply. This is done using 3/4 inch diameter hoses. You may need to lengthen them. Then this needs to be done using rubberized cuffs. Then you need to cut a thread in a certain part of the water supply system, as accessible as possible, and install a valve there, with the help of which water is supplied when washing begins.
Filtration system
To increase the service life of the washing machine, special filters in the form of meshes are used. They prevent foreign particles from entering the drum and are an important element in protecting the machine from premature wear.
Water supply method
Drain tanks or faucets can be used to supply water. If the water intake will come from the mixer, then you need to use a special tee to which a hose is connected for connection. It is possible to collect water from other, more convenient places. In this case, the connection is made by using pipes.
Note!
One of the options for using mixers is a temporary connection.
In this case, the intake hose is unscrewed after each wash and the mixer hose is put in its place.

Vibration protection
One of the important stages of connection is leveling the machine. If this is not done, then during the spin cycle there will be strong vibration, which, in addition to significant noise, causes harm to the device itself. To install it correctly, you should not use various supports and supports. It will be enough to level the level by unscrewing the legs. After this, the device is checked for stability. To do this, you need to press on the machine and if it wobbles, then tighten the legs again.
Safety
After you have connected the washing machine drain and water supply, you need to ensure its power supply with an increased degree of safety. Typically, these household units have a power of 2-2.5 kW and, accordingly, the cross-section of the wires must be selected according to these parameters. In general, modern washing machines already have the highest class of protection against electric shock, so you need to try hard to ensure that the user receives an electric shock. Even if the machine is installed in the bathroom, where there is always high humidity, the level of protection of modern equipment will allow you to work with minimal risk of receiving an electric shock.

Basic requirements for proper connection
The washing machine should be connected to the network according to the following scheme.
- The electrical panel is grounded using a bus whose cross-section must be at least 3 mm.
- When connecting, you must use three-wire sockets that have a phase, neutral and ground wire.
- There must be mandatory insulation of the ground wire.
You can clearly see the correct connection in the diagram below.

Scheme No. 2
Main signs of correct connection
So that you do not have to constantly look under the sink and check for leaks, you must make sure that the device is connected correctly. The main signs of a correct connection:
- No leaks.
- Quite fast filling of the tank.
- Drum rotation.
- Heating of water should occur within 6-7 minutes after drawing water.
- No extraneous sounds.
- High-quality draining and spinning work.
If all these requirements are met, then the washing machine is connected correctly and you can safely operate it for a long time. You can watch video instructions for connecting washing machines below.
Do-it-yourself washing machine installation video:
In contact with
See inaccuracies, incomplete or incorrect information? Do you know how to make an article better?
Would you like to suggest photos on the topic for publication?
Please help us make the site better! Leave a message and your contacts in the comments - we will contact you and together we will make the publication better!
Every user knows that the electric motor is the artificial heart of any household appliance, and it is it that rotates. Every home craftsman is interested in the question: is it possible to connect the motor from a washing machine to another device independently?
This is not so difficult to do, even for a person completely unfamiliar with the basics of electrical engineering. Let's say you have Indesit, but the engine with a power of 430 W, developing a speed of up to 11,500 rpm, is in good working order, its service life has not been exhausted. This means that it can be used for household needs.
There are many different ideas on how to use and reconnect a motor from a failed one.
- The simplest option is to do grinder, because in the house you constantly need to sharpen knives and scissors. To do this, you need to rigidly mount the electric motor on a solid base, attach a sharpening stone or grinding wheel to the shaft and connect it to the network.
- For those involved in construction, you can do concrete mixer. For these purposes, a tank from a washing machine will be useful after a little modification. Some people make their own vibrator for shrinking concrete - this is a good option for using a motor.
- Can be done vibrating table, if you are engaged in the production of cinder blocks or paving slabs on your personal plot.
- Kruporushka and mill for chopping grass - a very original use of an engine from an old washing machine, indispensable for those who live in rural areas and raise poultry.
There are extremely many options for use, all of them are based on the ability of the motor from the washing machine to rotate various nozzles or activate auxiliary mechanisms. You can choose the most unusual option for using the removed equipment, but to implement your plan, you need to know how to connect the motor from the washing machine correctly so that the winding does not burn out.
Washing machine motor
When using a powerful washing machine motor in a new incarnation, you must remember two important aspects of its connection:
- such units do not start through a capacitor;
- no starting winding is needed.
- two white wires are from the tachogenerator, we won’t need them;
- brown and red - go to the winding to the stator and rotor;
- gray and green are connected to graphite brushes.
Be prepared for the fact that in different models wires differ in color, but the principle of how to connect them remains the same. To detect pairs, ring the wires one by one: those going to the tachogenerator have a resistance of 60-70 Ohms. Take them to the side and tape them together with electrical tape to keep them out of the way. Ring the remaining wires to find a pair for them.

Let's understand the connection diagram
Before further actions, you need to familiarize yourself with the electrical connection diagram - it is very detailed and understandable to any amateur home craftsman.
Connecting the motor of a washing machine is not as difficult as it seems at first glance. First of all, we need wires coming from rotor and stator: according to the diagram, it is necessary to connect the stator winding to the rotor brush. To do this, we make a jumper (it is marked in pink) and insulate it with electrical tape. There are two wires left: from the rotor winding and a wire from the second brush, we connect them to the home voltage network.
Attention! If you connect the motor to 220 V, it immediately starts rotating. To avoid injury, you must first firmly secure it to any surface: in this way you guarantee the safety of testing.
You can simply change the direction of rotation - transfer the jumper to other contacts. To turn it on and off, you need to connect the corresponding buttons, this can be done using simple connection diagrams, which can be easily found on special websites.
We briefly talked about how to connect the motor from an old washing machine in order to use it for household needs, but now you need a little improve new device.
Speed controller
The motor from the washing machine has quite high speeds, so you need to make a regulator so that it works at different speeds and does not overheat. An ordinary one will do for this. light intensity relay, but needs a little work.
- We remove a triac with a radiator from an old machine, that’s what it’s called semiconductor device- in electronic control it performs the function of a controlled switch.
- Now we need to solder it into the relay chip instead of the low-power part. If you do not have such skills, it is better to entrust this procedure to a professional, an electronics engineer or a computer engineer you know.
In some cases, the motor copes well with the new job without a speed controller.

Motor speed control
Types of washing unit engines
Asynchronous- is removed together with the capacitor, which come in different types, depending on the model of the washing machine. It is advisable not to disturb its connection to the battery, the casing of which is sealed and made of various metals or plastics.
Carefully! Such an engine can only be removed from the car when the capacitor is completely discharged - the electric shock can be quite significant.
Low voltage collector The motors are distinguished by the fact that their stator contains permanent magnets that are alternately connected to a direct voltage current. There is a sticker on the case indicating the voltage value, which is not recommended to be exceeded.
Engines electronic type must be dismantled together with the ECU - an electronic control unit, on the body of which there is a sticker indicating the maximum possible connection voltage. Observe polarity because these motors do not have reverse.
Possible faults
Now you know how to connect an electric motor to give it a new life, but there may be a small incident: the engine does not start. We need to understand the reasons and find a way to solve the problem.
Check heating the motor after running it for a minute. In such a short period of time, the heat does not have time to spread to all the parts and it is possible to accurately record the location of intense heating: the stator, bearing assembly, or something else.
The main reasons for rapid heating are:
- wear or clogging of the bearing;
- greatly increased capacitor capacity (only for asynchronous motor type).
Then we check every 5 minutes of operation - three times is enough. If the fault is bearing— we sort it out, or . During further operation, we constantly monitor the heating of the engine. Avoid overheating; repairs can cause great damage to your home budget.